

【深度学习】多层感知器高级使用
文章目录
1 JSON序列化模型
2 YAML格式
3 模型增量更新
4 神网检查点
5 导入模型
6 可视化训练过程
神经网络的变种目前有很多,如误差反向传播(Back Propagation,BP)神经网路、概率神经网络、卷积神经网络(Convolutional Neural Network ,CNN-适用于图像识别)、时间递归神经网络(Long short-term Memory Network ,LSTM-适用于语音识别)等。但最简单且原汁原味的神经网络则是多层感知器(Muti-Layer Perception ,MLP),只有理解经典的原版,才能更好的去理解功能更加强大的现代变种。
1 JSON序列化模型

pip install h5pyJSON(JavaScript Object Notation, JS 对象简谱) 是一种轻量级的数据交换格式。它基于 ECMAScript (欧洲计算机协会制定的js规范)的一个子集,采用完全独立于编程语言的文本格式来存储和表示数据。简洁和清晰的层次结构使得 JSON 成为理想的数据交换语言。 易于人阅读和编写,同时也易于机器解析和生成,并有效地提升网络传输效率。
from sklearn import datasets
import numpy as np
from keras.models import Sequential
from keras.layers import Dense
from keras.utils import to_categorical
from keras.models import model_from_json

# 导入数据
dataset = datasets.load_iris()

x = dataset.data
Y = dataset.target

# Convert labels to categorical one-hot encoding
Y_labels = to_categorical(Y, num_classes=3)

# 设定随机种子
seed = 7
np.random.seed(seed)
# 构建模型函数
def create_model(optimizer='rmsprop', init='glorot_uniform'):
    # 构建模型
    model = Sequential()
    model.add(Dense(units=4, activation='relu', input_dim=4, kernel_initializer=init))
    model.add(Dense(units=6, activation='relu', kernel_initializer=init))
    model.add(Dense(units=3, activation='softmax', kernel_initializer=init))

    # 编译模型
    model.compile(loss='categorical_crossentropy', optimizer=optimizer, metrics=['accuracy'])

    return model

# 构建模型
model = create_model()
model.fit(x, Y_labels, epochs=200, batch_size=5, verbose=0)

scores = model.evaluate(x, Y_labels, verbose=0)
print('%s: %.2f%%' % (model.metrics_names[1], scores[1] * 100))

# 模型保存成Json文件
model_json = model.to_json()
with open('model.json', 'w') as file:
    file.write(model_json)

# 保存模型的权重值
model.save_weights('model.json.h5')

# 从Json加载模型
with open('model.json', 'r') as file:
    model_json = file.read()

# 加载模型
new_model = model_from_json(model_json)
new_model.load_weights('model.json.h5')

# 编译模型
new_model.compile(loss='categorical_crossentropy', optimizer='rmsprop', metrics=['accuracy'])

# 评估从Json加载的模型
scores = new_model.evaluate(x, Y_labels, verbose=0)
print('%s: %.2f%%' % (model.metrics_names[1], scores[1] * 100))
运行代码,会得到两次完全相同的结果哦。
看下json文件:
{"class_name": "Sequential", "config": [{"class_name": "Dense", "config": {"name": "dense_1", "trainable": true, "batch_input_shape": [null, 4], "dtype": "float32", "units": 4, "activation": "relu", "use_bias": true, "kernel_initializer": {"class_name": "VarianceScaling", "config": {"scale": 1.0, "mode": "fan_avg", "distribution": "uniform", "seed": null}}, "bias_initializer": {"class_name": "Zeros", "config": {}}, "kernel_regularizer": null, "bias_regularizer": null, "activity_regularizer": null, "kernel_constraint": null, "bias_constraint": null}}, {"class_name": "Dense", "config": {"name": "dense_2", "trainable": true, "units": 6, "activation": "relu", "use_bias": true, "kernel_initializer": {"class_name": "VarianceScaling", "config": {"scale": 1.0, "mode": "fan_avg", "distribution": "uniform", "seed": null}}, "bias_initializer": {"class_name": "Zeros", "config": {}}, "kernel_regularizer": null, "bias_regularizer": null, "activity_regularizer": null, "kernel_constraint": null, "bias_constraint": null}}, {"class_name": "Dense", "config": {"name": "dense_3", "trainable": true, "units": 3, "activation": "softmax", "use_bias": true, "kernel_initializer": {"class_name": "VarianceScaling", "config": {"scale": 1.0, "mode": "fan_avg", "distribution": "uniform", "seed": null}}, "bias_initializer": {"class_name": "Zeros", "config": {}}, "kernel_regularizer": null, "bias_regularizer": null, "activity_regularizer": null, "kernel_constraint": null, "bias_constraint": null}}], "keras_version": "2.0.8", "backend": "tensorflow"}
2 YAML格式
YAML(/ˈjæməl/,尾音类似camel骆驼)是一个可读性高,用来表达数据序列化的格式。YAML参考了其他多种语言,包括:C语言、Python、Perl,并从XML、电子邮件的数据格式(RFC 2822)中获得灵感。Clark Evans在2001年首次发表了这种语言,另外Ingy döt Net与Oren Ben-Kiki也是这语言的共同设计者。当前已经有数种编程语言或脚本语言支持(或者说解析)这种语言。
YAML是"YAML Ain't a Markup Language"(YAML不是一种标记语言)的递归缩写。在开发的这种语言时,YAML 的意思其实是:"Yet Another Markup Language"(仍是一种标记语言),但为了强调这种语言以数据做为中心,而不是以标记语言为重点,而用反向缩略语重命名。
使用方法和JSON同理,保存模型结构。
3 模型增量更新
目的:保证模型时效性。
# 从Json加载模型
with open('model.increment.json', 'r') as file:
    model_json = file.read()

# 加载模型
new_model = model_from_json(model_json)
new_model.load_weights('model.increment.json.h5')

# 编译模型
new_model.compile(loss='categorical_crossentropy', optimizer='rmsprop', metrics=['accuracy'])

# 增量训练模型
# Convert labels to categorical one-hot encoding
Y_increment_labels = to_categorical(Y_increment, num_classes=3)
new_model.fit(x_increment, Y_increment_labels, epochs=10, batch_size=5, verbose=2)
scores = new_model.evaluate(x_increment, Y_increment_labels, verbose=0)
print('Increment %s: %.2f%%' % (model.metrics_names[1], scores[1] * 100))
4 神网检查点
使用部分的权重预测数据。
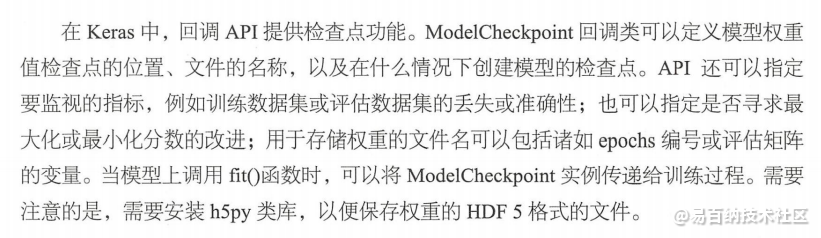
# 设置检查点
filepath = 'weights-improvement-{epoch:02d}-{val_acc:.2f}.h5'
checkpoint = ModelCheckpoint(filepath=filepath, monitor='val_acc', verbose=1, save_best_only=True, mode='max')
callback_list = [checkpoint]
model.fit(x, Y_labels, validation_split=0.2, epochs=200, batch_size=5, verbose=0, callbacks=callback_list)

# 设置检查点
filepath = 'weights.best.h5'
checkpoint = ModelCheckpoint(filepath=filepath, monitor='val_acc', verbose=1, save_best_only=True, mode='max')
callback_list = [checkpoint]
model.fit(x, Y_labels, validation_split=0.2, epochs=200, batch_size=5, verbose=0, callbacks=callback_list)

5 导入模型
使用load_model()函数即可。
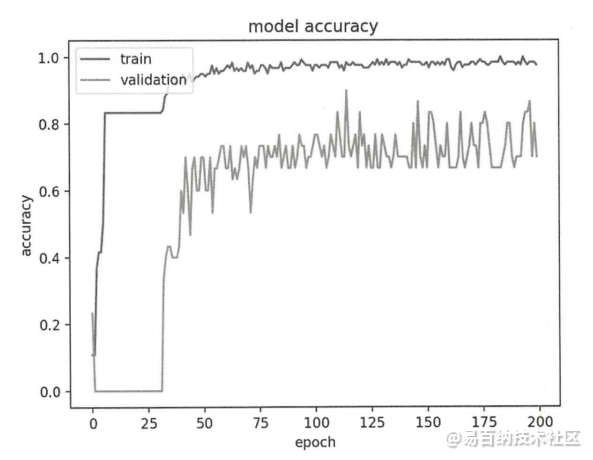
6 可视化训练过程
history = model.fit(x, Y_labels, validation_split=0.2, epochs=200, batch_size=5, verbose=0)
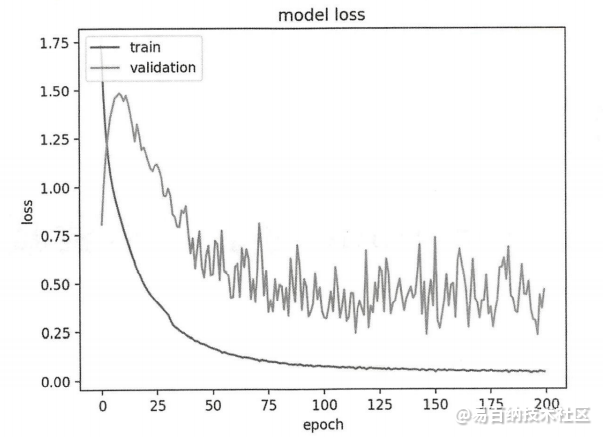
模型在 epoch 上的收敛速度(斜率)。
模型是否已经收敛(该线是否平滑收敛)。
模型是否过度学习训练数据(验证线的拐点)
在下面的例子中,使用莺尾花数据集构建一个神经网络,并使用对该神经网络训练时返回的历史信息,构建图表展示以下信息:
训练数据集和评估数据集在各 epoch 的准确度。
训练、数据集和评估数据集在各 epoch 的损失情况
from sklearn import datasets
import numpy as np
from keras.models import Sequential
from keras.layers import Dense
from keras.utils import to_categorical
from matplotlib import pyplot as plt
# 导入数据
dataset = datasets.load_iris()
x = dataset.data
Y = dataset.target
# Convert labels to categorical one-hot encoding
Y_labels = to_categorical(Y, num_classes=3)
# 设定随机种子
seed = 7
np.random.seed(seed)
# 构建模型函数
def create_model(optimizer='rmsprop', init='glorot_uniform'):
# 构建模型
model = Sequential()
model.add(Dense(units=4, activation='relu', input_dim=4, kernel_initializer=init))
model.add(Dense(units=6, activation='relu', kernel_initializer=init))
model.add(Dense(units=3, activation='softmax', kernel_initializer=init))
# 编译模型
model.compile(loss='categorical_crossentropy', optimizer=optimizer, metrics=['accuracy'])
return model
# 构建模型
model = create_model()
history = model.fit(x, Y_labels, validation_split=0.2, epochs=200, batch_size=5, verbose=0)
# 评估模型
scores = model.evaluate(x, Y_labels, verbose=0)
print('%s: %.2f%%' % (model.metrics_names[1], scores[1] * 100))
# Hisotry列表
print(history.history.keys())
# accuracy的历史
plt.plot(history.history['acc'])
plt.plot(history.history['val_acc'])
plt.title('model accuracy')
plt.ylabel('accuracy')
plt.xlabel('epoch')
plt.legend(['train', 'validation'], loc='upper left')
plt.show()
# loss的历史
plt.plot(history.history['loss'])
plt.plot(history.history['val_loss'])
plt.title('model loss')
plt.ylabel('loss')
plt.xlabel('epoch')
plt.legend(['train', 'validation'], loc='upper left')
plt.show()history里面是一个字典,有x数据也有y数据。
- 分享
- 举报
 微信扫码分享
 QQ好友
QQ好友
 暂无数据
暂无数据-
浏览量:4369次2021-08-09 16:10:30
-
浏览量:4812次2021-08-09 16:10:57
-
浏览量:6130次2021-08-09 16:09:53
-
浏览量:5972次2021-04-12 12:54:06
-
浏览量:6341次2020-12-20 19:38:14
-
浏览量:5036次2021-06-17 11:39:26
-
浏览量:1291次2023-01-21 10:13:45
-
浏览量:609次2023-02-13 15:29:10
-
浏览量:3057次2019-11-13 09:07:39
-
浏览量:4932次2021-06-23 15:25:25
-
2023-09-28 11:13:27
-
浏览量:5140次2021-05-17 16:52:58
-
浏览量:678次2023-03-02 13:55:57
-
浏览量:4267次2021-05-28 16:59:07
-
浏览量:102次2024-02-28 15:53:55
-
浏览量:2641次2020-10-20 15:40:55
-
浏览量:1108次2023-02-14 14:48:11
-
浏览量:154次2023-09-28 11:19:15
-
浏览量:29233次2021-07-06 10:18:59

这把我C
完整的教程https://fizzz.blog.csdn.net。该网站都是残缺


-
241篇
-
广告/SPAM
-
恶意灌水
-
违规内容
-
文不对题
-
重复发帖
这把我C

 微信支付
微信支付
举报类型
- 内容涉黄/赌/毒
- 内容侵权/抄袭
- 政治相关
- 涉嫌广告
- 侮辱谩骂
- 其他
详细说明
审核成功
审核失败


关注公众号
社区问题咨询:Ebaina-CN
定制需求咨询:xxqk158820
