

FFMPEG架构分析
FFmpeg 应用收集分享(1)
简介
FFmpeg是一个集录制、转换、音/视频编码解码功能为一体的完整的开源解决方案。FFmpeg的开发是基于Linux操作系统,但是可以在大多数操作系统中编译和使用。FFmpeg支持MPEG、DivX、MPEG4、AC3、DV、FLV等40多种编码,AVI、MPEG、OGG、Matroska、ASF等90多种解码.TCPMP, VLC, MPlayer等开源播放器都用到了FFmpeg。
FFmpeg主目录下主要有libavcodec、libavformat和libavutil等子目录。其中libavcodec用于存放各个encode/decode模块,libavformat用于存放muxer/demuxer模块,libavutil用于存放内存操作等辅助性模块。以flash movie的flv文件格式为例, muxer/demuxer的flvenc.cflvdec.c文件在libavformat目录下,encode/decode的mpegvideo.c和h263de.c在libavcodec目录下。
muxer/demuxer与encoder/decoder定义与初始化muxer/demuxer和encoder/decoder在FFmpeg中的实现代码里,有许多相同的地方,而二者最大的差别是muxer 和demuxer分别是不同的结构AVOutputFormat与AVInputFormat,而encoder和decoder都是用的AVCodec 结构。
muxer/demuxer和encoder/decoder在FFmpeg中相同的地方有:
    二者都是在main()开始的av_register_all()函数内初始化的
    二者都是以链表的形式保存在全局变量中的
        muxer/demuxer是分别保存在全局变量AVOutputFormat *first_oformat与
        AVInputFormat *first_iformat中的。
        encoder/decoder都是保存在全局变量AVCodec *first_avcodec中的。
    二者都用函数指针的方式作为开放的公共接口

demuxer开放的接口有:
    int (*read_probe)(AVProbeData *);
    int (*read_header)(struct AVFormatContext *, AVFormatParameters *ap);
    int (*read_packet)(struct AVFormatContext *, AVPacket *pkt);
    int (*read_close)(struct AVFormatContext *);
    int (*read_seek)(struct AVFormatContext *, int stream_index, int64_t timestamp, int flags);

muxer开放的接口有:
    int (*write_header)(struct AVFormatContext *);
    int (*write_packet)(struct AVFormatContext *, AVPacket *pkt);
    int (*write_trailer)(struct AVFormatContext *);

encoder/decoder的接口是一样的,只不过二者分别只实现encoder和decoder函数:
    int (*init)(AVCodecContext *);
    int (*encode)(AVCodecContext *, uint8_t *buf, int buf_size, void *data);
    int (*close)(AVCodecContext *);
    int (*decode)(AVCodecContext *, void *outdata, int *outdata_size, uint8_t *buf, int buf_size);

仍以flv文件为例来说明muxer/demuxer的初始化。
在libavformat\allformats.c文件的av_register_all(void)函数中,通过执行
REGISTER_MUXDEMUX(FLV, flv);
将支持flv 格式的flv_muxer与flv_demuxer变量分别注册到全局变量first_oformat与first_iformat链表的最后位置。
其中flv_muxer在libavformat\flvenc.c中定义如下:
AVOutputFormat flv_muxer = {
    "flv",
    "flv format",
    "video/x-flv",
    "flv",
    sizeof(FLVContext),
#ifdef CONFIG_LIBMP3LAME
    CODEC_ID_MP3,
#else // CONFIG_LIBMP3LAME
    CODEC_ID_NONE,
    CODEC_ID_FLV1,
    flv_write_header,
    flv_write_packet,
    flv_write_trailer,
    .codec_tag= (const AVCodecTag*[]){flv_video_codec_ids, flv_audio_codec_ids, 0},
}
AVOutputFormat结构的定义如下:
typedef struct AVOutputFormat {
    const char *name;
    const char *long_name;
    const char *mime_type;
    const char *extensions; /**< comma separated filename extensions */
    /** size of private data so that it can be allocated in the wrapper */
    int priv_data_size;
    /* output support */
    enum CodecID audio_codec; /**< default audio codec */
    enum CodecID video_codec; /**< default video codec */
    int (*write_header)(struct AVFormatContext *);
    int (*write_packet)(struct AVFormatContext *, AVPacket *pkt);
    int (*write_trailer)(struct AVFormatContext *);
    /** can use flags: AVFMT_NOFILE, AVFMT_NEEDNUMBER, AVFMT_GLOBALHEADER */
    int flags;
    /** currently only used to set pixel format if not YUV420P */
    int (*set_parameters)(struct AVFormatContext *, AVFormatParameters *);
    int (*interleave_packet)(struct AVFormatContext *, AVPacket *out, AVPacket *in, int flush);

    /**
     *list of supported codec_id-codec_tag pairs,ordered by "better choice first"
     * the arrays are all CODEC_ID_NONE terminated
     */
    const struct AVCodecTag **codec_tag;
    /* private fields */
    struct AVOutputFormat *next;
} AVOutputFormat;
由AVOutputFormat结构的定义可知,flv_muxer变量初始化的第一、二个成员分别为该muxer
的名称与长名称,第三、第四个成员为所对应MIMIE Type和后缀名,第五个成员是所对应的
私有结构的大小,第六、第七个成员为所对应的音频编码和视频编码类型ID,接下来就是三
个重要的接口函数,该 muxer的功能也就是通过调用这三个接口实现的。

flv_demuxer在libavformat\flvdec.c中定义如下, 与flv_muxer类似,在这儿主要也是设置
了5个接口函数,其中flv_probe接口用途是测试传入的数据段是否是符合当前文件格式,这
个接口在匹配当前demuxer时会用到。
AVInputFormat flv_demuxer = {
    "flv",
    "flv format",
    0,
    flv_probe,
    flv_read_header,
    flv_read_packet,
    flv_read_close,
    flv_read_seek,
    .extensions = "flv",
    .value = CODEC_ID_FLV1,
};

在上述av_register_all(void)函数中通过执行libavcodec\allcodecs.c文件里的
avcodec_register_all(void)函数来初始化全部的encoder/decoder。

因为不是每种编码方式都支持encode和decode,所以有以下三种注册方式:
#define REGISTER_ENCODER(X,x) \
    if(ENABLE_##X##_ENCODER) register_avcodec(&x##_encoder)
#define REGISTER_DECODER(X,x) \
    if(ENABLE_##X##_DECODER) register_avcodec(&x##_decoder)
#define REGISTER_ENCDEC(X,x) REGISTER_ENCODER(X,x); REGISTER_DECODER(X,x)

如支持flv的flv_encoder和flv_decoder变量就分别是在libavcodec\mpegvideo.c和libavcodec\h263de.c中创建的。
- 当前muxer/demuxer的匹配
在FFmpeg的文件转换过程中,首先要做的就是根据传入文件和传出文件的后缀名[FIXME]匹配
合适的demuxer和muxer。匹配上的demuxer和muxer都保存在如下所示,定义在ffmpeg.c里的
全局变量file_iformat和file_oformat中:
static AVInputFormat file_iformat;
static AVOutputFormat file_oformat;
3.1 demuxer匹配
在libavformat\utils.c中的static AVInputFormat av_probe_input_format2(
AVProbeData pd, int is_opened, int *score_max)函数用途是根据传入的probe data数据
,依次调用每个demuxer的read_probe接口,来进行该demuxer是否和传入的文件内容匹配的
判断。其调用顺序如下:void parse_options(int argc, char **argv, const OptionDef *options, void (* parse_arg_function)(const char *)); static void opt_input_file(const char *filename) int av_open_input_file(…… ) AVInputFormat *av_probe_input_format(AVProbeData *pd, int is_opened) static AVInputFormat *av_probe_input_format2(……)opt_input_file函数是在保存在const OptionDef options[]数组中,用于
void parse_options(int argc, char *argv, const OptionDef options)中解析argv里的
“-i” 参数,也就是输入文件名时调用的。
3.2 muxer匹配
与demuxer的匹配不同,muxer的匹配是调用guess_format函数,根据main() 函数的argv里的
输出文件后缀名来进行的。void parse_options(int argc, char **argv, const OptionDef *options, void (* parse_arg_function)(const char *)); void parse_arg_file(const char *filename) static void opt_output_file(const char *filename) AVOutputFormat *guess_format(const char *short_name, const char *filename, const char *mime_type)3.3 当前encoder/decoder的匹配
在main()函数中除了解析传入参数并初始化demuxer与muxer的parse_options( )函数以外,
其他的功能都是在av_encode( )函数里完成的。
在libavcodec\utils.c中有如下二个函数:AVCodec *avcodec_find_encoder(enum CodecID id) AVCodec *avcodec_find_decoder(enum CodecID id)他们的功能就是根据传入的CodecID,找到匹配的encoder和decoder。
在av_encode( )函数的开头,首先初始化各个AVInputStream和AVOutputStream,然后分别调
用上述二个函数,并将匹配上的encoder与decoder分别保存在:AVInputStream->AVStream *st->AVCodecContext *codec->struct AVCodec *codec与 AVOutputStream->AVStream *st->AVCodecContext *codec->struct ``` AVCodec *codec变量。 - 其他主要数据结构
4.1 AVFormatContext
AVFormatContext是FFMpeg格式转换过程中实现输入和输出功能、保存相关数据的主要结构。
每一个输入和输出文件,都在如下定义的指针数组全局变量中有对应的实体。static AVFormatContext *output_files[MAX_FILES]; static AVFormatContext *input_files[MAX_FILES];对于输入和输出,因为共用的是同一个结构体,所以需要分别对该结构中如下定义的iformat
或oformat成员赋值。struct AVInputFormat *iformat; struct AVOutputFormat *oformat;对一个AVFormatContext来说,这二个成员不能同时有值,即一个AVFormatContext不能同时
含有demuxer和muxer。在main( )函数开头的parse_options( )函数中找到了匹配的muxer和
demuxer之后,根据传入的argv参数,初始化每个输入和输出的AVFormatContext结构,并保
存在相应的output_files和input_files指针数组中。在av_encode( )函数中,output_files
和input_files是作为函数参数传入后,在其他地方就没有用到了。
4.2 AVCodecContext
保存AVCodec指针和与codec相关数据,如video的width、height,audio的sample rate等。
AVCodecContext中的codec_type,codec_id二个变量对于encoder/decoder的匹配来说,最为
重要。
enum CodecType codec_type; / see CODEC_TYPE_xxx /
enum CodecID codec_id; / see CODEC_ID_xxx /
如上所示,codec_type保存的是CODEC_TYPE_VIDEO,CODEC_TYPE_AUDIO等媒体类型,
codec_id保存的是CODEC_ID_FLV1,CODEC_ID_VP6F等编码方式。
以支持flv格式为例,在前述的av_open_input_file(…… ) 函数中,匹配到正确的
AVInputFormat demuxer后,通过av_open_input_stream( )函数中调用AVInputFormat的
read_header接口来执行flvdec.c中的flv_read_header( )函数。在flv_read_header( )函数
内,根据文件头中的数据,创建相应的视频或音频AVStream,并设置AVStream中
AVCodecContext的正确的codec_type值。codec_id值是在解码过程中flv_read_packet( )函
数执行时根据每一个packet头中的数据来设置的。
4.3 AVStream
AVStream结构保存与数据流相关的编解码器,数据段等信息。比较重要的有如下二个成员:
AVCodecContext *codec; /*< codec context /
void *priv_data;
其中codec指针保存的就是上节所述的encoder或decoder结构。priv_data指针保存的是和具
体编解码流相关的数据,如下代码所示,在ASF的解码过程中,priv_data保存的就是
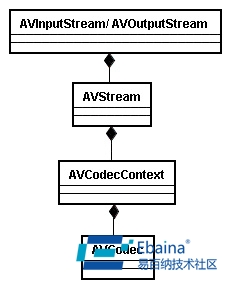
ASFStream结构的数据。AVStream *st; ASFStream *asf_st; … … st->priv_data = asf_st;4.4 AVInputStream/ AVOutputStream
根据输入和输出流的不同,前述的AVStream结构都是封装在AVInputStream和AVOutputStream
结构中,在av_encode( )函数中使用。AVInputStream中还保存的有与时间有关的信息。
AVOutputStream中还保存有与音视频同步等相关的信息。
4.5 AVPacket
AVPacket结构定义如下,其是用于保存读取的packet数据。typedef struct AVPacket { int64_t pts; ///< presentation time stamp in time_base units int64_t dts; ///< decompression time stamp in time_base units uint8_t *data; int size; int stream_index; int flags; int duration; ///< presentation duration in time_base units (0 if not available) void (*destruct)(struct AVPacket *); void *priv; int64_t pos; ///< byte position in stream, -1 if unknown } AVPacket;在av_encode()函数中,调用AVInputFormat的
(read_packet)(struct AVFormatContext , AVPacket *pkt)接口,读取输入文件的一帧数
据保存在当前输入AVFormatContext的AVPacket成员中。FFMPEG是目前被应用最广泛的编解码软件库,支持多种流行的编解码器,它是C语言实现的,不仅被集成到各种PC软件,也经常被移植到多种嵌入式 设备中。使用面向对象的办法来设想这样一个编解码库,首先让人想到的是构造各种编解码器的类,然后对于它们的抽象基类确定运行数据流的规则,根据算法转换 输入输出对象。
在实际的代码,将这些编解码器分成encoder/decoder,muxer/demuxer和device三种对象,分别对应于编解码,输入输 出格式和设备。在main函数的开始,就是初始化这三类对象。在avcodec_register_all中,很多编解码器被注册,包括视频的H.264 解码器和X264编码器等,REGISTER_DECODER (H264, h264); REGISTER_ENCODER (LIBX264, libx264);找到相关的宏代码如下
#define REGISTER_ENCODER(X,x) { \
      extern AVCodec x##_encoder; \
      if(CONFIG_##X##_ENCODER)  avcodec_register(&x##_encoder); }
#define REGISTER_DECODER(X,x) { \
      extern AVCodec x##_decoder; \
      if(CONFIG_##X##_DECODER)  avcodec_register(&x##_decoder); }
这样就实际在代码中根据CONFIG_##X##_ENCODER这样的编译选项来注册libx264_encoder和 h264_decoder,注册的过程发生在avcodec_register(AVCodec *codec)函数中,实际上就是向全局链表first_avcodec中加入libx264_encoder、h264_decoder特定的编解码 器,输入参数AVCodec是一个结构体,可以理解为编解码器的基类,其中不仅包含了名称,id等属性,而且包含了如下函数指针,让每个具体的编解码器扩 展类实现。
int (*init)(AVCodecContext *);
int (*encode)(AVCodecContext *, uint8_t *buf, int buf_size, void *data);
int (*close)(AVCodecContext *);
int (*decode)(AVCodecContext *, void *outdata, int *outdata_size,
              const uint8_t *buf, int buf_size);
void (*flush)(AVCodecContext *);
继续追踪libx264,也就是X264的静态编码库,它在FFMPEG编译的时候被引入作为H.264编码器。在libx264.c中有如下代码
AVCodec libx264_encoder = {
.name = "libx264",
.type = CODEC_TYPE_VIDEO,
.id = CODEC_ID_H264,
.priv_data_size = sizeof(X264Context),
.init = X264_init,
.encode = X264_frame,
.close = X264_close,
.capabilities = CODEC_CAP_DELAY,
.pix_fmts = (enum PixelFormat[]) { PIX_FMT_YUV420P, PIX_FMT_NONE },
.long_name = NULL_IF_CONFIG_SMALL("libx264 H.264 / AVC / MPEG-4 AVC / MPEG-4 part 10"),
};
这里具体对来自AVCodec得属性和方法赋值。其中
.init = X264_init,
.encode = X264_frame,
.close = X264_close,
将函数指针指向了具体函数,这三个函数将使用libx264静态库中提供的API,也就是X264的主要接口函数进行具体实现。pix_fmts定义了所支持的输入格式,这里4:2:0
PIX_FMT_YUV420P, ///< planar YUV 4:2:0, 12bpp, (1 Cr & Cb sample per 2x2 Y samples)
上面看到的X264Context封装了X264所需要的上下文管理数据,typedef struct X264Context { x264_param_t params; x264_t *enc; x264_picture_t pic; AVFrame out_pic; } X264Context;它 属于结构体AVCodecContext的void *priv_data变量,定义了每种编解码器私有的上下文属性,AVCodecContext也类似上下文基类一样,还提供其他表示屏幕解析率、量化范 围等的上下文属性和rtp_callback等函数指针供编解码使用。
回到main函数,可以看到完成了各类编解码器,输入输出格式和设备注册以后,将进行上下文初始化和编解码参数读入,然后调用av_encode()函数进行具体的编解码工作。根据该函数的注释一路查看其过程: - 输入输出流初始化。
- 根据输入输出流确定需要的编解码器,并初始化。
- 写输出文件的各部分
重点关注一下step2和3,看看怎么利用前面分析的编解码器基类来实现多态。大概查看一下这段代码的关系,发现在FFMPEG里,可以用类图来表示大概的编解码器组合。
可以参考【3】来了解这些结构的含义(见附录)。在这里会调用一系列来自utils.c的函数,这里的avcodec_open()函数,在打开编解码器都会调用到,它将运行如下代码:
    avctx->codec = codec;
    avctx->codec_id = codec->id;
    avctx->frame_number = 0;
    if(avctx->codec->init){
        ret = avctx->codec->init(avctx);
进行具体适配的编解码器初始化,而这里的avctx->codec->init(avctx)就是调用AVCodec中函数指针定义的具体初始化函数,例如X264_init。
在 avcodec_encode_video()和avcodec_encode_audio()被output_packet()调用进行音视频编码,将 同样利用函数指针avctx->codec->encode()调用适配编码器的编码函数,如X264_frame进行具体工作。
从上面的分析,我们可以看到FFMPEG怎么利用面向对象来抽象编解码器行为,通过组合和继承关系具体化每个编解码器实体。设想要在FFMPEG中加入新的解码器H265,要做的事情如下:
- 在config编译配置中加入CONFIG_H265_DECODER
- 利用宏注册H265解码器
- 定义AVCodec 265_decoder变量,初始化属性和函数指针
- 利用解码器API具体化265_decoder的init等函数指针
完成以上步骤,就可以把新的解码器放入FFMPEG,外部的匹配和运行规则由基类的多态实现了。 - X264架构分析
X264 是一款从2004年有法国大学生发起的开源H.264编码器,对PC进行汇编级代码优化,舍弃了片组和多参考帧等性能效率比不高的功能来提高编码效率,它 被FFMPEG作为引入的.264编码库,也被移植到很多DSP嵌入平台。前面第三节已经对FFMPEG中的X264进行举例分析,这里将继续结合 X264框架加深相关内容的了解。
查看代码前,还是思考一下对于一款具体的编码器,怎么面向对象分析呢?对熵编码部分对不同算法的抽象,还有帧内或帧间编码各种估计算法的抽象,都可以作为类来构建。
在X264中,我们看到的对外API和上下文变量都声明在X264.h中,API函数中,关于辅助功能的函数在common.c中定义void x264_picture_alloc( x264_picture_t *pic, int i_csp, int i_width, int i_height ); void x264_picture_clean( x264_picture_t *pic ); int x264_nal_encode( void *, int *, int b_annexeb, x264_nal_t *nal ); 而编码功能函数定义在encoder.c x264_t *x264_encoder_open ( x264_param_t * ); int x264_encoder_reconfig( x264_t *, x264_param_t * ); int x264_encoder_headers( x264_t *, x264_nal_t **, int * ); int x264_encoder_encode ( x264_t *, x264_nal_t **, int *, x264_picture_t *, x264_picture_t * ); void x264_encoder_close ( x264_t * );在x264.c文件中,有程序的main函数,可以看作做API使用的例子,它也是通过调用X264.h中的API和上下文变量来实现实际功能。
X264最重要的记录上下文数据的结构体x264_t定义在common.h中,它包含了从线程控制变量到具体的SPS、PPS、量化矩阵、cabac上下文等所有的H.264编码相关变量。其中包含如下的结构体x264_predict_t predict_16x16[4+3]; x264_predict_t predict_8x8c[4+3]; x264_predict8x8_t predict_8x8[9+3]; x264_predict_t predict_4x4[9+3]; x264_predict_8x8_filter_t predict_8x8_filter; x264_pixel_function_t pixf; x264_mc_functions_t mc; x264_dct_function_t dctf; x264_zigzag_function_t zigzagf; x264_quant_function_t quantf; x264_deblock_function_t loopf;跟 踪查看可以看到它们或是一个函数指针,或是由函数指针组成的结构,这样的用法很想面向对象中的interface接口声明。这些函数指针将在 x264_encoder_open()函数中被初始化,这里的初始化首先根据CPU的不同提供不同的函数实现代码段,很多与可能是汇编实现,以提高代码 运行效率。其次把功能相似的函数集中管理,例如类似intra16的4种和intra4的九种预测函数都被用函数指针数组管理起来。
x264_encoder_encode() 是负责编码的主要函数,而其内包含的x264_slice_write()负责片层一下的具体编码,包括了帧内和帧间宏块编码。在这里,cabac和 cavlc的行为是根据h->param.b_cabac来区别的,分别运行x264_macroblock_write_cabac()和 x264_macroblock_write_cavlc()来写码流,在这一部分,功能函数按文件定义归类,基本按照编码流程图运行,看起来更像面向过 程的写法,在已经初始化了具体的函数指针,程序就一直按编码过程的逻辑实现。如果从整体架构来看,x264利用这种类似接口的形式实现了弱耦合和可重用, 利用x264_t这个贯穿始终的上下文,实现信息封装和多态。
本文大概分析了FFMPEG/X264的代码架构,重点探讨用C语言来实现面向对象编码,虽不至于强行向C++靠拢,但是也各有实现特色,保证实用性。值得规划C语言软件项目所借鉴。
【参考文献】
1.“用例子说明面向对象和面向过程的区别”
- liyuming1978,“liyuming1978的专栏”
- “FFMpeg框架代码阅读”
Using libavformat and libavcodecUsing libavformat and libavcodec
Martin Böhme (boehme@inb.uni-luebeckREMOVETHIS.de)
February 18, 2004
Update (January 23 2009): By now, these articles are quite out of date... unfortunately, I haven't found the time to update them, but thankfully, others have jumped in. Stephen Dranger has a more recent tutorial, ryanfb of cryptosystem.org has an updated version of the code, and David Hoerl has a more recent update.
Update (July 22 2004): I discovered that the code I originally presented contained a memory leak (av_free_packet() wasn't being called). My apologies - I've updated the demo program and the code in the article to eliminate the leak.
Update (July 21 2004): There's a new prerelease of ffmpeg (0.4.9-pre1). I describe the changes to the libavformat / libavcodec API in this article.
The libavformat and libavcodec libraries that come with ffmpeg are a great way of accessing a large variety of video file formats. Unfortunately, there is no real documentation on using these libraries in your own programs (at least I couldn't find any), and the example programs aren't really very helpful either.
This situation meant that, when I used libavformat/libavcodec on a recent project, it took quite a lot of experimentation to find out how to use them. Here's what I learned - hopefully I'll be able to save others from having to go through the same trial-and-error process. There's also a small demo program that you can download. The code I'll present works with libavformat/libavcodec as included in version 0.4.8 of ffmpeg (the most recent version as I'm writing this). If you find that later versions break the code, please let me know.
In this document, I'll only cover how to read video streams from a file; audio streams work pretty much the same way, but I haven't actually used them, so I can't present any example code.
In case you're wondering why there are two libraries, libavformat and libavcodec: Many video file formats (AVI being a prime example) don't actually specify which codec(s) should be used to encode audio and video data; they merely define how an audio and a video stream (or, potentially, several audio/video streams) should be combined into a single file. This is why sometimes, when you open an AVI file, you get only sound, but no picture - because the right video codec isn't installed on your system. Thus, libavformat deals with parsing video files and separating the streams contained in them, and libavcodec deals with decoding raw audio and video streams.
Opening a Video File
First things first - let's look at how to open a video file and get at the streams contained in it. The first thing we need to do is to initialize libavformat/libavcodec:
av_register_all();
This registers all available file formats and codecs with the library so they will be used automatically when a file with the corresponding format/codec is opened. Note that you only need to call av_register_all() once, so it's probably best to do this somewhere in your startup code. If you like, it's possible to register only certain individual file formats and codecs, but there's usually no reason why you would have to do that.
Next off, opening the file:
AVFormatContext pFormatCtx;
const char filename="myvideo.mpg";
// Open video file
if(av_open_input_file(&pFormatCtx, filename, NULL, 0, NULL)!=0)
handle_error(); // Couldn't open file
The last three parameters specify the file format, buffer size and format parameters; by simply specifying NULL or 0 we ask libavformat to auto-detect the format and use a default buffer size. Replace handle_error() with appropriate error handling code for your application.
Next, we need to retrieve information about the streams contained in the file:
// Retrieve stream information
if(av_find_stream_info(pFormatCtx)<0)
    handle_error(); // Couldn't find stream information
This fills the streams field of the AVFormatContext with valid information. As a debugging aid, we'll dump this information onto standard error, but of course you don't have to do this in a production application:
dump_format(pFormatCtx, 0, filename, false);
As mentioned in the introduction, we'll handle only video streams, not audio streams. To make things nice and easy, we simply use the first video stream we find:
int            i, videoStream;
AVCodecContext *pCodecCtx;
// Find the first video stream
videoStream=-1;
for(i=0; i<pFormatCtx->nb_streams; i++)
    if(pFormatCtx->streams[i]->codec.codec_type==CODEC_TYPE_VIDEO)
    {
        videoStream=i;
        break;
    }
if(videoStream==-1)
    handle_error(); // Didn't find a video stream
// Get a pointer to the codec context for the video stream
pCodecCtx=&pFormatCtx->streams[videoStream]->codec;
OK, so now we've got a pointer to the so-called codec context for our video stream, but we still have to find the actual codec and open it:
AVCodec *pCodec;
// Find the decoder for the video stream
pCodec=avcodec_find_decoder(pCodecCtx->codec_id);
if(pCodec==NULL)
    handle_error(); // Codec not found
// Inform the codec that we can handle truncated bitstreams -- i.e.,
// bitstreams where frame boundaries can fall in the middle of packets
if(pCodec->capabilities & CODEC_CAP_TRUNCATED)
    pCodecCtx->flags|=CODEC_FLAG_TRUNCATED;
// Open codec
if(avcodec_open(pCodecCtx, pCodec)<0)
    handle_error(); // Could not open codec
(So what's up with those "truncated bitstreams"? Well, as we'll see in a moment, the data in a video stream is split up into packets. Since the amount of data per video frame can vary, the boundary between two video frames need not coincide with a packet boundary. Here, we're telling the codec that we can handle this situation.)
One important piece of information that is stored in the AVCodecContext structure is the frame rate of the video. To allow for non-integer frame rates (like NTSC's 29.97 fps), the rate is stored as a fraction, with the numerator in pCodecCtx->frame_rate and the denominator in pCodecCtx->frame_rate_base. While testing the library with different video files, I noticed that some codecs (notably ASF) seem to fill these fields incorrectly (frame_rate_base contains 1 instead of 1000). The following hack fixes this:
// Hack to correct wrong frame rates that seem to be generated by some
// codecs
if(pCodecCtx->frame_rate>1000 && pCodecCtx->frame_rate_base==1)
pCodecCtx->frame_rate_base=1000;
Note that it shouldn't be a problem to leave this fix in place even if the bug is corrected some day - it's unlikely that a video would have a frame rate of more than 1000 fps.
One more thing left to do: Allocate a video frame to store the decoded images in:
AVFrame *pFrame;
pFrame=avcodec_alloc_frame();
That's it! Now let's start decoding some video.
Decoding Video Frames
As I've already mentioned, a video file can contain several audio and video streams, and each of those streams is split up into packets of a particular size. Our job is to read these packets one by one using libavformat, filter out all those that aren't part of the video stream we're interested in, and hand them on to libavcodec for decoding. In doing this, we'll have to take care of the fact that the boundary between two frames can occur in the middle of a packet.
Sound complicated? Lucikly, we can encapsulate this whole process in a routine that simply returns the next video frame:
bool GetNextFrame(AVFormatContext *pFormatCtx, AVCodecContext *pCodecCtx,
    int videoStream, AVFrame *pFrame)
{
    static AVPacket packet;
    static int      bytesRemaining=0;
    static uint8_t  *rawData;
    static bool     fFirstTime=true;
    int             bytesDecoded;
    int             frameFinished;
    // First time we're called, set packet.data to NULL to indicate it
    // doesn't have to be freed
    if(fFirstTime)
    {
        fFirstTime=false;
        packet.data=NULL;
    }
    // Decode packets until we have decoded a complete frame
    while(true)
    {
        // Work on the current packet until we have decoded all of it
        while(bytesRemaining > 0)
        {
            // Decode the next chunk of data
            bytesDecoded=avcodec_decode_video(pCodecCtx, pFrame,
                &frameFinished, rawData, bytesRemaining);
            // Was there an error?
            if(bytesDecoded < 0)
            {
                fprintf(stderr, "Error while decoding frame\n");
                return false;
            }
            bytesRemaining-=bytesDecoded;
            rawData+=bytesDecoded;
            // Did we finish the current frame? Then we can return
            if(frameFinished)
                return true;
        }
        // Read the next packet, skipping all packets that aren't for this
        // stream
        do
        {
            // Free old packet
            if(packet.data!=NULL)
                av_free_packet(&packet);
            // Read new packet
            if(av_read_packet(pFormatCtx, &packet)<0)
                goto loop_exit;
        } while(packet.stream_index!=videoStream);
        bytesRemaining=packet.size;
        rawData=packet.data;
    }
loop_exit:
    // Decode the rest of the last frame
    bytesDecoded=avcodec_decode_video(pCodecCtx, pFrame, &frameFinished,
        rawData, bytesRemaining);
    // Free last packet
    if(packet.data!=NULL)
        av_free_packet(&packet);
    return frameFinished!=0;
}
Now, all we have to do is sit in a loop, calling GetNextFrame() until it returns false. Just one more thing to take care of: Most codecs return images in YUV 420 format (one luminance and two chrominance channels, with the chrominance channels samples at half the spatial resolution of the luminance channel). Depending on what you want to do with the video data, you may want to convert this to RGB. (Note, though, that this is not necessary if all you want to do is display the video data; take a look at the X11 Xvideo extension, which does YUV-to-RGB and scaling in hardware.) Fortunately, libavcodec provides a conversion routine called img_convert, which does conversion between YUV and RGB as well as a variety of other image formats. The loop that decodes the video thus becomes:
while(GetNextFrame(pFormatCtx, pCodecCtx, videoStream, pFrame))
{
    img_convert((AVPicture *)pFrameRGB, PIX_FMT_RGB24, (AVPicture*)pFrame,
        pCodecCtx->pix_fmt, pCodecCtx->width, pCodecCtx->height);
    // Process the video frame (save to disk etc.)
    DoSomethingWithTheImage(pFrameRGB);
}
The RGB image pFrameRGB (of type AVFrame *) is allocated like this:
AVFrame *pFrameRGB;
int     numBytes;
uint8_t *buffer;
// Allocate an AVFrame structure
pFrameRGB=avcodec_alloc_frame();
if(pFrameRGB==NULL)
    handle_error();
// Determine required buffer size and allocate buffer
numBytes=avpicture_get_size(PIX_FMT_RGB24, pCodecCtx->width,
    pCodecCtx->height);
buffer=new uint8_t[numBytes];
// Assign appropriate parts of buffer to image planes in pFrameRGB
avpicture_fill((AVPicture *)pFrameRGB, buffer, PIX_FMT_RGB24,
    pCodecCtx->width, pCodecCtx->height);
Cleaning up
OK, we've read and processed our video, now all that's left for us to do is clean up after ourselves:
// Free the RGB image
delete [] buffer;
av_free(pFrameRGB);
// Free the YUV frame
av_free(pFrame);
// Close the codec
avcodec_close(pCodecCtx);
// Close the video file
av_close_input_file(pFormatCtx);
Done!
Sample Code
A sample app that wraps all of this code up in compilable form is here. If you have any additional comments, please contact me at boehme@inb.uni-luebeckREMOVETHIS.de. Standard disclaimer: I assume no liability for the correct functioning of the code and techniques presented in this article.
- 分享
- 举报
 微信扫码分享
 QQ好友
QQ好友
 暂无数据
暂无数据-
浏览量:19880次2021-03-15 15:41:39
-
浏览量:5747次2021-04-12 15:49:26
-
浏览量:4521次2024-01-25 16:21:59
-
浏览量:2446次2020-07-28 17:27:40
-
浏览量:2991次2019-11-09 18:26:29
-
浏览量:6901次2021-07-01 16:47:45
-
浏览量:2675次2022-11-21 17:11:41
-
浏览量:3256次2023-12-29 17:51:55
-
浏览量:6875次2021-04-26 17:27:59
-
浏览量:4733次2020-08-25 18:10:00
-
浏览量:4616次2020-08-26 17:39:57
-
浏览量:5791次2021-03-13 17:09:17
-
浏览量:2826次2019-01-28 13:50:19
-
浏览量:4220次2020-07-28 19:20:20
-
浏览量:6349次2021-04-25 16:34:37
-
浏览量:2210次2023-01-11 12:36:23
-
浏览量:3656次2020-08-04 20:10:32
-
浏览量:5343次2021-04-23 14:10:09
-
浏览量:4737次2021-04-25 16:34:01

易百纳技术社区
暂无个性签名~


-
广告/SPAM
-
恶意灌水
-
违规内容
-
文不对题
-
重复发帖
易百纳技术社区

 微信支付
微信支付
举报类型
- 内容涉黄/赌/毒
- 内容侵权/抄袭
- 政治相关
- 涉嫌广告
- 侮辱谩骂
- 其他
详细说明
审核成功
审核失败


关注公众号
社区问题咨询:Ebaina-CN
定制需求咨询:xxqk158820
