

RecyclerView的绘制源码分析
朋友介绍有机会投稿这个网站。
笔者曾经是个半吊子嵌入式开发,现在从事移动端应用层开发,想通过这个平台记录一些随笔,随笔如果有错误,希望底层大佬门多包含。
这篇文章就随便写写android移动端开发中必须要用到的一个控件-RecycleView, 当然,是部分源码分析: RecycleView的绘制流程。
简单使用
布局中使用
<androidx.recyclerview.widget.RecyclerView
  android:id="@+id/list"
  android:layout_width="match_parent"
  android:layout_height="match_parent"
  />
  代码中调用
  val recyclerView = findViewById<RecyclerView>(R.id.list)
recyclerView.setHasFixedSize(true)
recyclerView.apply {
  itemAnimator = SlideInLeftAnimator()
  adapter = this@AnimatorSampleActivity.adapter

  layoutManager = if (intent.getBooleanExtra(MainActivity.KEY_GRID, true)) {
    GridLayoutManager(context, 2)
  } else {
    LinearLayoutManager(context)
  }
}
首次进入这个页面会执行其构造方法,我们进入构造方法看做了什么:
public RecyclerView(@NonNull Context context, @Nullable AttributeSet attrs, int defStyle) {
    super(context, attrs, defStyle);
    if (attrs != null) {
        TypedArray a = context.obtainStyledAttributes(attrs, CLIP_TO_PADDING_ATTR, defStyle, 0);
        mClipToPadding = a.getBoolean(0, true);
        a.recycle();
    } else {
        mClipToPadding = true;
    }
    setScrollContainer(true);
    setFocusableInTouchMode(true);

    final ViewConfiguration vc = ViewConfiguration.get(context);
    mTouchSlop = vc.getScaledTouchSlop();
    mScaledHorizontalScrollFactor =
            ViewConfigurationCompat.getScaledHorizontalScrollFactor(vc, context);
    mScaledVerticalScrollFactor =
            ViewConfigurationCompat.getScaledVerticalScrollFactor(vc, context);
    mMinFlingVelocity = vc.getScaledMinimumFlingVelocity();
    mMaxFlingVelocity = vc.getScaledMaximumFlingVelocity();
    setWillNotDraw(getOverScrollMode() == View.OVER_SCROLL_NEVER);

    mItemAnimator.setListener(mItemAnimatorListener);
    initAdapterManager();
    initChildrenHelper();
    initAutofill();
    // If not explicitly specified this view is important for accessibility.
    if (ViewCompat.getImportantForAccessibility(this)
            == ViewCompat.IMPORTANT_FOR_ACCESSIBILITY_AUTO) {
        ViewCompat.setImportantForAccessibility(this,
                ViewCompat.IMPORTANT_FOR_ACCESSIBILITY_YES);
    }
    mAccessibilityManager = (AccessibilityManager) getContext()
            .getSystemService(Context.ACCESSIBILITY_SERVICE);
    setAccessibilityDelegateCompat(new RecyclerViewAccessibilityDelegate(this));
    // Create the layoutManager if specified.

    boolean nestedScrollingEnabled = true;

    if (attrs != null) {
        int defStyleRes = 0;
        TypedArray a = context.obtainStyledAttributes(attrs, R.styleable.RecyclerView,
                defStyle, defStyleRes);
        String layoutManagerName = a.getString(R.styleable.RecyclerView_layoutManager);
        int descendantFocusability = a.getInt(
                R.styleable.RecyclerView_android_descendantFocusability, -1);
        if (descendantFocusability == -1) {
            setDescendantFocusability(ViewGroup.FOCUS_AFTER_DESCENDANTS);
        }
        mEnableFastScroller = a.getBoolean(R.styleable.RecyclerView_fastScrollEnabled, false);
        if (mEnableFastScroller) {
            StateListDrawable verticalThumbDrawable = (StateListDrawable) a
                    .getDrawable(R.styleable.RecyclerView_fastScrollVerticalThumbDrawable);
            Drawable verticalTrackDrawable = a
                    .getDrawable(R.styleable.RecyclerView_fastScrollVerticalTrackDrawable);
            StateListDrawable horizontalThumbDrawable = (StateListDrawable) a
                    .getDrawable(R.styleable.RecyclerView_fastScrollHorizontalThumbDrawable);
            Drawable horizontalTrackDrawable = a
                    .getDrawable(R.styleable.RecyclerView_fastScrollHorizontalTrackDrawable);
            initFastScroller(verticalThumbDrawable, verticalTrackDrawable,
                    horizontalThumbDrawable, horizontalTrackDrawable);
        }
        a.recycle();
        //创建布局管理器
        createLayoutManager(context, layoutManagerName, attrs, defStyle, defStyleRes);

        if (Build.VERSION.SDK_INT >= 21) {
            a = context.obtainStyledAttributes(attrs, NESTED_SCROLLING_ATTRS,
                    defStyle, defStyleRes);
            nestedScrollingEnabled = a.getBoolean(0, true);
            a.recycle();
        }
    } else {
        setDescendantFocusability(ViewGroup.FOCUS_AFTER_DESCENDANTS);
    }

    // Re-set whether nested scrolling is enabled so that it is set on all API levels
    setNestedScrollingEnabled(nestedScrollingEnabled);
}
构造方法进行了一系列初始化操作,比如ItemAnimator、AdapterManager、ChildrenHelper,创建布局管理器LayoutManager等,如果在布局中设置了layuotmanager属性会在构造方法中通过反射创建LayoutManager,也是通过去创建
createLayoutManager(context, layoutManagerName, attrs, defStyle, defStyleRes);不管是通过布局设置还是通过代码中设置布局管理器最终都会将它设置给当前RecycleView的布局管理器:
public void setLayoutManager(@Nullable LayoutManager layout) {
    if (layout == mLayout) {
        return;
    }
    stopScroll();
    if (mLayout != null) {
        // end all running animations
        if (mItemAnimator != null) {
            mItemAnimator.endAnimations();
        }
        mLayout.removeAndRecycleAllViews(mRecycler);
        mLayout.removeAndRecycleScrapInt(mRecycler);
        mRecycler.clear();

        if (mIsAttached) {
            mLayout.dispatchDetachedFromWindow(this, mRecycler);
        }
        mLayout.setRecyclerView(null);
        mLayout = null;
    } else {
        mRecycler.clear();
    }
    // this is just a defensive measure for faulty item animators.
    mChildHelper.removeAllViewsUnfiltered();
    mLayout = layout;
    if (layout != null) {
        if (layout.mRecyclerView != null) {
            throw new IllegalArgumentException("LayoutManager " + layout
                    + " is already attached to a RecyclerView:"
                    + layout.mRecyclerView.exceptionLabel());
        }
        mLayout.setRecyclerView(this);
        if (mIsAttached) {
            mLayout.dispatchAttachedToWindow(this);
        }
    }
    mRecycler.updateViewCacheSize();
    requestLayout();
}
设置布局之前会将缓存中的所用view给清除,然后通知界面,最后回调用requestLayout去刷新布局,进入View的绘制流程,mearsure、layuot、draw会分别被调用,这里不展开讲直接进入onMeasure方法
protected void onMeasure(int widthSpec, int heightSpec) {
    if (mLayout == null) {
        defaultOnMeasure(widthSpec, heightSpec);
        return;
    }
    //是否开启自动测量,这个变量在布局管理器初始化的时候默认开启
    if (mLayout.isAutoMeasureEnabled()) {
        final int widthMode = MeasureSpec.getMode(widthSpec);
        final int heightMode = MeasureSpec.getMode(heightSpec);

         //这边将自动测量的工作交给布局管理器来做去测量当前RecycleView的宽和高
         //如果在布局文件中对RecycleView的宽高设置为wrap_content,测量的宽高为0,需要进一步测量子View的宽高
         //如果RecycleView宽高属性设置了match_parents,通过当前方法就可以获取准确的宽高
        mLayout.onMeasure(mRecycler, mState, widthSpec, heightSpec);

        //如果RecycleView宽高属性设置了match_parents, 第一步测量到这结束
        final boolean measureSpecModeIsExactly =
                widthMode == MeasureSpec.EXACTLY && heightMode == MeasureSpec.EXACTLY;
        if (measureSpecModeIsExactly || mAdapter == null) {
            return;
        }
        //这个方法主要记录每个子view的状态,为了和dispatchLayoutStep3状态比对,
        //如果在onMearsure中没有做这一步,到onlayout的时候也会再进行一次
        if (mState.mLayoutStep == State.STEP_START) {
            dispatchLayoutStep1();
        }
        // set dimensions in 2nd step. Pre-layout should happen with old dimensions for
        // consistency
        mLayout.setMeasureSpecs(widthSpec, heightSpec);
        mState.mIsMeasuring = true;
        //这个方法是对子view做布局工作,
        //同dispatchLayoutStep1(),如果在onMearsure中没有做这一步,到onlayout的时候也会再进行一次
        dispatchLayoutStep2();

        //经过上面对子view的状态记录以及view的布局就可以算出当前Recycleview在wrap_content情况下准确的宽高
        mLayout.setMeasuredDimensionFromChildren(widthSpec, heightSpec);

        // if RecyclerView has non-exact width and height and if there is at least one child
        // which also has non-exact width & height, we have to re-measure.
        if (mLayout.shouldMeasureTwice()) {
            mLayout.setMeasureSpecs(
                    MeasureSpec.makeMeasureSpec(getMeasuredWidth(), MeasureSpec.EXACTLY),
                    MeasureSpec.makeMeasureSpec(getMeasuredHeight(), MeasureSpec.EXACTLY));
            mState.mIsMeasuring = true;
            dispatchLayoutStep2();
            // now we can get the width and height from the children.
            mLayout.setMeasuredDimensionFromChildren(widthSpec, heightSpec);
        }
    } else {
        //...
    }
}
RecycleView测量的时候首先会去判断是自动测量还是用户重写OnMeasure,默认是开启自动测量,mAutoMeasure变量由布局管理器维护,默认为true
//LinearLayoutManager 中直接返回true
@Override
public boolean isAutoMeasureEnabled() {
    return true;
}
//StaggeredGridLayoutManager  中默认为true
@Override
public boolean isAutoMeasureEnabled() {
    return mGapStrategy != GAP_HANDLING_NONE;
}

private int mGapStrategy = GAP_HANDLING_MOVE_ITEMS_BETWEEN_SPANS;
Recycleview是支持wrap_content属性,在EXACTLY模式下(在布局中对Recicleview的宽和高都设置match_parents)通过调用布局管理器的onMearsure方法获取,最终会调用chooseSize分别计算宽和高,在EXACTLY模式下,RecycleView的宽高即为父控件剩余的空间,在AT_MOST模式下,宽和高的最大值为父控件的剩余空间,参数desired和参数min分别为当前RecycleView的padding信息和设置的minWidth或者minHeight,如果没有设置为0:
public static int chooseSize(int spec, int desired, int min) {
    final int mode = View.MeasureSpec.getMode(spec);
    final int size = View.MeasureSpec.getSize(spec);
    switch (mode) {
        case View.MeasureSpec.EXACTLY:
            return size;
        case View.MeasureSpec.AT_MOST:
            return Math.min(size, Math.max(desired, min));
        case View.MeasureSpec.UNSPECIFIED:
        default:
            return Math.max(desired, min);
    }
}
显然,如果我们在布局中设置宽或者高为wrap_content在这次测量中不能获取准确的参数值。因此在非精确模式下,在onMeasure会对RecycleView的子view也进行测量,其中dispatchLayoutStep1() 和dispatchLayoutStep2()做的工作就是对view的状态进行记录以及布局,这两个步骤只不过将子view的布局测量和布局提前到关于onMeasure,这两个方法我们暂时略过,到onLayout阶段再分析。进行完以上两个步骤后,就可以在onMeasure中对子view测量:
void setMeasuredDimensionFromChildren(int widthSpec, int heightSpec) {
    final int count = getChildCount();
    if (count == 0) {
        mRecyclerView.defaultOnMeasure(widthSpec, heightSpec);
        return;
    }
    int minX = Integer.MAX_VALUE;
    int minY = Integer.MAX_VALUE;
    int maxX = Integer.MIN_VALUE;
    int maxY = Integer.MIN_VALUE;

    for (int i = 0; i < count; i++) {
        View child = getChildAt(i);
        final Rect bounds = mRecyclerView.mTempRect;
        //这边通过拿到child的LayoutParam去得到当前view的left、top、bottom、right
        getDecoratedBoundsWithMargins(child, bounds);
        if (bounds.left < minX) {
            minX = bounds.left;
        }
        if (bounds.right > maxX) {
            maxX = bounds.right;
        }
        if (bounds.top < minY) {
            minY = bounds.top;
        }
        if (bounds.bottom > maxY) {
            maxY = bounds.bottom;
        }
    }
    mRecyclerView.mTempRect.set(minX, minY, maxX, maxY);
    //在这个方法内部还是对得到的minXY、maxXY进行加减运算
    setMeasuredDimension(mRecyclerView.mTempRect, widthSpec, heightSpec);
}
这个方法中做的工作:遍历RecycleView中的所有子View,获取每个子View的left、top、right、bottom信息,分别记录最上方view的top、最下方view的bottom、最左边view的left、最右边view的right信息,结合padding信息就可以获取RecycleView的宽高信息。
到此测量结束,layout流程的入口函数为onLayout(),在这个方法中主要调用了dispatchLayout()方法,直接进入这个方法:
void dispatchLayout() {
    //在设置完adapter后会调用requestLayout方法重新走绘制流程
    if (mAdapter == null) {
        Log.e(TAG, "No adapter attached; skipping layout");
        // leave the state in START
        return;
    }
    //同上
    if (mLayout == null) {
        Log.e(TAG, "No layout manager attached; skipping layout");
        // leave the state in START
        return;
    }
    //如果在onMearsure中已经进行过前面两步且状态没有变化,在onlayout阶段会直接跳过进入dispatchLayoutStep3()
    mState.mIsMeasuring = false;
    if (mState.mLayoutStep == State.STEP_START) {
        dispatchLayoutStep1();
        mLayout.setExactMeasureSpecsFrom(this);
        dispatchLayoutStep2();
    } else if (mAdapterHelper.hasUpdates() || mLayout.getWidth() != getWidth()
            || mLayout.getHeight() != getHeight()) {
        // First 2 steps are done in onMeasure but looks like we have to run again due to
        // changed size.
        mLayout.setExactMeasureSpecsFrom(this);
        dispatchLayoutStep2();
    } else {
        // always make sure we sync them (to ensure mode is exact)
        mLayout.setExactMeasureSpecsFrom(this);
    }
    dispatchLayoutStep3();
}
layout流程主要分为三个步骤,对应RecycleView状态记录变量RecycleView.State中的三种状态:STEP_START、STEP_LAYOUT、STEP_ANIAMTORS,三个步骤负责不同是工作。
STEP_START:负责child view的状态记录(用于第三部的设置view的动画),对应方法dispatchLayoutStep1()
STEP_LAYOUT:负责child view的创建绑定数据以及测量布局,对应方法dispatchLayoutStep2()
STEP_ANIAMTORS:负责child view的动画控制,对应dispatchLayoutStep3()
接下来分别进入每个步骤看看:
dispatchLayoutStep1
private void dispatchLayoutStep1() {
    mState.assertLayoutStep(State.STEP_START);
    ....
    //这个方法会reset flag比如 pre-layout
    //在非首次layout且数据源变动的情况下,
    //内部会更新viewholder的position(mPosition以及mOldPosition)
    //假如原来屏幕中显示的item数据源pos是5、6、7,如果用户在item5 后面加了一个item,
    //经过这一步原来的viewholder里面维护的mPosition分别为 5 7 8, mOldPosition不变
    processAdapterUpdatesAndSetAnimationFlags();
    ...
    //在pre-layout情况下mState.mRunSimpleAnimations、mState.mRunPredictiveAnimations 为true
    // First layout是不会走这两个分支
    if (mState.mRunSimpleAnimations) {
        // Step 0: Find out where all non-removed items are, pre-layout
        int count = mChildHelper.getChildCount();
        for (int i = 0; i < count; ++i) {
            final ViewHolder holder = getChildViewHolderInt(mChildHelper.getChildAt(i));
            if (holder.shouldIgnore() || (holder.isInvalid() && !mAdapter.hasStableIds())) {
                continue;
            }
            //主要工作是将当前的view信息封装成一个ItemHolderInfo对象,
            //用于dispatchLayoutStep3信息对于然后做对应的动画
            final ItemHolderInfo animationInfo = mItemAnimator
                    .recordPreLayoutInformation(mState, holder,
                            ItemAnimator.buildAdapterChangeFlagsForAnimations(holder),
                            holder.getUnmodifiedPayloads());
            mViewInfoStore.addToPreLayout(holder, animationInfo);
            if (mState.mTrackOldChangeHolders && holder.isUpdated() && !holder.isRemoved()
                    && !holder.shouldIgnore() && !holder.isInvalid()) {
                long key = getChangedHolderKey(holder);
                mViewInfoStore.addToOldChangeHolders(key, holder);
            }
        }
    }
    //同上
    if (mState.mRunPredictiveAnimations) {
        saveOldPositions();
        final boolean didStructureChange = mState.mStructureChanged;
        mState.mStructureChanged = false;
        // temporarily disable flag because we are asking for previous layout
        //以linearlayoutManager这一步会mOldPosition去重新布局一遍view
        mLayout.onLayoutChildren(mRecycler, mState);
        mState.mStructureChanged = didStructureChange;

        for (int i = 0; i < mChildHelper.getChildCount(); ++i) {
            final View child = mChildHelper.getChildAt(i);
            final ViewHolder viewHolder = getChildViewHolderInt(child);
            if (viewHolder.shouldIgnore()) {
                continue;
            }
            if (!mViewInfoStore.isInPreLayout(viewHolder)) {
                int flags = ItemAnimator.buildAdapterChangeFlagsForAnimations(viewHolder);
                boolean wasHidden = viewHolder
                        .hasAnyOfTheFlags(ViewHolder.FLAG_BOUNCED_FROM_HIDDEN_LIST);
                if (!wasHidden) {
                    flags |= ItemAnimator.FLAG_APPEARED_IN_PRE_LAYOUT;
                }
                final ItemHolderInfo animationInfo = mItemAnimator.recordPreLayoutInformation(
                        mState, viewHolder, flags, viewHolder.getUnmodifiedPayloads());
                if (wasHidden) {
                    recordAnimationInfoIfBouncedHiddenView(viewHolder, animationInfo);
                } else {
                    mViewInfoStore.addToAppearedInPreLayoutHolders(viewHolder, animationInfo);
                }
            }
        }
        // we don't process disappearing list because they may re-appear in post layout pass.
        //清除前面processAdapterUpdatesAndSetAnimationFlags设置的mOldPosition和mPrelayoutPosition
        clearOldPositions();
    } else {
        clearOldPositions();
    }
    onExitLayoutOrScroll();
    stopInterceptRequestLayout(false);
    mState.mLayoutStep = State.STEP_LAYOUT;
}
正如源码中注释,layout第一步主要工作是:1)处理adapter的更新;2)如果需要记录view的状态;3)在数据源发生变化的情况下需要predictive-layout.
用ItemHolderInfo 对应每个view的信息,主要是位置状态,然后将ItemHolderInfo存入到mViewInfoStore 中,需要注意一点是此时调用的是mViewInfoStore 的addToPreLayout方法。 ItemHolderInfo 结构如下:
public static class ItemHolderInfo {
        public int left;
        public int top;
        public int right;
        public int bottom;
        @AdapterChanges
        public int changeFlags;
        ...
    }
}
如果需要Predictive-layout(由mState.mRunPredictiveAnimations决定,请参考 https://blog.csdn.net/qq_36523667/article/details/78750805), 会在step1中调用layoutManager的onLayoutChidren提前布局,以LinearLayoutManager的加入一个item 为例,屏幕中中显示4个view, 对应viewHolder为
viewHolder1(mPosition = 0, mOldPosition = NO_POSITION, mPrelayoutPosition = NO_POSITION)
viewHolder2(mPosition = 1, mOldPosition = NO_POSITION, mPrelayoutPosition = NO_POSITION)
viewHolder3(mPosition = 2, mOldPosition = NO_POSITION, mPrelayoutPosition = NO_POSITION)
viewHolder4(mPosition = 3, mOldPosition = NO_POSITION, mPrelayoutPosition = NO_POSITION)
如果在position=1的位置加入第五个item,因为数据源发生变化,dispatchLayoutStep1方法中在首先改变viewHolder的pos,位置标记通过三个变量:mPosition、mOldPosition、mPrelayoutPosition。经过processAdapterUpdatesAndSetAnimationFlags方法后
viewHolder1(mPosition = 0, mOldPosition = 0, mPrelayoutPosition = 0)
viewHolder2(mPosition = 2, mOldPosition = 1, mPrelayoutPosition = 1)
viewHolder3(mPosition = 3, mOldPosition = 2, mPrelayoutPosition = 2)
viewHolder4(mPosition = 4, mOldPosition = 3, mPrelayoutPosition = 3)
在onLayoutChidren中会根据viewHolder的mPrelayoutPosition来决定布局哪个view,通过以下方法可以知道在dispatchLayoutStep1中onLayoutChidren会根据原来的左边去布局view,在dispatchLayoutStep1最后会调用clearOldPositions清除mOldPosition以及mPrelayoutPosition位置信息(这里我们知道是这么回事就好,在dispatchLayoutStep2中会分析流程)
public final int getLayoutPosition() {
    return mPreLayoutPosition == NO_POSITION ? mPosition : mPreLayoutPosition;
}
新加入的view会在dispatchLayoutStep2进行布局,onLayoutChidren也会在dispatchLayoutStep2中进行分析,那接下来我们去看看dispatchLayoutStep2。
dispatchLayoutStep2
private void dispatchLayoutStep2() {
    ...
    mState.assertLayoutStep(State.STEP_LAYOUT | State.STEP_ANIMATIONS);
    mAdapterHelper.consumeUpdatesInOnePass();
    mState.mItemCount = mAdapter.getItemCount();
    mState.mDeletedInvisibleItemCountSincePreviousLayout = 0;

    // Step 2: Run layout
    mState.mInPreLayout = false;
    mLayout.onLayoutChildren(mRecycler, mState);
    ...
    mState.mLayoutStep = State.STEP_ANIMATIONS;
    onExitLayoutOrScroll();
    stopInterceptRequestLayout(false);
}
layout第二步的核心是调用布局管理器layoutManager的onLayoutChildren去真正的布局views, 布局view的工作主要在交给布局管理器完成,因为每个布局管理器实现逻辑不一样,这边还是以LinearLayoutManager为例,
public void onLayoutChildren(RecyclerView.Recycler recycler, RecyclerView.State state) {
    ...
    if (!mAnchorInfo.mValid || mPendingScrollPosition != RecyclerView.NO_POSITION
            || mPendingSavedState != null) {
        ...
        updateAnchorInfoForLayout(recycler, state, mAnchorInfo);
        mAnchorInfo.mValid = true;
    }
    ...
    int startOffset;
    int endOffset;
    final int firstLayoutDirection;
    if (mAnchorInfo.mLayoutFromEnd) {
        firstLayoutDirection = mShouldReverseLayout ? LayoutState.ITEM_DIRECTION_TAIL
                : LayoutState.ITEM_DIRECTION_HEAD;
    } else {
        firstLayoutDirection = mShouldReverseLayout ? LayoutState.ITEM_DIRECTION_HEAD
                : LayoutState.ITEM_DIRECTION_TAIL;
    }

    onAnchorReady(recycler, state, mAnchorInfo, firstLayoutDirection);
    detachAndScrapAttachedViews(recycler);
    mLayoutState.mInfinite = resolveIsInfinite();
    mLayoutState.mIsPreLayout = state.isPreLayout();
    if (mAnchorInfo.mLayoutFromEnd) {
        ...
    } else {
        // fill towards end
        ...
        fill(recycler, mLayoutState, state, false);
        ...
        fill(recycler, mLayoutState, state, false);
        startOffset = mLayoutState.mOffset;

        if (mLayoutState.mAvailable > 0) {
            extraForEnd = mLayoutState.mAvailable;
            // start could not consume all it should. add more items towards end
            updateLayoutStateToFillEnd(lastElement, endOffset);
            mLayoutState.mExtra = extraForEnd;
            fill(recycler, mLayoutState, state, false);
            endOffset = mLayoutState.mOffset;
        }
    }
    ...
    layoutForPredictiveAnimations(recycler, state, startOffset, endOffset);
    ...
}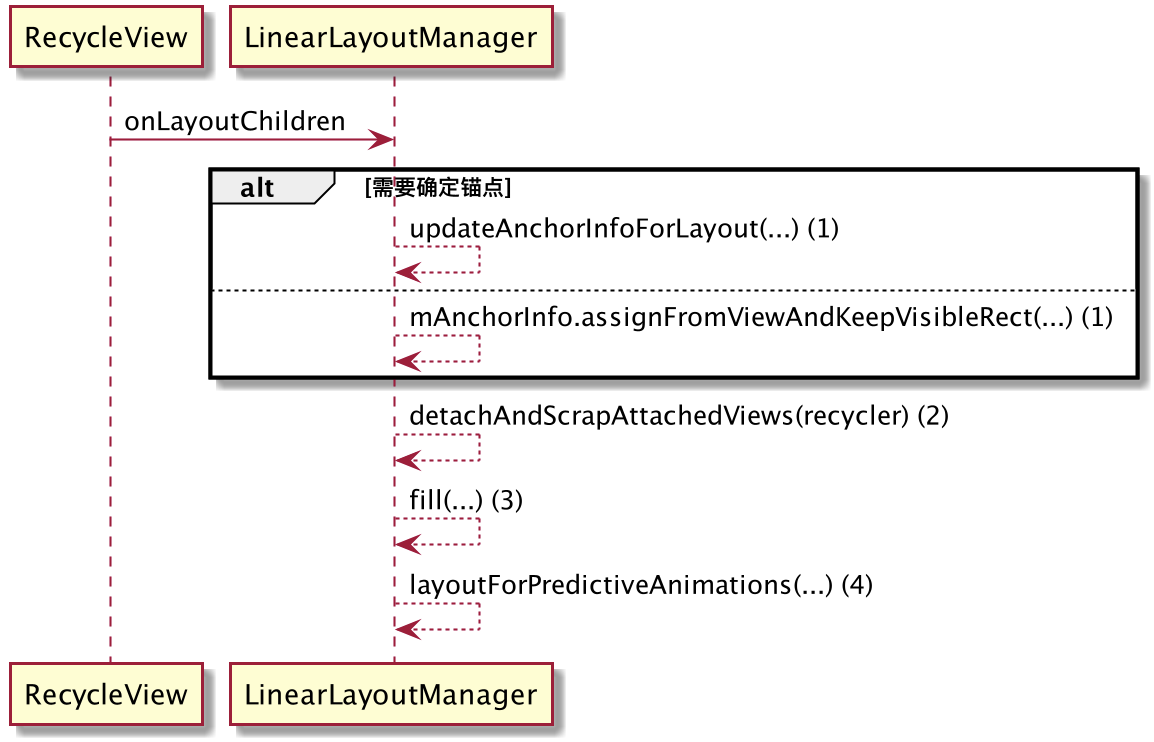
onLayoutChildren过程代码有点多,这里尽量catch主要的流程,省略部分细节,onLayoutChildren主要工作:
1)、寻找anchorInfo
2)、根据anchorInfo确定方向以anchorInfo为起点,填充view
onLayoutChildren流程图注释(1)为确定anchorInfo点,我们来看看updateAnchorInfoForLayout流程,如下:
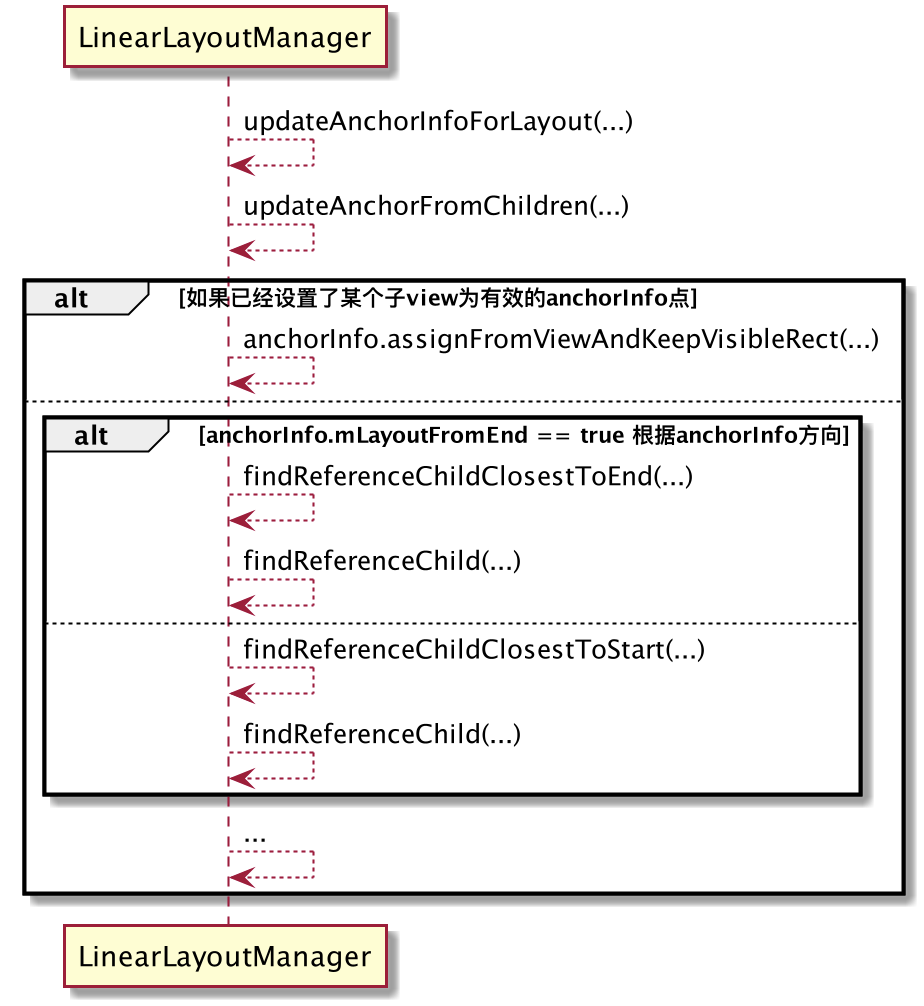
代码比较简单不展开讲,首先如果已经设置了某个子view为focus状态,则直接以子view作为anchorInfo点,如果没有则根据填充方向遍历所有的子view,确定这个方向上面第一个view作为anchorInfo点。
onLayoutChildren流程图注释(2)detachAndScrapAttachedViews(recycler),需要注意这个方法是因为在每次测量和布局views之前会先把之前attach过的view先暂时detach并且加入到mAttachScrap中,然后在fill时候会去读这个集合中的viewHolder,如果有直接复用不需要再重新create或者bind, 我们暂时需要知道这里有这么个处理过程,逻辑很简单我们结合fill流程看。
int fill(RecyclerView.Recycler recycler, LayoutState layoutState,
RecyclerView.State state, boolean stopOnFocusable) {
...
final int start = layoutState.mAvailable;
if (layoutState.mScrollingOffset != LayoutState.SCROLLING_OFFSET_NaN) {
if (layoutState.mAvailable < 0) {
layoutState.mScrollingOffset += layoutState.mAvailable;
}
//这个涉及view的回收,暂时打住等后面涉及RecycleView的4级回收再看下
recycleByLayoutState(recycler, layoutState);
}
...
//在对view测量以及layout时候会通过一个while循环判断是否已经达到了屏幕的最大宽度和最大高度
//layoutState.mAvailable为屏幕可用的空间
//layoutState.mExtra为当需要额外提前predictive-layout某个view在屏幕之外可以会设置这个值
int remainingSpace = layoutState.mAvailable + layoutState.mExtra;
LayoutChunkResult layoutChunkResult = mLayoutChunkResult;
while ((layoutState.mInfinite || remainingSpace > 0) && layoutState.hasMore(state)) {
...
layoutChunk(recycler, state, layoutState, layoutChunkResult);
...
}
...
return start - layoutState.mAvailable;
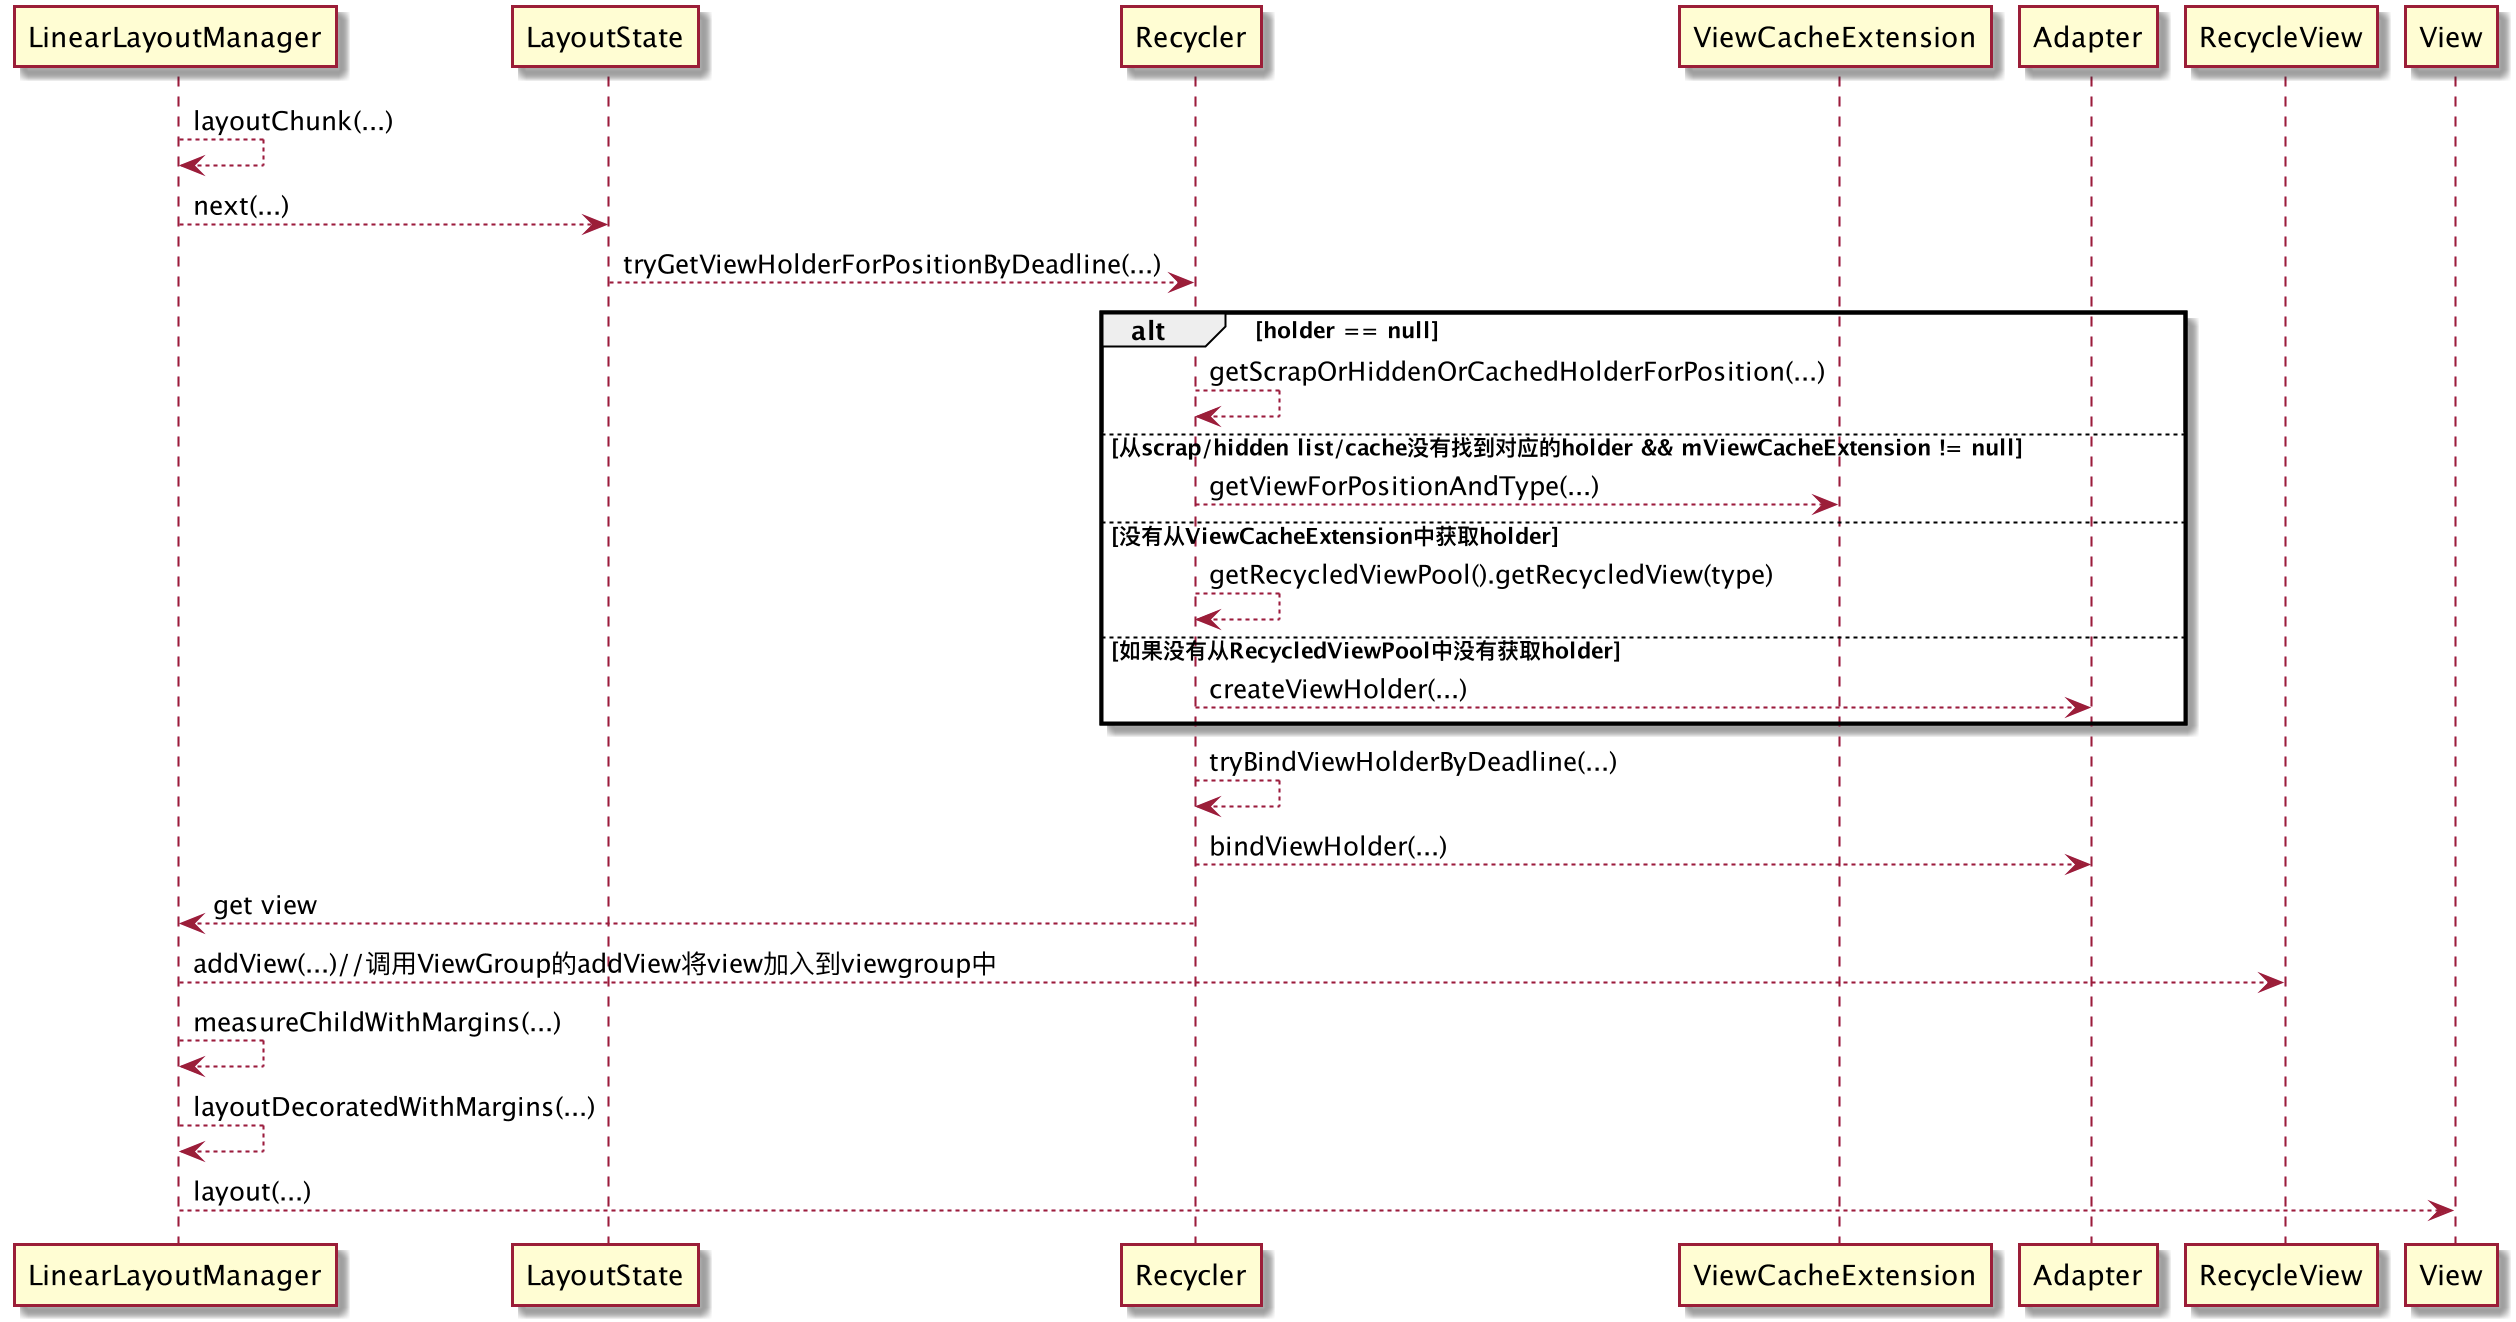
}fill方法的流程就是计算剩余的空间,如果还有空间就调用layoutChunk(...)创建或者回收view并对view测量以及布局,下图为fill方法的主要时序图。
void layoutChunk(RecyclerView.Recycler recycler, RecyclerView.State state,
        LayoutState layoutState, LayoutChunkResult result) {
    //创建和复用view的核心入口
    View view = layoutState.next(recycler);
    //...
    //创建完view之后会将view加入到ViewGroup中
    RecyclerView.LayoutParams params = (RecyclerView.LayoutParams) view.getLayoutParams();
    if (layoutState.mScrapList == null) {
        if (mShouldReverseLayout == (layoutState.mLayoutDirection
                == LayoutState.LAYOUT_START)) {
            addView(view);
        } else {
            addView(view, 0);
        }
    } else {
        if (mShouldReverseLayout == (layoutState.mLayoutDirection
                == LayoutState.LAYOUT_START)) {
            addDisappearingView(view);
        } else {
            addDisappearingView(view, 0);
        }
    }
    //对每个子view测量,确定子view的top/bottom/left/right,同时根据子view的宽高确定剩余的空间
    measureChildWithMargins(view, 0, 0);
    result.mConsumed = mOrientationHelper.getDecoratedMeasurement(view);
    int left, top, right, bottom;
    //...
    //最终会调用子view的layout
    layoutDecoratedWithMargins(view, left, top, right, bottom);
    //...
}
layoutChunk方法主要做了三件事情:
1)调用Recycler创建或者复用一个view
2)对子view测量,确定子view在父view中的位置以及布局子view
首先,会调用layoutState的next方法去获取一个view
View next(RecyclerView.Recycler recycler) {
    if (mScrapList != null) {
        return nextViewFromScrapList();
    }
    final View view = recycler.getViewForPosition(mCurrentPosition);
    mCurrentPosition += mItemDirection;
    return view;
}
获取view的逻辑主要交给Recycler负责,最终会调用Recycler的如下方法:
ViewHolder tryGetViewHolderForPositionByDeadline(int position,
        boolean dryRun, long deadlineNs) {
    //...
    if (mState.isPreLayout()) {
        holder = getChangedScrapViewForPosition(position);
        fromScrapOrHiddenOrCache = holder != null;
    }
    if (holder == null) {
        //0)尝试会从mAttatchScrap中获取viewHolder,如果没有从mCacheView中获取
        holder = getScrapOrHiddenOrCachedHolderForPosition(position, dryRun);
        //...
    }
    if (holder == null) {
        //...
        //1)尝试根据stable ids从mAttachView中获取,如果没有从mCacheView中获取
        if (mAdapter.hasStableIds()) {
            holder = getScrapOrCachedViewForId(mAdapter.getItemId(offsetPosition),
                    type, dryRun);
            //...
        }
        //2)如果设置了外部扩展cache,会尝试从mViewCacheExtension中获取
        if (holder == null && mViewCacheExtension != null) {
            final View view = mViewCacheExtension
                    .getViewForPositionAndType(this, position, type);
            //...
        }
        if (holder == null) { // fallback to pool
            //...
            //3)尝试从缓存池RecycledViewPool中获取viewHolder
            holder = getRecycledViewPool().getRecycledView(type);
            //...
        }
        if (holder == null) {
            //...
            //4)如果都没有会回调到adapter中创建一个viewholder
            holder = mAdapter.createViewHolder(RecyclerView.this, type);
            //...
        }
    }
    //...
    if (mState.isPreLayout() && holder.isBound()) {
        holder.mPreLayoutPosition = position;
    } else if (!holder.isBound() || holder.needsUpdate() || holder.isInvalid()) {
        //...
        //5)如果需要绑定数据,会调用Adapter#onBindViewHolder来绑定数据
        bound = tryBindViewHolderByDeadline(holder, offsetPosition, position, deadlineNs);
    }

    //...
    return holder;
}
代码有点多,同样省略了很多细节,主要做的工作会根据mCurrentPosition尝试去mAttachScrap、mCacheView、mCacheViewExtension以及缓存池RecycleViewPool中获取viewHolder,如果没有会回调adapter的createViewHolder方法创建viewHolder以及通过回调adapter的onBindViewHolder绑定数据,上文我们已经提到mAttachScrap数据刷新时机,至于其他几个缓存什么时候会被更新我们放在后面分析。至此,获取viewHolder的流程结束。
我们再回到layoutChunk方法,在根据mCurrentPosition获取到对应的Position后通过addView,最终会将子view添加到RecycleView中:
if (mShouldReverseLayout == (layoutState.mLayoutDirection
        == LayoutState.LAYOUT_START)) {
    addView(view);
} else {
    addView(view, 0);
}
子view的测量以及布局分别在layoutChunk如下方法中进行,比较简单,这里就不贴代码
measureChildWithMargins(...)
layoutDecoratedWithMargins(...)
至此,fill流程也结束,我们也已经fill流程就是不断的计算屏幕剩余空间,如果还有空间就调用layoutChunk方法去填充view。我们再回到上面onLayoutChildren中的第四个步骤layoutForPredictiveAnimations,还是以前文中屏幕内有4个view在第一个后面加入一个view为例,在经过dispatchLayoutStep1后4个viewHolder对应:
viewHolder1(mPosition = 0, mOldPosition = NO_POSITION, mPrelayoutPosition = NO_POSITION)
viewHolder2(mPosition = 2, mOldPosition = NO_POSITION, mPrelayoutPosition = NO_POSITION)
viewHolder3(mPosition = 3, mOldPosition = NO_POSITION, mPrelayoutPosition = NO_POSITION)
viewHolder4(mPosition = 4, mOldPosition = NO_POSITION, mPrelayoutPosition = NO_POSITION)
在经过dispatchLayoutStep2中onlayoutChildren方法根据mCurrentPosition(0、1、2、3)的执行fill方法后,real-layout了三个原来的viewholder,因为mCurrentPosition = 1在缓存中没有命中对应的viewHolder,因此会走adapter的createViewHolder流程重新创建新加入的view,因此在经过fill流程后layout了四个view,分别为:
viewHolder1(mPosition = 0, mOldPosition = NO_POSITION, mPrelayoutPosition = NO_POSITION)
viewHolder2(mPosition = 1, mOldPosition = NO_POSITION, mPrelayoutPosition = NO_POSITION)
viewHolder3(mPosition = 2, mOldPosition = NO_POSITION, mPrelayoutPosition = NO_POSITION)
viewHolder4(mPosition = 3, mOldPosition = NO_POSITION, mPrelayoutPosition = NO_POSITION)
这时候还有mPosition = 4的viewHolder还在mAttachScrap中,因此layoutForPredictiveAnimations做的工作就是布局这个viewholder
private void layoutForPredictiveAnimations(RecyclerView.Recycler recycler,
        RecyclerView.State state, int startOffset,
        int endOffset) {
    //...
    int scrapExtraStart = 0, scrapExtraEnd = 0;
    //其实就是去mAttachScrap中获取viewholder
    //然后确定anchorInfo点
    final List<RecyclerView.ViewHolder> scrapList = recycler.getScrapList();
    final int scrapSize = scrapList.size();
    final int firstChildPos = getPosition(getChildAt(0));
    for (int i = 0; i < scrapSize; i++) {
        RecyclerView.ViewHolder scrap = scrapList.get(i);
        if (scrap.isRemoved()) {
            continue;
        }
        final int position = scrap.getLayoutPosition();
        final int direction = position < firstChildPos != mShouldReverseLayout
                ? LayoutState.LAYOUT_START : LayoutState.LAYOUT_END;
        if (direction == LayoutState.LAYOUT_START) {
            scrapExtraStart += mOrientationHelper.getDecoratedMeasurement(scrap.itemView);
        } else {
            scrapExtraEnd += mOrientationHelper.getDecoratedMeasurement(scrap.itemView);
        }
    }

    //...
    mLayoutState.mScrapList = scrapList;
    if (scrapExtraStart > 0) {
        //确定anchorInfo点,以当前例子为例,anchorInfo点为mPosition=3对应的view
        View anchor = getChildClosestToStart();
        updateLayoutStateToFillStart(getPosition(anchor), startOffset);
        //设置扩展空间,因为fill中循环的前提条件是layoutState.mAvailable + layoutState.mExtra,
        //layoutState.mAvailable为屏幕的有效空间,前面已经被四个view占满,想要加载当前第五个view需要设置mExtra继续循环
        mLayoutState.mExtra = scrapExtraStart;
        mLayoutState.mAvailable = 0;
        //设置mCurrentPosition为当前viewHolder对应的layoutPosition,设置完fill时候会直接这个viewHolder而不会重新开始
        mLayoutState.assignPositionFromScrapList();
        fill(recycler, mLayoutState, state, false);
    }

    //...
    mLayoutState.mScrapList = null;
}
layoutForPredictiveAnimations主要工作就是找到scrap中还没有被布局的view,如果还存在没有被布局的view,会重新调用fill方法确定该view在屏幕中的位置,这一步可以确保后面动画的顺利进行,上面的例子最后5个view经过dispatchLayoutStep2布局后如下图:

至此,dispatchLayoutStep2全部结束,下面我们来看看dispatchLayoutStep3.
dispatchLayoutStep3
private void dispatchLayoutStep3() {
    //...
    //在First-layout是不走进这个分支,同dispatchLayoutStep1分析
    //在这个分支内部会遍历layout屏幕中的view,同样记录变化话的位置信息到ItemHolderInfo中
    if (mState.mRunSimpleAnimations) {
        for (int i = mChildHelper.getChildCount() - 1; i >= 0; i--) {
            ViewHolder holder = getChildViewHolderInt(mChildHelper.getChildAt(i));
            if (holder.shouldIgnore()) {
                continue;
            }
            long key = getChangedHolderKey(holder);
            final ItemHolderInfo animationInfo = mItemAnimator
                    .recordPostLayoutInformation(mState, holder);
            ViewHolder oldChangeViewHolder = mViewInfoStore.getFromOldChangeHolders(key);
            if (oldChangeViewHolder != null && !oldChangeViewHolder.shouldIgnore()) {
                //...
            } else {
                //注意这里是addToPostLayout, 前面是addToPreLayout
                mViewInfoStore.addToPostLayout(holder, animationInfo);
            }
        }

        mViewInfoStore.process(mViewInfoProcessCallback);
    }

    //...
}
这一步和dispatchLayoutStep1第一步做的事情很类似,如果判断需要动画遍历屏幕内的所有view,记录layout变化后的view信息到mViewInfoStore 中,然后调用mViewInfoStore.process比较前后,我们直接看mViewInfoProcessCallback
private final ViewInfoStore.ProcessCallback mViewInfoProcessCallback =
        new ViewInfoStore.ProcessCallback() {
            @Override
            public void processDisappeared(ViewHolder viewHolder, @NonNull ItemHolderInfo info,
                    @Nullable ItemHolderInfo postInfo) {
                mRecycler.unscrapView(viewHolder);
                animateDisappearance(viewHolder, info, postInfo);
            }
            //...
        };
以processDisappeared方法为例子
void animateDisappearance(@NonNull ViewHolder holder,
        @NonNull ItemHolderInfo preLayoutInfo, @Nullable ItemHolderInfo postLayoutInfo) {
    addAnimatingView(holder);
    holder.setIsRecyclable(false);
    if (mItemAnimator.animateDisappearance(holder, preLayoutInfo, postLayoutInfo)) {
        postAnimationRunner();
    }
}
animateDisappearance方法的三个参数itemHolder为holder身,preLayoutInfo为在dispatchLayoutStep1中记录的view信息,postLayoutInfo为位置变化后的位置信息,在animateDisappearance方法中需要根据后面两个参数的位置信息决定做哪个动画,还是以LinearLayoutManager为例如下:
@Override
public boolean animateDisappearance(@NonNull RecyclerView.ViewHolder viewHolder,
        @NonNull ItemHolderInfo preLayoutInfo, @Nullable ItemHolderInfo postLayoutInfo) {
    int oldLeft = preLayoutInfo.left;
    int oldTop = preLayoutInfo.top;
    View disappearingItemView = viewHolder.itemView;
    int newLeft = postLayoutInfo == null ? disappearingItemView.getLeft() : postLayoutInfo.left;
    int newTop = postLayoutInfo == null ? disappearingItemView.getTop() : postLayoutInfo.top;
    if (!viewHolder.isRemoved() && (oldLeft != newLeft || oldTop != newTop)) {
        disappearingItemView.layout(newLeft, newTop,
                newLeft + disappearingItemView.getWidth(),
                newTop + disappearingItemView.getHeight());
        return animateMove(viewHolder, oldLeft, oldTop, newLeft, newTop);
    } else {
        return animateRemove(viewHolder);
    }
}
真正的动画实现在DefaultItemAnimator,以animateMove为例:
public boolean animateMove(final RecyclerView.ViewHolder holder, int fromX, int fromY,
        int toX, int toY) {
    final View view = holder.itemView;
    fromX += (int) holder.itemView.getTranslationX();
    fromY += (int) holder.itemView.getTranslationY();
    resetAnimation(holder);
    int deltaX = toX - fromX;
    int deltaY = toY - fromY;
    if (deltaX == 0 && deltaY == 0) {
        dispatchMoveFinished(holder);
        return false;
    }
    if (deltaX != 0) {
        view.setTranslationX(-deltaX);
    }
    if (deltaY != 0) {
        view.setTranslationY(-deltaY);
    }
    mPendingMoves.add(new MoveInfo(holder, fromX, fromY, toX, toY));
    return true;
}
上面这段代码主要做三件事情:1)重置holder动画,2)设置属性动画参数,3)构造一个特定对象加入到一个ArrayList列表中。设置完最后会执行postAnimationRunner(),最后同样实现在DefaultItemAnimato中
@Override
public void runPendingAnimations() {
    boolean removalsPending = !mPendingRemovals.isEmpty();
    boolean movesPending = !mPendingMoves.isEmpty();
    boolean changesPending = !mPendingChanges.isEmpty();
    boolean additionsPending = !mPendingAdditions.isEmpty();
    //...
    // First, remove stuff
    for (RecyclerView.ViewHolder holder : mPendingRemovals) {
        animateRemoveImpl(holder);
    }
    mPendingRemovals.clear();
    // Next, move stuff
    if (movesPending) {
        final ArrayList<MoveInfo> moves = new ArrayList<>();
        moves.addAll(mPendingMoves);
        mMovesList.add(moves);
        mPendingMoves.clear();
        Runnable mover = new Runnable() {
            @Override
            public void run() {
                for (MoveInfo moveInfo : moves) {
                    animateMoveImpl(moveInfo.holder, moveInfo.fromX, moveInfo.fromY,
                            moveInfo.toX, moveInfo.toY);
                }
                moves.clear();
                mMovesList.remove(moves);
            }
    };
    if (removalsPending) {
        View view = moves.get(0).holder.itemView;
        ViewCompat.postOnAnimationDelayed(view, mover, getRemoveDuration());
    } else {
        mover.run();
    }
        }
    // Next, change stuff, to run in parallel with move animations
    if (changesPending) {
        final ArrayList<ChangeInfo> changes = new ArrayList<>();
        changes.addAll(mPendingChanges);
        mChangesList.add(changes);
        //...
    }
    // Next, add stuff
    if (additionsPending) {
        final ArrayList<RecyclerView.ViewHolder> additions = new ArrayList<>();
        additions.addAll(mPendingAdditions);
        mAdditionsList.add(additions);
        //...
    }
}
runPendingAnimations方法并不难,按照移除,移动,改变,添加,依次处理之前的待处理列表中的内容。这里还是以移动view为例子来分析,最终会调用for循环调用animateMoveImpl
void animateMoveImpl(final RecyclerView.ViewHolder holder, int fromX, int fromY, int toX, int toY) {
    final View view = holder.itemView;
    final int deltaX = toX - fromX;
    final int deltaY = toY - fromY;
    if (deltaX != 0) {
        view.animate().translationX(0);
    }
    if (deltaY != 0) {
        view.animate().translationY(0);
    }
    final ViewPropertyAnimator animation = view.animate();
    mMoveAnimations.add(holder);
    animation.setDuration(getMoveDuration()).setListener(new AnimatorListenerAdapter() {
        @Override
        public void onAnimationStart(Animator animator) {
            dispatchMoveStarting(holder);
        }

        @Override
        public void onAnimationCancel(Animator animator) {
            if (deltaX != 0) {
                view.setTranslationX(0);
            }
            if (deltaY != 0) {
                view.setTranslationY(0);
            }
        }

        @Override
        public void onAnimationEnd(Animator animator) {
            animation.setListener(null);
            dispatchMoveFinished(holder);
            mMoveAnimations.remove(holder);
            dispatchFinishedWhenDone();
        }
    }).start();
}
最终根据原来设置的属性做属性动画。至此,dispatchLayoutStep3流程结束。
- 分享
- 举报
 微信扫码分享
 QQ好友
QQ好友
 暂无数据
暂无数据-
浏览量:4772次2020-08-06 20:14:59
-
浏览量:3372次2024-05-24 18:51:13
-
浏览量:2638次2024-01-24 17:37:01
-
浏览量:1092次2023-07-05 10:11:41
-
浏览量:1270次2023-07-26 09:17:52
-
浏览量:2103次2020-08-14 18:34:40
-
2020-08-03 13:37:42
-
浏览量:2333次2022-01-07 09:00:21
-
浏览量:6499次2021-01-29 17:06:57
-
浏览量:2048次2019-12-16 15:07:45
-
浏览量:1558次2023-12-18 18:23:15
-
浏览量:4743次2020-08-14 11:35:53
-
浏览量:2188次2019-12-12 09:19:09
-
浏览量:8385次2021-12-11 15:15:40
-
浏览量:3005次2023-08-07 12:05:31
-
浏览量:2534次2024-01-15 15:09:32
-
浏览量:1396次2023-08-23 18:47:54
-
浏览量:2277次2024-02-22 15:39:36
-
浏览量:1326次2023-12-18 18:38:45
-
广告/SPAM
-
恶意灌水
-
违规内容
-
文不对题
-
重复发帖
Bilbo

 微信支付
微信支付
举报类型
- 内容涉黄/赌/毒
- 内容侵权/抄袭
- 政治相关
- 涉嫌广告
- 侮辱谩骂
- 其他
详细说明
审核成功
审核失败


关注公众号
社区问题咨询:Ebaina-CN
定制需求咨询:xxqk158820
