

使用Stable Diffusion图像修复来生成自己的目标检测数据集

有些情况下,收集各种场景下的数据很困难,本文给出了一种方法。
深度学习模型需要大量的数据才能得到很好的结果,目标检测模型也是一样。
要训练一个YOLOv5的模型来自动检测你最喜欢的玩具,你需要拍几千张你的玩具在不同上下文中的照片,对于每张图,你需要标注玩具在图中的位置。
这样是非常耗时的。
本文提出了使用图像分割和stable diffusion来自动生成目标检测数据集的方法。
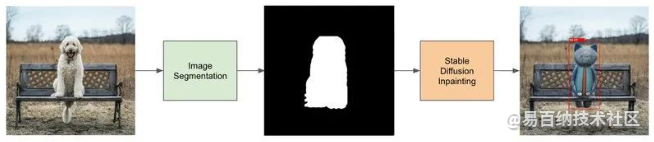
生成自定义数据集的pipeline
生成目标检测数据集的pipeline包含4个步骤:
- 找一个和你要识别的物体属于相同实例的数据集(比如狗数据集)。
- 使用图像分割生成狗的mask。
- 微调图像修复Stable Diffusion模型。
- 使用Stable Diffusion图像修复模型和生成的mask来生成数据。
图像分割:生成mask图像
Stable Diffusion图像修复pipeline需要输入一个提示,一张图像和一张mask图像,这个模型会只从mask图像中的白色像素部分上去生成新的图像。
PixelLib这个库帮助我们来做图像分割,只用几行代码就可以,在这个例子里,我们会使用PointRend模型来检测狗,下面是图像分割的代码。
import pixellib
from pixellib.torchbackend.instance import instanceSegmentation

ins = instanceSegmentation()
ins.load_model("pointrend_resnet50.pkl")
target_classes = ins.select_target_classes(dog=True)
results, output = ins.segmentImage(
  "dog.jpg",
  show_bboxes=True,
  segment_target_classes=target_classes,
  output_image_name="mask_image.jpg"
)
使用pixellib来做图像分割
segmentImage 函数返回一个tuple:
results: 是一个字典,包含了 'boxes', 'class_ids', 'class_names', 'object_counts', 'scores', 'masks', 'extracted_objects'这些字段。output: 原始的图像和mask图像进行了混合,如果show_bboxes设置为True,还会有包围框。
生成mask图像
我们生成的mask只包含白色和黑色的像素,我们的mask会比原来图中的狗略大一些,这样可以给Stable Diffusion足够的空间来进行修复。为了做到这种效果,我们将mask向左、右、上、下分别平移了10个像素。
from PIL import Image
import numpy as np

width, height = 512, 512
image=Image.open("dog.jpg")

# Store the mask of dogs found by the pointrend model
mask_image = np.zeros(image.size)
for idx, mask in enumerate(results["masks"].transpose()):
  if results["class_names"][idx] == "dog":
    mask_image += mask


# Create a mask image bigger than the original segmented image
mask_image += np.roll(mask_image, 10, axis=[0, 0]) # Translate the mask 10 pixels to the left
mask_image += np.roll(mask_image, -10, axis=[0, 0]) # Translate the mask 10 pixels to the right
mask_image += np.roll(mask_image, 10, axis=[1, 1]) # Translate the mask 10 pixels to the bottom
mask_image += np.roll(mask_image, -10, axis=[1, 1]) # Translate the mask 10 pixels to the top


# Set non black pixels to white pixels
mask_image = np.clip(mask_image, 0, 1).transpose() * 255
# Save the mask image
mask_image = Image.fromarray(np.uint8(mask_image)).resize((width, height))
mask_image.save("mask_image.jpg")
从pixellib的输出生成图像的mask
现在,我们有了狗图像的原始图和其对应的mask。
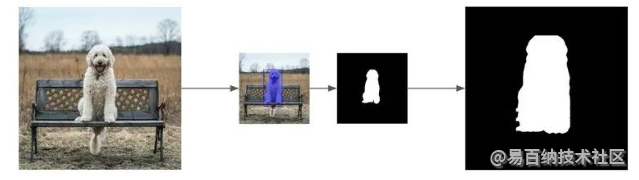
使用pixellib基于狗的图像生成mask
微调Stable Diffusion图像修复pipeline
Dreambooth是微调Stable Diffusion的一种技术,我们可以使用很少的几张照片将新的概念教给模型,我们准备使用这种技术来微调图像修复模型。train_dreambooth_inpaint.py这个脚本中展示了如何在你自己的数据集上微调Stable Diffusion模型。
微调需要的硬件资源
在单个24GB的GPU上可以使用gradient_checkpointing和mixed_precision来微调模型,如果要使用更大的batch_size 和更快的训练,需要使用至少30GB的GPU。
安装依赖
在运行脚本之前,确保安装了这些依赖:
pip install git+https://github.com/huggingface/diffusers.git
pip install -U -r requirements.txt
并初始化加速环境:
accelerate config你需要注册Hugging Face Hub的用户,你还需要token来使用这些代码,运行下面的命令来授权你的token:
huggingface-cli login微调样本
在运行这些计算量很大的训练的时候,超参数微调很关键,需要在你跑训练的机器上尝试不同的参数,我推荐的参数如下:
$ accelerate launch train_dreambooth_inpaint.py \
  --pretrained_model_name_or_path="runwayml/stable-diffusion-inpainting"  \
  --instance_data_dir="dog_images" \
  --output_dir="stable-diffusion-inpainting-toy-cat" \
  --instance_prompt="a photo of a toy cat" \
  --resolution=512 \
  --train_batch_size=1 \
  --learning_rate=5e-6 \
  --lr_scheduler="constant" \
  --lr_warmup_steps=0 \
  --max_train_steps=400 \
  --gradient_accumulation_steps=2 \
  --gradient_checkpointing \
  --train_text_encoder
运行Stable Diffusion图像修复pipeline
Stable Diffusion图像修复是一个text2image的扩散模型,使用一张带mask的图像和文本输入来生成真实的图像。使用https://github.com/huggingface/diffusers来实现这个功能。
from PIL import Image
from diffusers import StableDiffusionInpaintPipeline
# Image and Mask
image = Image.open("dog.jpg")
mask_image = Image.open("mask_image.jpg")
# Inpainting model
pipe = StableDiffusionInpaintPipeline.from_pretrained(
"stable-diffusion-inpainting-toy-cat",
torch_dtype=torch.float16,
)
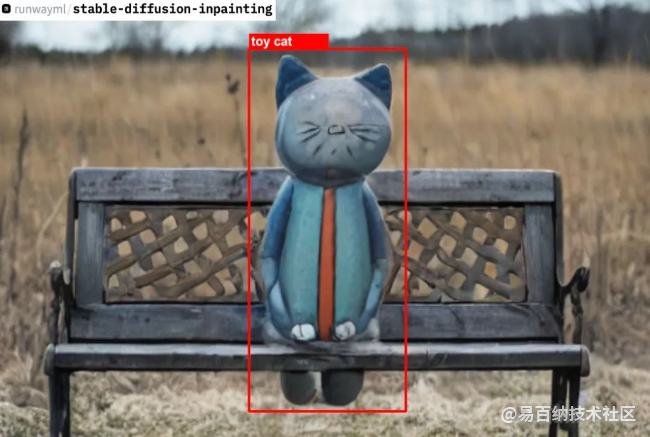
image = pipe(prompt="a toy cat", image=image, mask_image=mask_image).images[0]使用微调过的模型运行Stable Diffusion图像修复。
结论Conclusion
总结一下:
- 使用pixellib进行图像分割,得到图像的mask。
- 微调
runwayml/stable-diffusion-inpainting模型使得该模型能够学习到新的玩具猫类型。 - 在狗的图像上,使用微调过的模型和生成的mask运行
StableDiffusionInpaintPipeline。
最终的结果
所有步骤完成之后,我们生成了一个新的图像,玩具猫代替了原来的狗的位置,这样,2张图像可以使用相同的包围框。
我们现在可以为数据集中的所有的图像都生成新的图像。
局限性
Stable Diffusion并不能每次都生成好的结果,数据集生成之后,还需要进行清理的工作。
这个pipeline是非常耗费计算量的,Stable Diffusion的微调需要24GB内存的显卡,推理的时候也是需要GPU的。
这种构建数据集的方法当数据集中的图像很难获得的时候是很有用的,比如,你需要检测森林火焰,最好是使用这种方法,而不是去森林里放火。但是,对于普通的场景,数据标注还是最标准的做法。
- 分享
- 举报
 微信扫码分享
 QQ好友
QQ好友
 暂无数据
暂无数据-
浏览量:4317次2023-11-25 17:47:33
-
浏览量:5320次2021-03-01 14:31:59
-
浏览量:2768次2023-04-14 10:12:00
-
浏览量:4798次2024-02-20 13:54:36
-
浏览量:12012次2021-04-27 00:28:09
-
浏览量:6658次2023-05-25 16:32:18
-
浏览量:1535次2023-06-03 16:08:03
-
浏览量:6236次2021-02-18 16:03:22
-
浏览量:6456次2021-05-02 18:00:46
-
浏览量:8961次2024-02-05 10:11:42
-
浏览量:5389次2021-03-15 16:24:28
-
浏览量:2431次2018-07-09 10:24:44
-
浏览量:10715次2021-02-23 14:31:42
-
浏览量:1824次2023-06-02 17:42:09
-
浏览量:5829次2021-01-14 16:44:46
-
浏览量:13905次2021-05-12 12:35:30
-
浏览量:2248次2021-01-15 17:16:48
-
浏览量:1603次2023-12-20 17:38:18
-
浏览量:17739次2021-07-29 10:22:10


-
广告/SPAM
-
恶意灌水
-
违规内容
-
文不对题
-
重复发帖

一亿

 微信支付
微信支付
举报类型
- 内容涉黄/赌/毒
- 内容侵权/抄袭
- 政治相关
- 涉嫌广告
- 侮辱谩骂
- 其他
详细说明
审核成功
审核失败


关注公众号
社区问题咨询:Ebaina-CN
定制需求咨询:xxqk158820
