

Jetson Nano之ROS入门 -- YOLO目标检测与定位

前言
Darknet_ros是一个基于ROS(机器人操作系统)的开源深度学习框架,它使用YOLO算法进行目标检测和识别。YOLO算法是一种实时物体检测算法,它能够在单个前向传递中同时检测图像中的多个目标。
Darknet_ros将YOLO算法集成到ROS中,使得机器人可以实时地检测和识别周围环境中的物体。它提供了一些ROS节点和服务,可以在ROS系统中轻松使用YOLO算法进行目标检测和识别。同时,它还提供了一些示例程序,帮助用户快速了解如何在ROS中使用深度学习算法进行机器人视觉任务。
Darknet_ros的优点是速度快、准确度高,可以在实时应用中使用。它还可以在不同的机器人项目中使用,例如无人机、机器人车辆和机器人臂等。
一、yolo板端部署推理
首先确认CUDA,OpenCV,cuDNN已安装,可以用命令查看CUDA是否安装
ls -l /usr/local | grep cuda
查看opencv版本
opencv_version
接着从gitee上克隆darknet_ros源码下来
git clone https://gitee.com/bluesky_ryan/darknet_ros.git
按照如下指引下载权重文件,将下载的weights权重文件放在
darknet_ros/darknet_ros/yolo_network_config/weights
cd catkin_workspace/src/darknet_ros/darknet_ros/yolo_network_config/weights/

COCO data set (Yolo v2):
  wget http://pjreddie.com/media/files/yolov2.weights
  wget http://pjreddie.com/media/files/yolov2-tiny.weights

VOC data set (Yolo v2):
  wget http://pjreddie.com/media/files/yolov2-voc.weights
  wget http://pjreddie.com/media/files/yolov2-tiny-voc.weights

Yolo v3:
  wget http://pjreddie.com/media/files/yolov3.weights
  wget http://pjreddie.com/media/files/yolov3-voc.weights
使用jetson nano自带的opencv4.x编译会报错,需要安装opencv3.4.2版本,配置opencv cmake桥接目录
sudo vim /opt/ros/melodic/share/cv_bridge/cmake/cv_bridgeConfig.cmake

接着cd到工作空间下,编译darknet_ros功能包
catkin_make -DCATKIN_WHITELIST_PACKAGES="darknet_ros"
配置launch文件图像输入的topic,可以打开摄像头节点后用rostopic命令查看
rostopic list
我的RGB图像发布的话题是/camera/rgb/image_raw,接着配置yolo网络参数,我用的是yolov2-tiny权重文件,检查一下ros.yaml文件也要配置成/camera/rgb/image_raw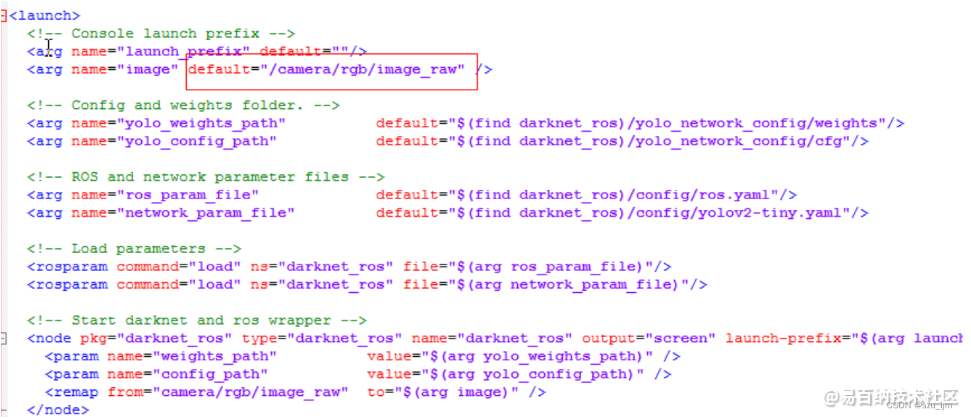
打开终端,source一下工作空间下ros的环境变量
source /catkin_ws/devel/setup.bash
首先启动相机节点,需要有/camera/rgb/image_raw的话题输出,再运行darknet_ros 节点
roslaunch darknet_ros darknet_ros.launch
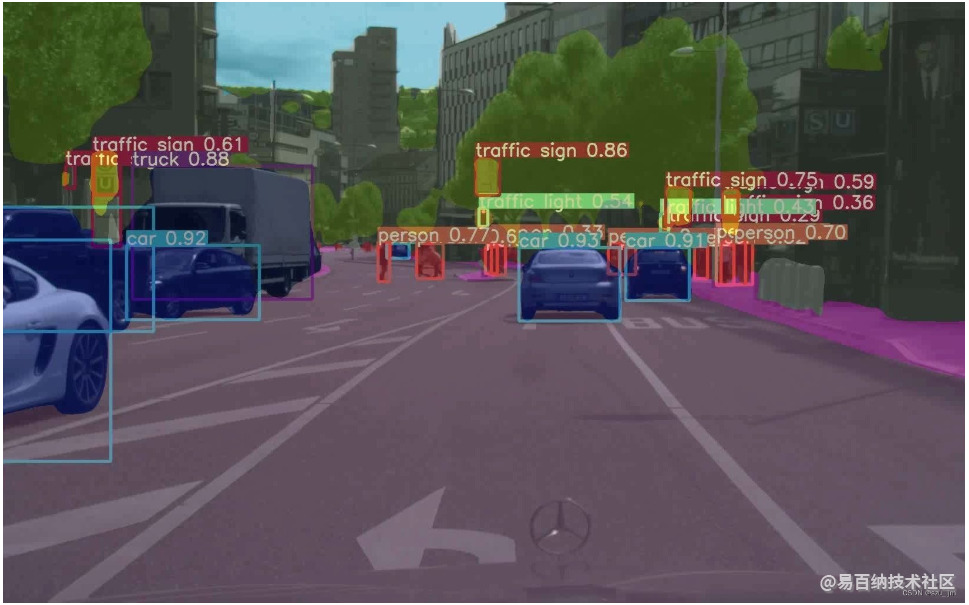
接着会弹出一个窗口,展示识别到的物体
二、目标深度测距
目标的深度测距的实现我们可以结合darknet_ros功能包,我这里用的是RGBD相机,型号是Astra_Pro,深度相机节点在启动后会输出深度图的话题
rostopic list

/camera/depth/image_rect_raw
查看一下darknet_ros功能包的msg消息文件,下面是BoundingBoxes.msg消息文件
Header header
Header image_header
BoundingBox[] bounding_boxes
下面是BoundingBox.msg消息文件
float64 probability
int64 xmin
int64 ymin
int64 xmax
int64 ymax
int16 id
string Class
用rostopic info命令可以看到/darknet_ros/bounding_boxes话题的具体内容
rostopic info /darknet_ros/bounding_boxes

Type: darknet_ros_msgs/BoundingBoxes

Publishers:
 * /darknet_ros (http://localhost:43545/)
这个话题就是我们需要的目标检测框的信息,将目标检测框输出到深度图我们就可以读取目标的深度
首先创建一个scripts文件夹,创建ObjectLocation.py文件
touch ObjectLocation.py
目标深度测距的代码思路首先导入rospy、cv2、numpy、darknet_ros_msgs等包,创建一个目标定位的类,实例化类的一些参数,订阅深度图话题并转化为深度矩阵,订阅目标检测框将坐标信息对齐到深度图中,按照3x3滑动窗口遍历检测框进行中值滤波,最后取中心深度作为目标的估计深度,并发布距离话题
#!/usr/bin/env python
#-*- coding: utf-8 -*-
import rospy
import cv2
from cv_bridge import CvBridge, CvBridgeError
from sensor_msgs.msg import Image
from darknet_ros_msgs.msg import BoundingBoxes
import numpy as np
from scipy.ndimage import median_filter
import math


class ObjectLocation:

    def __init__(self):
        self.bridge = CvBridge()
        self.depth_image = None
        self.bounding_boxes = None
        self.probability = 0
        self.Class = None
        self.distance = 0
        self.centerx = 0
        self.centery = 0
        self.x_h = 0
        self.y_h = 0
        self.w_h = 0
        cv2.destroyAllWindows()

    '''
    get depth distance from found object rect
    '''
    def depthDistanceFromCoordinate(self, data):
        try:
            self.depth_image = self.bridge.imgmsg_to_cv2(data, "passthrough")
            depth_array = np.array(self.depth_image, dtype=np.float32)
            filter_depth_array = np.zeros_like(depth_array)
            if self.bounding_boxes != None:
                for bounding_box in self.bounding_boxes:
                    # bounding box coordinates
                    # less than 0 and larger than width or height
                    xmin = 0 if bounding_box.xmin < 0 else bounding_box.xmin
                    xmax = bounding_box.xmax if bounding_box.xmax < len(depth_array[0]) else len(depth_array[0])
                    ymin = 0 if bounding_box.ymin < 0 else bounding_box.ymin
                    ymax = bounding_box.ymax if bounding_box.ymax < len(depth_array) else len(depth_array)
                    dep_aver = 0
                    filter_depth_array = median_filter(depth_array, size=(3, 3))
                    dep_aver = filter_depth_array[int((ymin + ymax) / 2), int((xmin + xmax) / 2)]
                    self.probability = bounding_box.probability
                    self.Class = bounding_box.Class
                    self.distance = dep_aver
                    self.centerx =  (xmin + xmax) / 2
                    self.centery =  (ymin + ymax) / 2
                    rospy.loginfo("Class=%s, Probability=%f, Distance=%f", self.Class, self.probability, self.distance)
                    pub = rospy.Publisher('/darknet_ros/distance', self.distance, queue_size = 100)
                    pub.publish(self.distance)
        except Exception as e:
                print(e)


    def bbox_callback(self, msg):
        self.bounding_boxes = msg.bounding_boxes


if __name__ == '__main__':
    od = ObjectLocation()
    rospy.init_node('ObjectLocation', anonymous=True)
    rospy.Subscriber('/darknet_ros/bounding_boxes', BoundingBoxes, od.bbox_callback)
    rospy.Subscriber('/camera/depth/image_rect_raw', Image, od.depthDistanceFromCoordinate)
    rate = rospy.Rate(10)
    rate.sleep()
    rospy.spin()
三、目标方位解算与导航点设定
1、相机成像原理
我们需要根据相机内外参去解算目标的方位,相机内参外参原理参照下面链接,依据成像原理我们可以将在像素坐标系下的目标映射到相机坐标系
https://zhuanlan.zhihu.com/p/389653208
2、Python实现目标定位
运行标定相机的demo就可以得到相机的内参外参矩阵,我的是出厂就标定好的附带内参矩阵,放在
home/wheeltec/.ros/camera_info/camera.yaml 文件里,内参矩阵是相机出厂时就决定了的
image_width: 640
image_height: 480
camera_name: camera
camera_matrix:
  rows: 3
  cols: 3
  data: [ 581.88585,    0.     ,  314.2472 ,
            0.     ,  592.27138,  210.27091,
            0.     ,    0.     ,    1.     ]
camera_model: plumb_bob
distortion_model: plumb_bob
distortion_coefficients:
  rows: 1
  cols: 5
  data: [0.221666, -0.575455, -0.014215, 0.003895, 0.000000]
rectification_matrix:
  rows: 3
  cols: 3
  data: [ 1.,  0.,  0.,
          0.,  1.,  0.,
          0.,  0.,  1.]
projection_matrix:
  rows: 3
  cols: 4
  data: [ 591.88599,    0.     ,  315.96148,    0.     ,
            0.     ,  603.39893,  205.72873,    0.     ,
            0.     ,    0.     ,    1.     ,    0.     ]
相机的外参矩阵则要确定机器人坐标系下的相机位姿,才能将目标方位解算到机器人bse_link坐标系下。用Python程序设定导航目标点的主要通过ROS中名为”move_base”的动作服务器(Action Server),负责接收和处理导航目标,我们将导航目标点位姿信息解算好,发送到move_base节点即可。
在原有的ObjectLocation.py上导入actionlib、tf、move_base_msgs等包,使用矩阵求逆加内积来将像素坐标系下的目标位置映射到相机坐标系,再通过tf坐标变换映射到机器人坐标系,实例化导航目标点,将目标点位姿发送到move_base节点,等待动作服务器响应即可
#!/usr/bin/env python
#-*- coding: utf-8 -*-
import rospy
import cv2
from cv_bridge import CvBridge, CvBridgeError
from sensor_msgs.msg import Image
from darknet_ros_msgs.msg import  BoundingBoxes
import numpy as np
from scipy.ndimage import median_filter
import actionlib
from move_base_msgs.msg import MoveBaseAction, MoveBaseGoal
import tf.transformations as tr
import math


class ObjectLocation:

    def __init__(self):
        self.bridge = CvBridge()
        self.depth_image = None
        self.bounding_boxes = None
        self.probability = 0
        self.Class = None
        self.distance = 0
        self.centerx = 0
        self.centery = 0
        self.x_h = 0
        self.y_h = 0
        self.w_h = 0
        cv2.destroyAllWindows()

    '''
    get depth distance from found object rect
    '''
    def depthDistanceFromCoordinate(self, data):
        try:
            self.depth_image = self.bridge.imgmsg_to_cv2(data, "passthrough")
            depth_array = np.array(self.depth_image, dtype=np.float32)
            filter_depth_array = np.zeros_like(depth_array)
            if self.bounding_boxes != None:
                for bounding_box in self.bounding_boxes:
                    # bounding box coordinates
                    # less than 0 and larger than width or height
                    xmin = 0 if bounding_box.xmin < 0 else bounding_box.xmin
                    xmax = bounding_box.xmax if bounding_box.xmax < len(depth_array[0]) else len(depth_array[0])
                    ymin = 0 if bounding_box.ymin < 0 else bounding_box.ymin
                    ymax = bounding_box.ymax if bounding_box.ymax < len(depth_array) else len(depth_array)
                    dep_aver = 0
                    filter_depth_array = median_filter(depth_array, size=(3, 3))
                    dep_aver = filter_depth_array[int((ymin + ymax) / 2), int((xmin + xmax) / 2)]
                    self.probability = bounding_box.probability
                    self.Class = bounding_box.Class
                    self.distance = dep_aver
                    self.centerx =  (xmin + xmax) / 2
                    self.centery =  (ymin + ymax) / 2
                    rospy.loginfo("Class=%s, Probability=%f, Distance=%f", self.Class, self.probability, self.distance)
                    if self.Class == "pottedplant":
                        fx = 581.88585
                        fy = 592.27138
                        cx = 314.2472
                        cy = 210.27091
                        K = np.array([[fx, 0., cx], [0., fy, cy], [0., 0., 1.]])
                        point_pixel = np.array([self.centerx, self.centery, 1])
                        point_camera = np.dot(np.linalg.inv(K), point_pixel) * self.distance
                        self.y_h = - point_camera[0] - 460
                        self.x_h = point_camera[2] + 110
                        orientation = tr.quaternion_from_euler(0, 0, math.atan2(self.y_h, self.x_h))
                        self.w_h = orientation[3]
                        rospy.loginfo("%s Goal location is x_h = %f, y_h = %f, w_h=%f", "pottedplant", self.x_h, self.y_h, self.w_h)
                        self.movebase_callback()
                    pub = rospy.Publisher('/darknet_ros/distance', self.distance, queue_size = 100)
                    pub.publish(self.distance)
        except Exception as e:
                print(e)


    def movebase_callback(self):
        try:
            client = actionlib.SimpleActionClient('move_base', MoveBaseAction)
            client.wait_for_server()
            goal = MoveBaseGoal()
            goal.target_pose.header.frame_id = "base_link"
            goal.target_pose.pose.position.x = self.x_h * 4 / 5000
            goal.target_pose.pose.position.y = self.y_h * 4 / 5000
            goal.target_pose.pose.orientation.w = self.w_h
            client.send_goal(goal)
            rospy.loginfo("move_base set goal success!")
            client.wait_for_result()
        except Exception as e:
            print("movebase_callback service failed")

    def bbox_callback(self, msg):
        self.bounding_boxes = msg.bounding_boxes


if __name__ == '__main__':
    od = ObjectLocation()
    rospy.init_node('ObjectLocation', anonymous=True)
    rospy.Subscriber('/darknet_ros/bounding_boxes', BoundingBoxes, od.bbox_callback)
    rospy.Subscriber('/camera/depth/image_rect_raw', Image, od.depthDistanceFromCoordinate)
    rate = rospy.Rate(10)
    rate.sleep()
    rospy.spin()
下面是演示结果,其实还可以用其他滤波方法让深度估计更加精确,用重采样方法让方位估计更加精准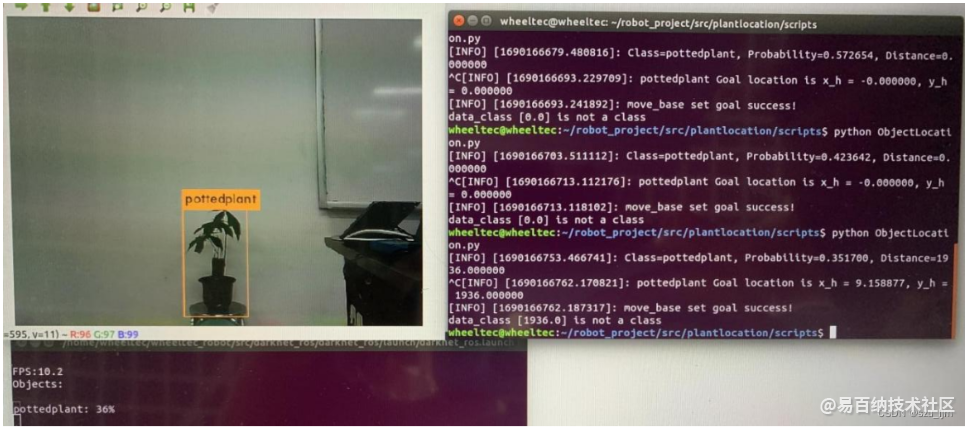
总结
darknet_ros软件包将ROS和YOLO很好的融合在一起,为机器人视觉任务开发提供了更多可能性。通过实时目标检测和识别,机器人能够感知和理解环境,实现人机交互,提高安全性,并在各种应用中发挥更智能和自主的作用。通过实时目标检测和识别,可以帮助机器人识别不同类型的物体,并根据目标物体的位置和特征来理解当前场景。这对于机器人在导航、路径规划和任务执行中具有重要意义。
- 分享
- 举报
 微信扫码分享
 QQ好友
QQ好友
 暂无数据
暂无数据-
浏览量:9262次2020-12-16 13:01:00
-
浏览量:3140次2023-12-18 17:48:09
-
浏览量:2930次2023-12-01 14:35:39
-
浏览量:1277次2023-12-18 18:07:01
-
浏览量:1574次2023-12-20 16:31:10
-
浏览量:1364次2023-03-15 09:05:04
-
浏览量:13616次2021-06-16 17:06:40
-
2024-02-02 14:41:10
-
2023-09-07 13:53:43
-
浏览量:2554次2019-11-07 14:15:02
-
浏览量:702次2026-01-13 15:26:50
-
浏览量:9159次2021-06-17 14:48:29
-
浏览量:6088次2021-06-19 14:43:01
-
浏览量:7556次2021-06-17 15:14:12
-
浏览量:10356次2021-06-19 14:22:58
-
浏览量:7637次2021-06-14 02:59:16
-
浏览量:1848次2023-09-19 17:11:18
-
浏览量:7620次2021-05-01 14:14:55
-
浏览量:1376次2023-04-14 14:42:21


-
广告/SPAM
-
恶意灌水
-
违规内容
-
文不对题
-
重复发帖

一休摸鱼

 微信支付
微信支付
举报类型
- 内容涉黄/赌/毒
- 内容侵权/抄袭
- 政治相关
- 涉嫌广告
- 侮辱谩骂
- 其他
详细说明
审核成功
审核失败


关注公众号
社区问题咨询:Ebaina-CN
定制需求咨询:xxqk158820
