

AI社交距离检测器:基于TensorFlow和MobileNet的对象检测
上一篇文章AI社交距离检测器:使用OpenCV标记检测到的对象我们学习了如何使用鼠标回调来选择图像中的各种对象,这个功能通常是用来训练对象检测器,让对象检测器可以更准确的获取对象,然后标记对象。
在本文中,我们将使用绘图函数来标记检测到的对象。
在这里,我们将学习如何在Python中使用预先训练好的MobileNet模型来执行对象检测。我们将实现从加载模型到解释和显示结果的完整过程。
在本文中,我们将继续学习如何使用人工智能来构建一个社交距离检测器。具体来说,我们将学习如何使用TensorFlow检测图像中的对象。然后,我们将用我们之前开发的方法对检测到的对象进行标记。
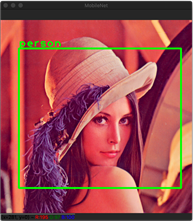
比如这样:
前提条件
我首先下载了一个预先训练过的TensorFlow模型这里。该包包含两个文件:
- Tflite-预先训练的模型保存为TensorFlow Lite格式。我们将使用该文件执行对象检测。
- Txt-包含检测对象的标签的文本文件。
选定的模型(detect.tflite)返回关于检测到的对象的几个信息,包括:
- 包围框-包围检测对象的矩形。
- 类ID-类的标识符,描述检测到的对象。给定这个ID,您可以从labelmap.txt文件中获得对象标签。
- 分数-检测信任值,通常表示为0到1之间的浮点值。该值越大,可信度就越高。
开始
鉴于以上所述,我首先实现了Inference类(Inference.py),其中我定义了两个方法:load_model_and_configure和load_labels_from_file方法,在初始化器内调用这两个方法。Inference类的第一种方法,load_model_and_configure,看起来是这样的:
from tensorflow import lite as tflite

def load_model_and_configure(self, model_path):
    """ Loads the model and configures input image dimensions accordingly
    : model_path: A full path to the file containing the model
    """
    # Load model from file
    self.interpreter = tflite.Interpreter(model_path)

    # Allocate tensors
    self.interpreter.allocate_tensors()

    # Get input and output details
    self.input_details = self.interpreter.get_input_details()
    self.output_details = self.interpreter.get_output_details()

    # Store input image dimensions
    self.input_image_height = self.input_details[0]['shape'][1]
self.input_image_width = self.input_details[0]['shape'][2]Load方法接受一个参数,model_path。它指向*.tflite档案。然后,我使用Interpreter来自TensorFlow Lite的类。我将结果对象存储在interpreter字段Inference类。然后,我分配内存(allocate_tensors),保持模型的输入和输出。为此,我使用get_input_details和get_output_details从Interpreter类。最后,我使用输入细节读取模型输入时接受的图像的格式。模型可以预先训练以获得特定格式的图像。根据模型的不同,可以使用resize_tensor_input。在这里,我使用prepare_image方法(见下文)。该方法将彩色通道排列由BGR(蓝-绿-红)转换为RGB,然后将图像调整为模型所期望的格式。这两个步骤都是使用OpenCV执行的。
def prepare_image(self, image):
    """ Prepares image for the TensorFlow inference
    : image: An input image
    """
    # Convert image to BGR
    image = opencv.cvtColor(image, opencv.COLOR_BGR2RGB)

    # Get new size
    new_size = (self.input_image_height, self.input_image_width)

    # Resize
    image = opencv.resize(image, new_size, interpolation = opencv.INTER_AREA)

    return image
要从文件中读取对象标签,我实现了以下方法:
def load_labels_from_file(self, file_path):
    with open(file_path, 'r') as file:
self.labels = [line.strip() for line in file.readlines()]我读取文件的内容,并将产生的字符串集合存储在labels字段Inference类。
我使用上述方法load_model_and_configure若要初始化Inference类,如下所示。这将确保模型和标签在执行对象检测之前已经就绪。
class Inference(object):
    def __init__(self, model_file_path, labels_file_path):
        # Load model
        self.load_model_and_configure(model_file_path)

        # Load labels
        self.load_labels_from_file(labels_file_path)
目标检测
在模型和标签准备就绪之后,我们可以执行对象检测。这里的一般流程是,首先将输入图像或图像序列设置为输入值。这个可以通过tensor的Interpreter类实现。下面是Inference类:
def set_input_tensor(self, image):
    tensor_index = self.input_details[0]['index']
    input_tensor = self.interpreter.tensor(tensor_index)()[0]
    input_tensor[:,:] = image
该方法读取输入值索引,然后将值设置为传递给图像的参数。
下一步是使用invoke方法Interpreter类并读取输出张量的推断结果。输出细节的数量将根据模型的不同而有所不同。这里使用的模型返回边界框、类标识符和分数。我用get_output_detailsHelper方法(它在给定索引处返回一个值):
def get_output_tensor(self, index):
    tensor = self.interpreter.get_tensor(self.output_details[index]['index'])
    return np.squeeze(tensor)
为了处理用于检测对象的完整工作流,我实现了以下方法:
def detect_objects(self, image, threshold):
    """Returns a list of detection results"""

    # Store input image size
    input_image_size = image.shape[-2::-1]

    # Prepare image
    image = self.prepare_image(image)

    # Set image as the input tensor
    self.set_input_tensor(image)

    # Perform inference
    self.interpreter.invoke()

    # Get all output details
    boxes = self.get_output_tensor(0)
    classes = self.get_output_tensor(1)
    scores = self.get_output_tensor(2)

    # Filter out detections below the threshold
    results = []
    for i in range(scores.size):
        if scores[i] >= threshold:
            result = {
                'rectangle': self.convert_bounding_box_to_rectangle_points(
                    boxes[i], input_image_size),
                'label': self.labels[int(classes[i])],
            }
            results.append(result)

    # Return informations about detected objects
return results在获得了推理结果的集合后,我删除了所有得分低于阈值的检测结果,从而过滤掉了检测结果。此阈值来自detect_objects方法。这个detect_objects方法将返回一个对象列表,每个对象具有两个属性:rectangle和label.
还请注意,TensorFlow模型返回的边界框(四元素数组)是以规范化单元表示的。左上角(数组的前两个元素)和右下角(第三和第四个元素)的坐标都有小数值。它们被划分为输入图像的高度和宽度(传递给模型的图像)。因此,为了恢复边界框在输入图像中的位置,我们需要将这些值乘以输入图像的宽度和高度。我使用以下方法进行此操作:
def convert_bounding_box_to_rectangle_points(self, bounding_box, input_image_size):
    width = input_image_size[0]
    height = input_image_size[1]

    top_left_corner = (int(bounding_box[1] * width), int(bounding_box[0] * height))
    bottom_right_corner = (int(bounding_box[3] * width), int(bounding_box[2] * height))

return (top_left_corner, bottom_right_corner)该方法返回两个值:top_left_corner,和bottom_right_corner。然后,我使用它们来使用OpenCV绘制矩形。
显示结果
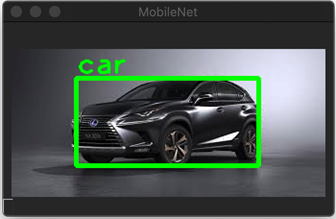
理接着对检测到的对象进行注释,为此,我使用OpenCV的rectangle,和putText方法,在前一篇文章中描述过。相应的功能是在静态方法中实现的。draw_rectangle_and_label在ImageHelper类(参见配套代码),它接受单个检测结果,并在图像上绘制矩形和标签。返回的列表中的每个元素调用此方法。detect_objects。最后,如下图所示,我使用imshow来自OpenCV的函数:
def display_image_with_detected_objects(image, inference_results):
    # Prepare window
    opencv.namedWindow(common.WINDOW_NAME, opencv.WINDOW_GUI_NORMAL)

    # Draw rectangles and labels on the image
    for i in range(len(inference_results)):
        current_result = inference_results[i]
        ImageHelper.draw_rectangle_and_label(
            image, current_result['rectangle'], current_result['label'])

    # Display image
    opencv.imshow(common.WINDOW_NAME, image)

    # Wait until user presses any key
    opencv.waitKey(0)
把东西放在一起
现在,我们可以将上述所有部分放在一起编写应用程序的主要内容:
import common
from image_helper import ImageHelper as imgHelper
from inference import Inference as model

if __name__ == "__main__":
    # Load and prepare model
    model_file_path = '../Models/01_model.tflite'
    labels_file_path = '../Models/02_labels.txt'

    # Initialize model
    ai_model = model(model_file_path, labels_file_path)

    # Get input image
    image = imgHelper.load_image('../Images/Lena.png')

    # Detect objects
    score_threshold = 0.5
    results = ai_model.detect_objects(image, score_threshold)

    # Display results
    imgHelper.display_image_with_detected_objects(image, results)
如上所示,我们从模型子文件夹加载模型和标签。然后,我们配置模型,加载图像,并在阈值为0.5的情况下进行检测。这意味着,低于50%的信任值将被去掉。最后,我们用带注释的检测对象显示图像。运行main.py之后,将得到前面描述的结果。
总结
本篇文章学习了如何使用Python中经过预先训练的MobileNet模型来执行对象检测。我们实现了从加载模型到解释和显示结果的完整过程。将在下一篇文章中检测更多的人,并计算出他们之间的距离。
- 分享
- 举报
 微信扫码分享
 QQ好友
QQ好友
 暂无数据
暂无数据-
浏览量:8898次2020-12-13 17:04:33
-
浏览量:9265次2020-12-16 13:01:00
-
浏览量:8937次2020-12-14 16:47:50
-
浏览量:8670次2020-12-15 16:59:08
-
浏览量:8822次2020-12-14 16:23:48
-
浏览量:10226次2020-12-12 15:24:59
-
浏览量:8645次2020-12-15 17:11:22
-
浏览量:1326次2023-12-18 18:38:45
-
浏览量:6203次2021-04-06 17:40:39
-
浏览量:2271次2020-03-19 09:04:57
-
浏览量:2122次2023-02-14 14:48:11
-
浏览量:2906次2022-05-13 10:46:47
-
浏览量:2215次2023-03-01 09:29:12
-
浏览量:967次2023-12-05 17:39:39
-
浏览量:1211次2023-12-14 16:51:13
-
浏览量:3148次2023-12-18 17:48:09
-
浏览量:1463次2023-06-03 16:08:07
-
浏览量:7266次2021-01-23 17:41:13
-
浏览量:3478次2024-03-06 16:15:59
恬静的小魔龙
他强任他强,清风拂山岗


-
18篇
-
广告/SPAM
-
恶意灌水
-
违规内容
-
文不对题
-
重复发帖
恬静的小魔龙

 微信支付
微信支付
举报类型
- 内容涉黄/赌/毒
- 内容侵权/抄袭
- 政治相关
- 涉嫌广告
- 侮辱谩骂
- 其他
详细说明
审核成功
审核失败


关注公众号
社区问题咨询:Ebaina-CN
定制需求咨询:xxqk158820
