

AI社交距离检测器:利用Yolo目标检测改进人的检测
在上一篇文章中,我们改进了我们的Python控制台应用程序,用于AI的社会距离检测。
在这篇文章中,我们将实现我们的应用程序的最终版本,也就是标记违反社交距离规则的人,给出来摄像机或视频文件的图像。
我们已经知道如何从摄像头或视频文件中检测人,并计算出他们之间的距离。然而,我们发现底层的AI模型(MobileNet)并不总是表现良好。也就是说,它不能检测到图像中的所有人。
我们将通过采用最先进的技术YOLO物体检测器来改善这一状况。网上有很多关于YOLO的教程和描述,所以,我不在这里详细讨论。我将重点介绍如何使我们的应用程序使用YOLO而不是MobileNet。最后,我们将实现以下图像所示的结果。

加载YOLO对象检测
要使用YOLO进行对象检测,请遵循与MobileNet相同的路径。
具体来说,首先加载和配置模型。然后,对输入图像进行预处理,使其与YOLO输入兼容。接下来,在YOLO神经网络的输出处运行推理并解析结果。
我在YOLO_Inference.py的YoloInference类中开始加载YOLO模型。YOLO的模型由三个文件组成:
- config -包含YOLO神经网络的参数。
- weights -存储神经网络的权重。
- labels -带有检测对象标签的文本文件。
在MobileNet中,配置和权重位于一个*.tflite文件中。在这里,两个人分开了。
要加载YOLO网络,我使用来自OpenCV的DNN(深度学习网络)模块的readNetFromDarknet方法。它返回一个表示网络的对象(类似于Interpreter在TensorFlow):
def load_model_and_configure(self, config_file_path, weights_file_path):
    # Load YOLO
    self.interpreter = opencv.dnn.readNetFromDarknet(config_file_path, weights_file_path)

    # Get output layers
    layer_names = self.interpreter.getLayerNames()
    self.output_layers =
        [layer_names[i[0] - 1] for i in self.interpreter.getUnconnectedOutLayers()]

    # Set the input image size accepted by YOLO and scaling factor
    self.input_image_size = (608, 608)
self.scaling_factor = 1 / 255.0注意,上面的方法还设置了YoloInference类:
input_image_size-存储传递给YOLO网络的图像的大小。我从配置文件中获得了这些值。scaling_factor-一个数字,用于在推断之前乘以每个图像像素。通过这种缩放,图像像素将从整数(值为0到255)转换为浮动(值为0到1)。
然后,我调用load_model_and_configure函数中的YoloInference类构造函数,然后加载标签(使用与MobileNet相同的方法):
def __init__(self, config_file_path, weights_file_path, labels_file_path):
    # Load model
    self.load_model_and_configure(config_file_path, weights_file_path)

    # Load labels
    self.load_labels_from_file(labels_file_path)
运行计算
加载模型后,可以对输入图像进行预处理,然后进行计算。为了对图像进行预处理,我使用以下方法:
def prepare_image(self, image):
    # Converts image to the blob using scaling factor and input image size accepted by YOLO
    blob = opencv.dnn.blobFromImage(image, self.scaling_factor,
        self.input_image_size, swapRB=True, crop=False)

return blob方法调用来自OpenCV的DNN模块的blobFromImage,该方法接受像素缩放因子和图像大小,还有两个附加参数:swapRB和crop。第一个将交换红色和蓝色通道。这是必需的,因为OpenCV的图像有一个BGR颜色通道排序。交换后,颜色通道将按RGB顺序排列。第二个参数指示图像是否应该裁剪到预期的输入大小。
然后,运行计算:
image = self.prepare_image(image)

# Set the blob as the interpreter (neural network) input
self.interpreter.setInput(image)

# Run inference
output_layers = self.interpreter.forward(self.output_layers)有关检测到的对象的信息编码在output_layers变量储存。这是网络输出的列表。然后,我们需要解析这些输出以获得检测结果。
解析结果
为了处理输出层,我使用两个for循环。第一个是多层的。第二种方法分析每一层的检测结果:
# Process output layers
detected_people = []

for output_layer in output_layers:
    for detection_result in output_layer:
        object_info = self.parse_detection_result(input_image_size,
            detection_result, threshold)

        if(object_info is not None):
detected_people.append(object_info)在上面的代码中,我使用了Helper方法。parse_detection_result。它接受三个参数:
input_image_size-原始输入图像的大小。detection_result-输出层中的对象。threshold-得分门槛。分数低于此值的检测将被拒绝。
给定这些输入,parse_detection_result方法解码对象标签及其得分,然后使用标签“Person”查找对象。最后,该方法对对象的边界框进行解码,并将其转换为矩形。为了使代码与应用程序的其他部分兼容,需要进行此转换。最后,该方法将矩形、标签和分数封装到Python字典中。这里还有一个物体:一个盒子。稍后我将使用它来改进对象位置检测。
def parse_detection_result(self, input_image_size, detection_result, threshold):
    # Get the object label and detection score
    label, score = self.get_object_label_and_detection_score(detection_result)

    # Store only objects with the score above the threshold and label 'person'
    if(score > threshold and label == 'person'):
        box = detection_result[0:4]

        return {
            'rectangle': self.convert_bounding_box_to_rectangle_points(
                box, input_image_size),
            'label': label,
            'score': float(score),
            'box' : self.adjust_bounding_box_to_image(box, input_image_size)
        }
    else:
        return None
要解码标签和分数,我使用另一个助手:
def get_object_label_and_detection_score(self, detection_result):
    scores = detection_result[5:]

    class_id = np.argmax(scores)

    return self.labels[class_id], scores[class_id]
它从检测结果中获取原始分数,计算出最大分数的位置,并使用该位置查找相应的标签。
预览检测到的人
我们现在可以使用我们的视频文件测试YOLO检测器。为此,我使用了前面开发的大多数组件,包括视频读取、图像读取和距离分析器。此外,我还导入了YoloInference类。以下是完整的脚本:
import sys

sys.path.insert(1, '../Part_03/')
sys.path.insert(1, '../Part_05/')
sys.path.insert(1, '../Part_06/')

from yolo_inference import YoloInference as model
from image_helper import ImageHelper as imgHelper
from video_reader import VideoReader as videoReader
from distance_analyzer import DistanceAnalyzer as analyzer

if __name__ == "__main__":
    # Load and prepare model
    config_file_path = '../Models/03_yolo.cfg'
    weights_file_path = '../Models/04_yolo.weights'
    labels_file_path = '../Models/05_yolo-labels.txt'

    # Initialize model
    ai_model = model(config_file_path, weights_file_path, labels_file_path)

    # Initialize video reader
    video_file_path = '../Videos/01.mp4'
    video_reader = videoReader(video_file_path)

    # Detection and preview parameters
    score_threshold = 0.5
    delay_between_frames = 5

    # Perform object detection in the video sequence
    while(True):
        # Get frame from the video file
        frame = video_reader.read_next_frame()

        # If frame is None, then break the loop
        if(frame is None):
            break

        # Perform detection
        results = ai_model.detect_people(frame, score_threshold)

        imgHelper.display_image_with_detected_objects(frame,
results, delay_between_frames)这个脚本看起来和我们为MobileNet开发的脚本差不多。唯一的区别是我们用YoloInference而不是Inference。运行上述代码后,您应该得到如下图像所示的结果。这里显而易见的是,YOLO检测到了图像中的每个人,但是我们有很多重叠的边框。让我们看看如何移除它们。
过滤掉重叠的边框
在每个重叠的边框中,我们需要选择最好的一个(得分最高的那个)。谢天谢地,我们不需要从头开始实现一切。在OpenCV中有一个专门的来自DNN(深度学习网络)模块的函数NMSBoxes。它使用非最大抑制NMS(深度学习网络)模块算法滤除无用的盒子.
NMSBox接受四个输入参数:
boxes-包装箱清单。scores-检测分数清单。threshold-得分的门槛。nms_threshold-NMS算法使用的阈值。
在下面的代码中,我从返回的结果中获得了方框和分数。detect_people这样,我只能从字典中的相应字段获得值:
def get_values_from_detection_results_by_key(self, detection_results, dict_key):
return [detection_results[i][dict_key] for i in range(0, len(detection_results))]随后,将NMSBoxes的YoloInference函数使用另一个助手类进行初始化:
def filter_detections(self, detected_people, threshold, nms_threshold):
    # Get scores and boxes
    scores = self.get_values_from_detection_results_by_key(detected_people, 'score')
    boxes = self.get_values_from_detection_results_by_key(detected_people, 'box')

    # Get best detections
    best_detections_indices = opencv.dnn.NMSBoxes(boxes,
        scores, threshold, nms_threshold)

    # Return filtered people
return [detected_people[i] for i in best_detections_indices.flatten()]最后,调用在detect_people里面的filter_detections,详情如下:
def detect_people(self, image, threshold):
    # Store the original image size
    input_image_size = image.shape[-2::-1]

    # Preprocess image to get the blob
    image = self.prepare_image(image)

    # Set the blob as the interpreter (neural network) input
    self.interpreter.setInput(image)

    # Run inference
    output_layers = self.interpreter.forward(self.output_layers)

    # Process output layers
    detected_people = []
    for output_layer in output_layers:
        for detection_result in output_layer:
            object_info = self.parse_detection_result(input_image_size,
                detection_result, threshold)

            if(object_info is not None):
                detected_people.append(object_info)

    # Filter out overlapping detections
    nms_threshold = 0.75
    detected_people = self.filter_detections(detected_people, threshold, nms_threshold)

    return detected_people
把东西放在一起
使用上述所有部分,我们现在可以按如下方式修改主脚本,有关完整代码,请参见Main.py:
# Get frame from the video file
frame = video_reader.read_next_frame()
# If frame is None, then break the loop
if(frame is None):
break
# Perform detection
results = ai_model.detect_people(frame, score_threshold)
#imgHelper.display_image_with_detected_objects(frame, results, delay_between_frames)
# Find people that are too close
proximity_distance_threshold = 150
people_that_are_too_close = analyzer.find_people_that_are_too_close(
results, proximity_distance_threshold)
#Indicate those people in the image
imgHelper.indicate_people_that_are_too_close(
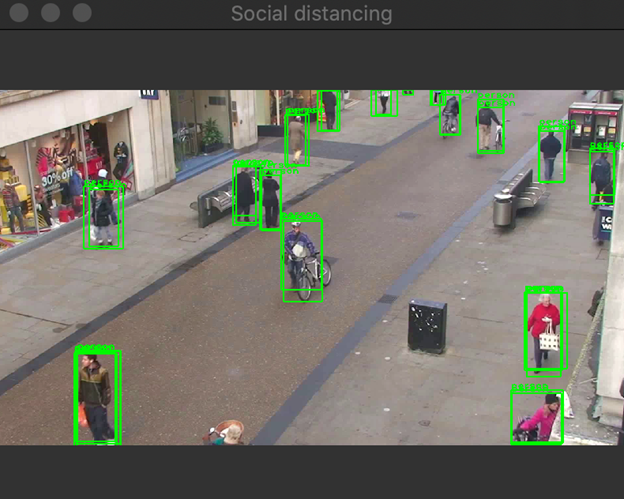
frame, people_that_are_too_close, delay_between_frames)脚本设置AI模型,打开示例视频文件,并找到太近的人。在这里,我将距离阈值设置为150像素。在运行main.py之后,您将得到导言中显示的结果,实现我们的目标,即AI驱动的社交距离检测器。
总结
在本文中,我们实现了我们的应用程序的最终版本,以指示那些违反社交距离规则的人,给出来自摄像机或视频文件的图像。
我们通过使用OpenCV学习计算机视觉任务(图像获取和显示),开始了这一激动人心的旅程。然后,我们学习了图像标记、使用TensorFlow Lite进行对象检测以及如何计算检测对象之间的距离。最后,我们结合了最先进的YOLO对象检测器,使我们的应用程序更加健壮。
- 分享
- 举报
 微信扫码分享
 QQ好友
QQ好友
 暂无数据
暂无数据-
浏览量:8820次2020-12-14 16:23:48
-
浏览量:8934次2020-12-14 16:47:50
-
浏览量:8669次2020-12-15 16:59:08
-
浏览量:8929次2020-12-13 17:30:07
-
浏览量:8896次2020-12-13 17:04:33
-
浏览量:8641次2020-12-15 17:11:22
-
浏览量:10226次2020-12-12 15:24:59
-
浏览量:3568次2024-02-20 10:27:52
-
浏览量:1277次2023-12-18 18:07:01
-
浏览量:2931次2023-12-01 14:35:39
-
浏览量:2238次2023-09-08 15:20:45
-
浏览量:1574次2023-12-20 16:31:10
-
浏览量:3141次2023-12-18 17:48:09
-
浏览量:1848次2023-09-19 17:11:18
-
浏览量:1325次2023-12-18 18:38:45
-
2023-09-07 13:53:43
-
浏览量:1724次2023-12-11 16:56:37
-
浏览量:4839次2023-12-16 11:15:45
-
浏览量:3190次2024-01-24 23:37:22
恬静的小魔龙
他强任他强,清风拂山岗

-
18篇
- LG携AI新品亮相CES展会 IP Park介绍公司的新计划
- 谷歌AI可成为诊疗工具 负责人称其工作效率极高
- 人工智能还有望为科学研究提供支持
- 基于OpenCV的斑马线检测
- 百度AI输入法打破传统定义 快嘴华少现场展开对决
- 6. 在 Python OpenCV 针对图像细节的不同操作
- 海思Hi3519V101开发核心板 4k@30fps H.265音视频编码Hi3519RFCV101芯片
- [python opencv 计算机视觉零基础到实战] 十一 找到图片中指定内容
- 音视频处理基础框架介绍:FFmpeg、GStreamer、OpenCV、OpenGL
- [python opencv 计算机视觉零基础到实战] 十七、深入ellipse方法
-
广告/SPAM
-
恶意灌水
-
违规内容
-
文不对题
-
重复发帖
恬静的小魔龙

 微信支付
微信支付
举报类型
- 内容涉黄/赌/毒
- 内容侵权/抄袭
- 政治相关
- 涉嫌广告
- 侮辱谩骂
- 其他
详细说明
审核成功
审核失败


关注公众号
社区问题咨询:Ebaina-CN
定制需求咨询:xxqk158820
