

基于 YOLO 的车牌检测与识别

本文将重点介绍 ALPR 的端到端实现。它将侧重于两个过程:车牌检测和检测到的车牌的 OCR。
背景介绍
深度学习一直是现代世界发展最快的技术之一。深度学习已经成为我们日常生活的一部分,从语音助手到汽车自动驾驶,它无处不在。其中一项应用是自动车牌识别 (ALPR)。顾名思义,ALPR 是一种利用人工智能和深度学习的力量来自动检测和识别车辆牌照字符的技术。
本文将重点介绍 ALPR 的端到端实现。它将侧重于两个过程,[1]车牌检测,[2]检测到的车牌的 OCR。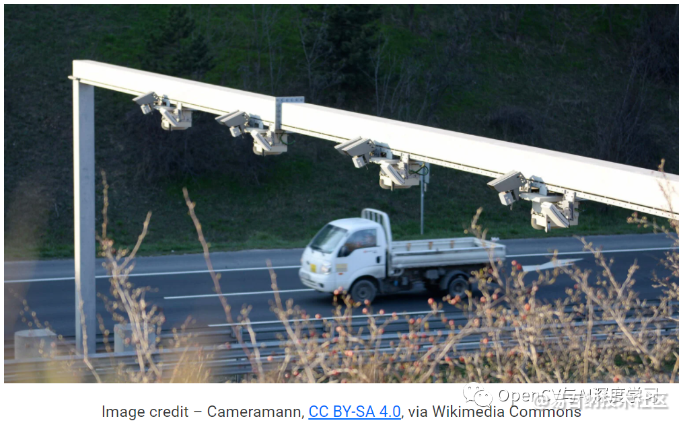
ALPR简介
想象一下,一个美丽的夏天,你在高速公路上行驶,收音机里播放着你最喜欢的歌曲,你越过限速,在 70 公里/小时的限速区以 90 公里/小时的速度驶过几个摄像头,然后意识到你的错误但为时已晚。几周后,您会收到一张罚单,上面附有您的汽车形象的证据。您一定想知道,他们是否手动检查每张图片并发送罚单?
当然不是,那是 ALPR 系统发送的。从捕获的图像或镜头中,ALPR 检测并提取您的车牌号并向您发送罚单。这一切都是基于简单的 ALPR 系统和几行代码。
自动车牌识别 (ALPR) 或 ANPR 是负责使用光学字符识别在图像或视频序列中读取车辆牌照的技术。随着深度学习和计算机视觉的最新进展,这些任务可以在几毫秒内完成。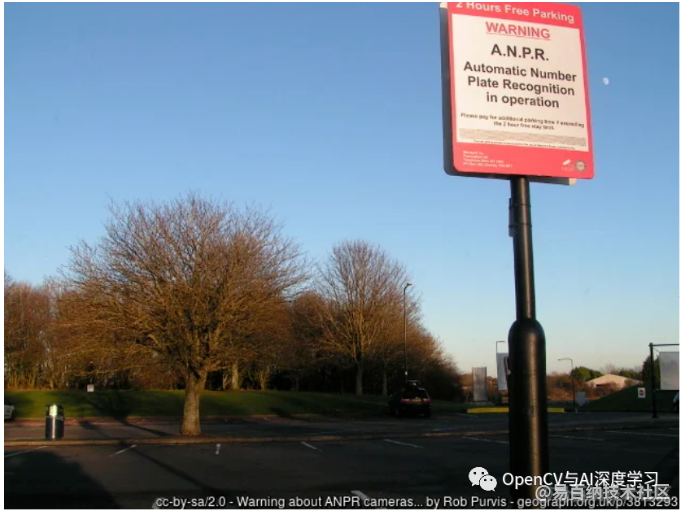
ALPR如何工作
ALPR 是广泛使用的计算机视觉应用之一。它利用了各种方法,如对象检测、OCR、图像分割等。对于硬件,ALPR 系统只需要一个摄像头和一个好的 GPU。为简单起见,这篇博文将重点介绍两步过程。
【1】检测:首先,将视频序列的图像或帧从摄像头或已存储的文件传递给检测算法,该算法检测车牌并返回该车牌的边界框位置。
【2】识别:将OCR应用于检测到的车牌,识别车牌的字符,并以文本格式以相同的顺序返回字符。输出可以存储在数据库中,也可以绘制在图像上以进行可视化。
让我们一一详细了解每个步骤。
使用YOLO V4检测车牌
该管道模块负责从视频序列的图像或帧中检测车牌。
检测过程可以使用任何检测器完成,无论是基于区域的检测器还是单次检测器。这篇博文将重点介绍YOLO v4 的单次检测器,主要是因为它具有良好的速度和精度折中以及更好地检测小物体的能力。YOLOv4 将使用Darknet框架实现。
Darknet
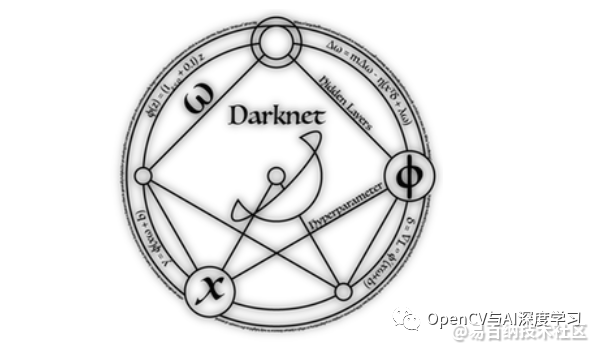
Darknet 是一个用 C 和 CUDA 编写的开源神经网络框架。YOLOv4 使用 CSPDarknet53 CNN,这意味着它的目标检测主干使用了 Darknet53,共有 53 个卷积层。Darknet 非常易于安装、使用,只需几行代码即可完成。
git clone https://github.com/AlexeyAB/darknet
将安装和编译Darknet,并根据环境需要设置一些参数。
%cd darknet
sed -i 's/OPENCV=0/OPENCV=1/' Makefile
sed -i 's/GPU=0/GPU=1/' Makefile
sed -i 's/CUDNN=0/CUDNN=1/' Makefile
sed -i 's/CUDNN_HALF=0/CUDNN_HALF=1/' Makefile
sed -i 's/LIBSO=0/LIBSO=1/' Makefile
恭喜!Darknet现已安装。
在这里,一些参数(如 OpenCV、GPU、CUDA 等)设置为 1,即设置为 True,因为它们是提高代码效率和更快地运行计算所必需的。
数据集
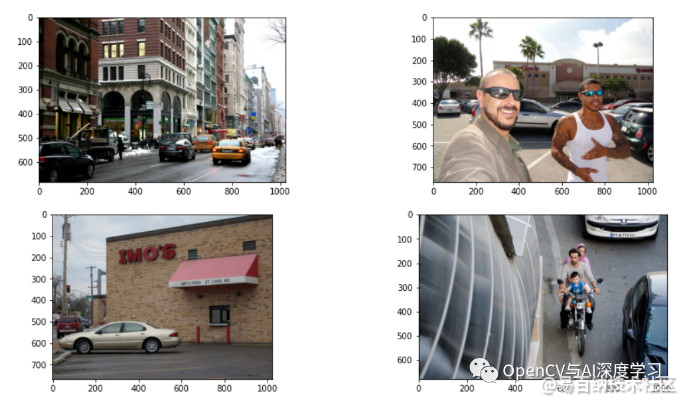
数据是任何 AI 应用程序的核心,也是第一步也是最重要的步骤之一。为了训练 YOLOv4 检测器,将使用 Google 的车辆开放图像数据集。谷歌的“开放图像”是一个开源数据集,包含数千张带有注释的对象图像,用于对象检测、分割等。该数据集包含 1500 张训练图像和 300 张 YOLO 格式的验证图像。可以从这里下载数据集并将其放在名为 data 的文件夹下。让我们看一下数据集。
import math
# Creating a list of image files of the dataset.
data_path = './data/obj/train/'
files = os.listdir(data_path)
img_arr = []

# Displaying 4 images only.
num = 4

# Appending the array of images to a list.
for fimg in files:
    if fimg.endswith('.jpg'):
      demo = img.imread(data_path+fimg)
      img_arr.append(demo)
      if len(img_arr) == num:
        break

# Plotting the images using matplotlib.
_, axs = plt.subplots(math.floor(num/2), math.ceil(num/2), figsize=(50, 28))

axs = axs.flatten()

for cent, ax in zip(img_arr, axs):
    ax.imshow(cent)
plt.show()
训练
为了让模型学习,它需要在数据集上进行训练。在开始训练过程之前,需要修改配置文件(.cfg)。需要修改的参数是批量大小、细分、类等。从这里下载配置文件。
现在数据已经到位,配置完成,但是模型将如何访问数据呢?创建了两个文件,其中一个包含训练数据、测试数据和类信息的信息。我们称之为obj.data(可以从这里下载),另一个是obj.names包含所有类的名称。你可以obj.names 从这里下载。
下一步是下载 YOLOv4 的预训练权重。
wget https://github.com/AlexeyAB/darknet/releases/download/darknet_yolo_v3_optimal/yolov4.conv.137
现在是训练的重要部分!
./darknet detector train data/obj.data cfg/yolov4-obj.cfg yolov4.conv.137 -dont_show -map
参数包括obj.data文件、配置文件和 yolov4 预训练的权重,如前所述。
-dont_show当我们不想显示输出时通过。另外,在 google colab notebook 中运行代码时需要传递这个,因为它不支持 GUI 输出,不传递会导致错误。
-map在每几次迭代后传递给计算预测的mAP。
让我们等几个小时,万岁!模型现在已经训练好了。如果您想跳过训练过程,也可以从这里下载经过训练或我们微调的模型。
评估
判断训练模型在看不见的数据上的表现非常重要。这是了解模型是否表现良好或过度拟合的好方法。对于目标检测任务,其中一项指标是平均精度,简称为 mAP。在高级解释中,将预测的边界框与检测到的边界框进行比较,并返回一个称为 mAP 的分数。
这段代码自动保存了训练进度图表,这是我们的模型的表现,在 5.3 小时内 3000 个 epoch 后实现了90%的 mAP。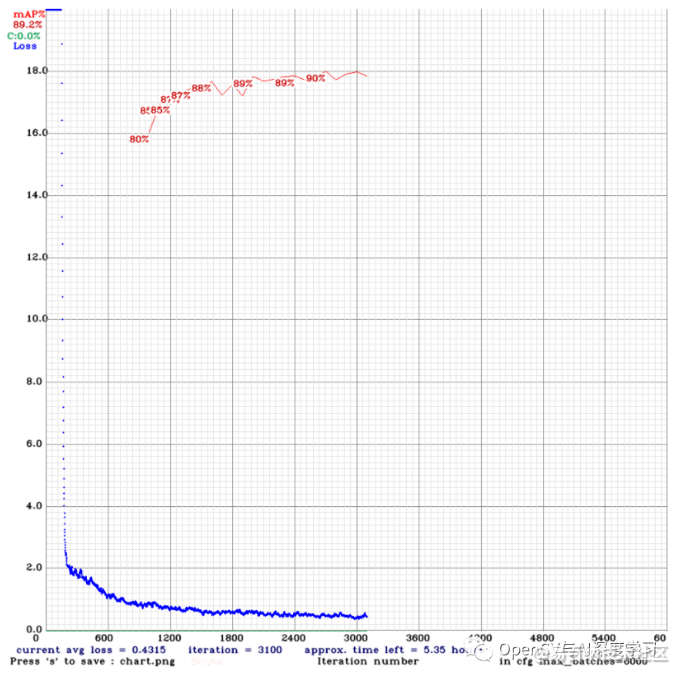
推理
现在车牌检测器已经完全训练好了。是时候使用它了。为此,我们将创建一个名为yolo_det(). 该函数负责从输入的车辆图像中检测车牌的边界框。
def yolo_det(frame, config_file, data_file, batch_size, weights, threshold, output, network, class_names, class_colors, save = False, out_path = ''):

  prev_time = time.time()

  # Preprocessing the input image.
  width = darknet.network_width(network)
  height = darknet.network_height(network)
  darknet_image = darknet.make_image(width, height, 3)
  image_rgb = cv2.cvtColor(frame, cv2.COLOR_BGR2RGB)
  image_resized = cv2.resize(image_rgb, (width, height))

  # Passing the image to the detector and store the detections
  darknet.copy_image_from_bytes(darknet_image, image_resized.tobytes())
  detections = darknet.detect_image(network, class_names, darknet_image, thresh=threshold)
  darknet.free_image(darknet_image)

  # Plotting the deetections using darknet in-built functions
  image = darknet.draw_boxes(detections, image_resized, class_colors)
  print(detections)
  if save:
    im = cv2.cvtColor(image, cv2.COLOR_RGB2BGR)
    file_name = out_path + '-det.jpg'
    cv2.imwrite(os.path.join(output, file_name), im)

  # Calculating time taken and FPS for detection
  det_time = time.time() - prev_time
  fps = int(1/(time.time() - prev_time))
  print("Detection time: {}".format(det_time))

  # Resizing predicted bounding box from 416x416 to input image resolution
  out_size = frame.shape[:2]
  in_size = image_resized.shape[:2]
  coord, scores = resize_bbox(detections, out_size, in_size)
  return coord, scores, det_time
车牌文字识别
现在我们已经训练了自定义车牌检测器,是时候进入 ALPR 的第二步,即文本识别。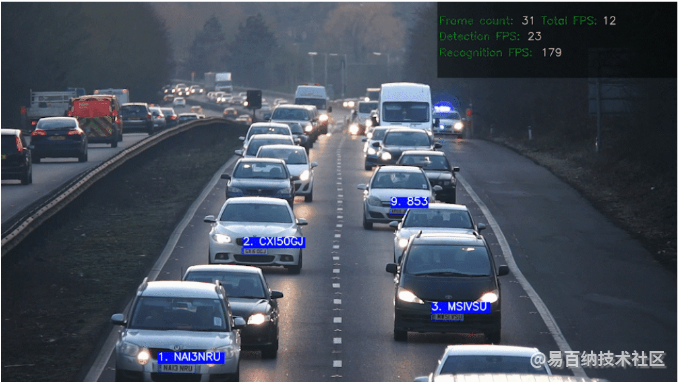
文本识别是通过理解和分析其潜在模式从场景中识别文本的过程。它也称为光学字符识别或 OCR。它还可以用于各种应用,如文档阅读、信息检索、货架产品识别等等。OCR 可以被训练或用作预训练模型。在本文中,将使用一个预训练的 OCR 模型。
PaddleOCR
PaddleOCR 就是这样一种用于 OCR 的框架或工具包。PaddleOCR为用户提供多语言实用 OCR 工具,帮助用户在几行代码中应用和训练不同的模型。PaddleOCR 在其工具包中提供了很多模型,包括 PP-OCR,一系列高质量的预训练 OCR,最新的算法如 SRN,以及流行的 OCR 算法如 CRNN。
PaddleOCR 还提供了不同类型的模型,无论是轻量级(占用较少内存的模型)还是重量级(占用大量内存的模型),以及可自由使用的预训练权重。
OCR 比较
如上一节所述,PaddleOCR 提供了各种模型,在准确性和速度的情况下比较哪个模型表现良好始终是一个好习惯。
这些模型在IC15 数据集上进行了测试,该数据集是一个附带的场景文本数据集,仅包含英文单词。它包含 1000 张训练图像,但它是在其中随机的 500 张图像上进行测试的。该模型使用称为 Levenshtein 距离的字符串相似性度量进行测试。Levenshtein 距离是在一个字符串中实现另一个字符串所需的更改。距离越小模型越好。在 Tesla K80 GPU 上使用 Levenshtein 距离在IC15数据集上测试了三个模型。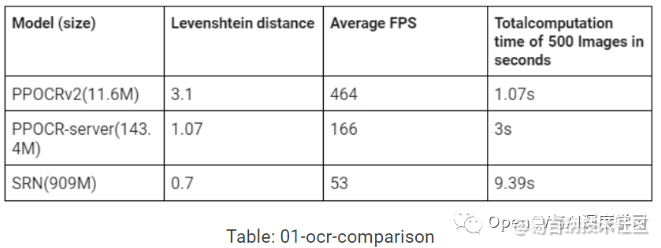
重点将放在轻量级 PPOCRv2(11.6M) 上。它在速度、准确性之间取得了很好的平衡,而且非常轻巧(即占用的内存非常少)。它还提供对英文和中文的支持。有关 OCR 比较代码,请参阅此处。
OCR 实施
现在,是时候实施选定的 OCR 模型了。PaddleOCR 将在几行代码中实现,并将为我们的 ALPR 系统创造奇迹。
首先,让我们安装所需的工具包和依赖项。这些依赖项和工具将帮助我们访问 OCR 实施所需的所有文件和脚本。
pip install paddlepaddle-gpu
pip install "paddleocr>=2.0.1"
安装完成后,OCR 需要根据我们的要求进行初始化。
from paddleocr import PaddleOCR
ocr = PaddleOCR(lang='en',rec_algorithm='CRNN')
使用PaddleOCR 我们初始化 OCR,它需要几个参数,它们是:
lang – 指定要识别的语言
det_algorithm – 指定使用的文本检测算法
Rec_algorithm– 指定使用的识别算法
对于 ALPR,只会传递两个参数,即语言和识别算法。在这里,我们使用lang 了英语和 CRNN 识别算法,在这个工具包中也称为 PPOCRv2。
只需一行代码即可使用此 OCR。
result = ocr.ocr(cr_img, cls=False, det=False)
这里,cr_img 是传递给 OCR 的图像cls ,det 是设置为 false 的参数,因为在我们的 ALPR 管道中不需要文本检测器和文本角度分类器。
推理
现在车牌检测器已经完全训练好了,OCR 已经准备就绪。是时候将所有这些放在一起并投入使用了。为此,我们将创建一些辅助函数来一次性访问所有功能。
首先,我们将创建一个函数,该函数通过将图像和坐标作为参数来负责裁剪图像,我们称之为crop()。
def crop(image, coord):
  # Cropping is done by -> image[y1:y2, x1:x2].
  cr_img = image[coord[1]:coord[3], coord[0]:coord[2]]
  return cr_img
图像测试
为了在图像上执行 ANPR,我们将创建一个最终函数,比如test_img() 在一个地方执行检测、裁剪、OCR 和输出绘图。
在此之前,我们将初始化一些对整篇博文都有帮助的变量。
# Variables storing colors and fonts.
font = cv2.FONT_HERSHEY_SIMPLEX
blue_color = (255,0,0)
white_color = (255,255,255)
black_color = (0,0,0)
green_color = (0,255,0)
yellow_color = (178, 247, 218)
def test_img(input, config_file, weights, out_path):
  # Loading darknet network and classes along with the bbox colors.
  network, class_names, class_colors = darknet.load_network(
            config_file,
            data_file,
            weights,
            batch_size= batch_size
        )

  # Reading the image and performing YOLOv4 detection.
  img = cv2.imread(input)
  bboxes, scores, det_time = yolo_det(img, config_file, data_file, batch_size, weights, thresh, out_path, network, class_names, class_colors)

  # Extracting or cropping the license plate and applying the OCR.
  for bbox in bboxes:
    cr_img = crop(img, bbox)
    result = ocr.ocr(cr_img, cls=False, det=False)
    ocr_res = result[0][0]
    rec_conf = result[0][1]

    # Plotting the predictions using OpenCV.
    (label_width,label_height), baseline = cv2.getTextSize(ocr_res , font, 2, 3)
    top_left = tuple(map(int,[int(bbox[0]),int(bbox[1])-(label_height+baseline)]))
    top_right = tuple(map(int,[int(bbox[0])+label_width,int(bbox[1])]))
    org = tuple(map(int,[int(bbox[0]),int(bbox[1])-baseline]))

    cv2.rectangle(img, (int(bbox[0]), int(bbox[1])), (int(bbox[2]), int(bbox[3])), blue_color, 2)
    cv2.rectangle(img, top_left, top_right, blue_color,-1)
    cv2.putText(img, ocr_res, org, font, 2, white_color,3)

  # Writing output image.
  file_name = os.path.join(out_path, 'out_' + input.split('/')[-1])
  cv2.imwrite(file_name, img)
恭喜!!成功创建了在镜像上运行 ALPR 的管道。让我们在随机图像上尝试一下。
首先,我们将导入一些库以及应用 ANPR 所需的功能和方法。
# Importing libraries and required functionalities.
# DeepSORT imports.
%cd ./deep_sort
from application_util import preprocessing
from deep_sort import nn_matching
from deep_sort.detection import Detection
from deep_sort.tracker import Tracker
from tools_deepsort import generate_detections as gdet
import uuid

# Required libraries.
import os
import glob
import random
import time
import cv2
import numpy as np
import darknet
import subprocess
import sys
from PIL import Image
import matplotlib
import matplotlib.pyplot as plt
%matplotlib inline


# Darknet object detector imports.
%cd ./darknet
from darknet_images import load_images
from darknet_images import image_detection
# Declaring important variables.
# Path of Configuration file of YOLOv4.
config_file = './darknet/cfg/yolov4-obj.cfg'
# Path of obj.data file.
data_file = './darknet/data/obj.data'
# Batch size of data passed to the detector.
batch_size = 1
# Path to trained YOLOv4 weights.
weights = './checkpoint/yolov4-obj_best.weights'
# Confidence threshold.
thresh = 0.6
# Calling the function.
input_dir = 'car-img.jpg'
out_path = '/content/'
test_img(input_dir, config_file, weights,out_path)
我们现在将显示最终输出。
out_img = cv2.imread('./out_car-img.jpg')
cv2.imshow(out_img)
视频测试
在我们在图像上测试了我们的 ALPR 之后,我们也可以类似地将其应用于视频。对于视频,我们只是以与图像类似的方式逐帧应用 ALPR 管道。让我们深入了解它。
def test_vid(vid_dir, config_file, weights,out_path):
  # Declaring variables for video processing.
  cap = cv2.VideoCapture(vid_dir)
  codec = cv2.VideoWriter_fourcc(*'XVID')
  width = int(cap.get(cv2.CAP_PROP_FRAME_WIDTH))
  height = int(cap.get(cv2.CAP_PROP_FRAME_HEIGHT))
  fps = int(cap.get(cv2.CAP_PROP_FPS))
  file_name = os.path.join(out_path, 'out_' + vid_dir.split('/')[-1])
  out = cv2.VideoWriter(file_name, codec, fps, (width, height))

  # Frame count variable.
  ct = 0

  # Loading darknet network and classes along with the bbox colors.
  network, class_names, class_colors = darknet.load_network(
          config_file,
          data_file,
          weights,
          batch_size= batch_size
      )

  # Reading video frame by frame.
  while(cap.isOpened()):
    ret, img = cap.read()
    if ret == True:
        print(ct)

        # Noting time for calculating FPS.
        prev_time = time.time()

        # Performing the YOLOv4 detection.
        bboxes, scores, det_time = yolo_det(img, config_file, data_file, batch_size, weights, thresh, out_path, network, class_names, class_colors)

        # Extracting or cropping the license plate and applying the OCR.
        if list(bboxes):
          for bbox in bboxes:
            cr_img, cord = crop(img, bbox)

            result = ocr.ocr(cr_img, cls=False, det=False)

            ocr_res = result[0][0]
            rec_conf = result[0][1]

            # Plotting the predictions using OpenCV.
            txt = ocr_res
            (label_width,label_height), baseline = cv2.getTextSize(ocr_res , font,2,3)
            top_left = tuple(map(int,[int(bbox[0]),int(bbox[1])-(label_height+baseline)]))
            top_right = tuple(map(int,[int(bbox[0])+label_width,int(bbox[1])]))
            org = tuple(map(int,[int(bbox[0]),int(bbox[1])-baseline]))

            cv2.rectangle(img, (int(bbox[0]), int(bbox[1])), (int(bbox[2]), int(bbox[3])), blue_color, 2)
            cv2.rectangle(img, top_left, top_right, blue_color, -1)
            cv2.putText(overlay_img,txt, org, font, 2, white_color, 3)
            #cv2.imwrite('/content/{}.jpg'.format(ct), img)

          # Calculating time taken and FPS for the whole process.
          tot_time = time.time() - prev_time
          fps = 1/tot_time

          # Writing information onto the frame and saving it to be processed in a video.
          cv2.putText(img, 'frame: %d fps: %s' % (ct, fps),
                  (0, int(100 * 1)), cv2.FONT_HERSHEY_PLAIN, 5, (0, 0, 255), thickness=2)
          out.write(img)

        ct = ct + 1
    else:
      break
是时候在随机视频上尝试一下了。你可以从这里下载。
# Calling the function.
input_dir = './Pexels Videos 2103099.mp4'
out_path = '/content/'
test_vid(input_dir, config_file, weights,out_path)
显示输出(对于 jupyter notebooks 或 colab)。输出可见here。
from IPython.display import HTML
from base64 import b64encode

# Input video path.
save_path = './out_Pexels Videos 2103099.mp4'

# Compressed video path.
compressed_path = "./compressed.mp4"

#compressing the size of video to avoid crashing.
os.system(f"ffmpeg -i {save_path} -vcodec libx264 {compressed_path}")

# Show video.
mp4 = open(compressed_path,'rb').read()
data_url = "data:video/mp4;base64," + b64encode(mp4).decode()
HTML("""
<video width=400 controls>
      <source src="%s" type="video/mp4">
</video>
""" % data_url)
Tracker 的集成
正如您在上一节中一定看到的那样,视频输出不太准确,存在很多问题。
- 抖动
- OCR输出的波动
- 检测丢失
为了解决这个问题,本节提出了一个将跟踪器与 ALPR 系统集成的解决方案。但是跟踪器的使用如何解决这些问题呢?让我们来看看。
跟踪器在 ALPR 中的作用
如前所述,在视频上运行 ALPR 时,会导致一些问题导致 ALPR 不太准确。但是如果使用跟踪器,这些问题可以得到纠正。Tracker 一般用于以下原因:
- 物体检测失败时工作
- 分配 ID
- 追踪路径
ALPR 面临的所有问题,tracker 只是因为这些问题而被使用。跟踪器将用于获取特定检测到的车牌的最 佳 OCR 结果。
跟踪器实现后,它会返回边界框的坐标和 ID,OCR 将应用于每个边界框,输出将与 id 一起存储。为了减少 OCR 输出的波动问题,将收集所有相同 id 的边界框直到当前帧,并为该 id 保留并显示具有最高 OCR 置信度的边界框。实施时,流程将更加清晰。
跟踪器的实现
为此,让我们创建一个新的辅助函数get_best_ocr()来实现上一节中讨论的逻辑。
def get_best_ocr(preds, rec_conf, ocr_res, track_id):
  for info in preds:
    # Check if it is the current track id.
    if info['track_id'] == track_id:
      # Check if the ocr confidence is highest or not.
      if info['ocr_conf'] < rec_conf:
        info['ocr_conf'] = rec_conf
        info['ocr_txt'] = ocr_res
      else:
        rec_conf = info['ocr_conf']
        ocr_res = info['ocr_txt']
      break
  return preds, rec_conf, ocr_res
最后,我们将研究下一个在视频上运行 ALPR 的功能以及名为tracker_test_vid(). 它将就像test_vid(),使用它实现的跟踪器一样。这篇博文将重点介绍使用DeepSORT作为跟踪器,因为它轻量级且易于使用,并且还提供了外观描述符,并且只需几行代码即可。我们将使用称为预训练的深度关联度量模型mars-small128.pb,可以从这里下载。
def tracker_test_vid(vid_dir, config_file, weights,out_path):
  # Declaring variables for video processing.
  cap = cv2.VideoCapture(vid_dir)
  codec = cv2.VideoWriter_fourcc(*'XVID')
  width = int(cap.get(cv2.CAP_PROP_FRAME_WIDTH))
  height = int(cap.get(cv2.CAP_PROP_FRAME_HEIGHT))
  fps = int(cap.get(cv2.CAP_PROP_FPS))
  file_name = os.path.join(out_path, 'out_' + vid_dir.split('/')[-1])

  out = cv2.VideoWriter(file_name, codec, fps, (width, height))

  # Declaring variables for tracker.
  max_cosine_distance = 0.4
  nn_budget = None

  # Initializing tracker
  model_filename = './model_data/mars-small128.pb'
  encoder = gdet.create_box_encoder(model_filename, batch_size=1)
  metric = nn_matching.NearestNeighborDistanceMetric("cosine", max_cosine_distance, nn_budget)
  tracker = Tracker(metric)

  # Initializing some helper variables.
  ct = 0
  preds = []
  total_obj = 0
  rec_tot_time = 1
  alpha = 0.5

  # Loading darknet network and classes along with the bbox colors.
  network, class_names, class_colors = darknet.load_network(
          config_file,
          data_file,
          weights,
          batch_size= batch_size
      )

  # Reading video frame by frame.
  while(cap.isOpened()):
    ret, img = cap.read()
    if ret == True:

        h, w = img.shape[:2]
        print(ct)

        w_scale = w/1.55
        h_scale = h/17
        top_left = (int(w_scale) + 10 + label_width, int(h_scale))

        # Method to blend two images, here used to make the information box transparent.
        overlay_img = img.copy()
        cv2.rectangle(img, (w_scale, 0), (w, int(h_scale*3.4)), black_color, -1)
        cv2.addWeighted(img, alpha, overlay_img, 1 - alpha, 0, overlay_img)

        # Noting time for calculating FPS.
        prev_time = time.time()

        # Performing the YOLOv4 detection.
        bboxes, scores, det_time = yolo_det(img, config_file, data_file, batch_size, weights, thresh, out_path, network, class_names, class_colors)

        if list(bboxes):
          # Getting appearance features of the object.
          features = encoder(img, bboxes)
          # Storing all the required info in a list.
          detections = [Detection(bbox, score, feature) for bbox, score, feature in zip(bboxes, scores, features)]

          # Applying tracker.
          # The tracker code flow: kalman filter -> target association(using hungarian algorithm) and appearance descriptor.
          tracker.predict()
          tracker.update(detections)
          track_time = time.time() - prev_time

          # Checking if tracks exist.
          for track in tracker.tracks:
            if not track.is_confirmed() or track.time_since_update > 1:
                continue

            # Changing track bbox to top left, bottom right coordinates
            bbox = list(track.to_tlbr())

            for i in range(len(bbox)):
              if bbox[i] < 0:
                bbox[i] = 0

            # Extracting or cropping the license plate and applying the OCR.
            cr_img = crop(img, bbox)

            rec_pre_time = time.time()
            result = ocr.ocr(cr_img, cls=False, det=False)
            rec_tot_time = time.time() - rec_pre_time

            ocr_res = result[0][0]
            rec_conf = result[0][1]

            if rec_conf == 'nan':
              rec_conf = 0

            # Storing the ocr output for corresponding track id.
            output_frame = {"track_id":track.track_id, "ocr_txt":ocr_res, "ocr_conf":rec_conf}

            # Appending track_id to list only if it does not exist in the list.
            if track.track_id not in list(set(ele['track_id'] for ele in preds)):
              total_obj = total_obj + 1
              preds.append(output_frame)
            # Looking for the current track in the list and updating the highest confidence of it.
            else:
              preds, rec_conf, ocr_res = get_best_ocr(preds, rec_conf, ocr_res, track.track_id)

            # Plotting the predictions using OpenCV.
            txt = str(track.track_id) + '. ' + ocr_res
            (label_width,label_height), baseline = cv2.getTextSize(ocr_res , font,2,3)
            top_left = tuple(map(int,[int(bbox[0]),int(bbox[1])-(label_height+baseline)]))
            top_right = tuple(map(int,[int(bbox[0])+label_width,int(bbox[1])]))
            org = tuple(map(int,[int(bbox[0]),int(bbox[1])-baseline]))

            cv2.rectangle(img, (int(bbox[0]), int(bbox[1])), (int(bbox[2]), int(bbox[3])), blue_color, 2)
            cv2.rectangle(img, top_left, top_right, blue_color, -1)
            cv2.putText(overlay_img,txt, org, font, 2, white_color, 3)
            #cv2.imwrite('/content/{}.jpg'.format(ct), img)

          # Calculating time taken and FPS for the whole process.
          tot_time = time.time() - prev_time
          fps = 1/tot_time

          # Writing information onto the frame and saving the frame to be processed into a video with title and values of different colors.
          if w < 2000:
            size = 1
          else:
            size = 2

          # Plotting frame count information on the frame.
          (label_width,label_height), baseline = cv2.getTextSize('Frame count:' , font,size,2)
          cv2.putText(overlay_img, 'Frame count:', top_left, font, size, green_color, thickness=2)
          cv2.putText(overlay_img,'%d ' % (ct), top_left, font, size, yellow_color, thickness=2)

          (label_width,label_height), baseline = cv2.getTextSize('Frame count:' + ' ' + str(ct) , font, size,2)
          cv2.putText(overlay_img, 'Total FPS:' , top_left, font, size, green_color, thickness=2)

          (label_width,label_height), baseline = cv2.getTextSize('Frame count:' + ' ' + str(ct) + 'Total FPS:' , font, size,2)
          cv2.putText(overlay_img, '%s' % (int(fps)), top_left, font, size, yellow_color, thickness=2)

          # Plotting Total FPS of ANPR information on the frame.
          cv2.putText(overlay_img, 'Detection FPS:' ,(top_left[0], int(h_scale*1.7)), font, size, green_color, thickness=2)
          (label_width,label_height), baseline = cv2.getTextSize('Detection FPS:', font,size,2)
          cv2.putText(overlay_img, '%d' % ((int(1/det_time))),(top_left[0], int(h_scale*1.7)), font, size, yellow_color, thickness=2)

          # Plotting Recognition/OCR FPS of ANPR on the frame.
          cv2.putText(overlay_img, 'Recognition FPS:',(top_left[0], int(h_scale*2.42)), font, size, (green_color, thickness=2)
          (label_width,label_height), baseline =                     cv2.getTextSize('Recognition FPS:', font,size,2)
          cv2.putText(overlay_img, '%s' % ((int(1/rec_tot_time))),(top_left[0], int(h_scale*2.42)), font, size, yellow_color, thickness=2)
          cv2.imwrite('/content/{}.jpg'.format(ct), overlay_img)
          out.write(overlay_img)

        # Increasing frame count.
        ct = ct + 1
    else:
      break
与前面的部分类似地运行它。
# Calling the function.
input_dir = './Pexels Videos 2103099.mp4'
out_path = '/content/'
tracker_test_vid(input_dir, config_file, weights,out_path)
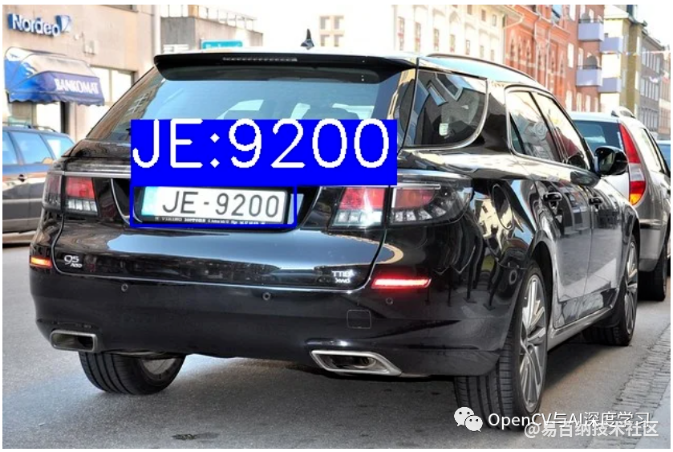
可以如前所示显示输出。这是最终输出,因为可以清楚地看到所有讨论的问题都大大减少了,ALPR 看起来相当准确,并且以14-15 FPS的良好速度执行。
结论
在这篇博文中,我们构建了一个速度为 14 到 15 FPS 的 ALPR 或 ANPR 系统。在这里,我们专注于两步过程:i)车牌检测器,ii)车牌检测器的提取和 OCR。
在经历这个过程中,许多问题可能会打动你的大脑,比如如何加快速度?如何提高准确率?跟踪器将如何响应遮挡?等等。一种方法是自己尝试找出答案。
在这里,车牌以 90% 的准确率进行了训练。如果速度是车牌检测器的主要目标,则更希望使用 YOLO-tiny,它提供比 YOLOv4 更好的速度,但在准确性方面有所权衡。
此外,PaddleOCR 的 PP-OCR 工作完美无缺,它重量轻且非常准确,在准确性和速度之间取得了很好的平衡。PaddleOCR 提供了各种模型,如 SRN、重量级 PPOCR 等等,可以使用甚至从头开始训练以获得理想的结果。
但是我们的 ALPR 的理想方法是使用跟踪器,这样可以保持最好的 OCR 结果。各种其他跟踪器,如 OpenCV 跟踪器、CenterTrack、Tracktor 等,它们解决了不同的高级问题,如遮挡、Re-id 等。
尽情探索参考资料、调整输入内容并找出更多方法让任务更具挑战性。
本文代码地址:
https://github.com/spmallick/learnopencv/tree/master/ALPR
参考
YOLOv4: https://github.com/AlexeyAB/darknet
车牌数据集:
https://storage.googleapis.com/openimages/web/index.html
PaddleOCR: https://github.com/PaddlePaddle/PaddleOCR
测试视频:
https://www.pexels.com/video/traffic-flow-in-the-highway-2103099/
DeepSORT:https://github.com/nwojke/deep_sort
- 分享
- 举报
 微信扫码分享
 QQ好友
QQ好友
 暂无数据
暂无数据-
浏览量:7637次2021-06-14 02:59:16
-
浏览量:12007次2021-04-27 00:28:09
-
浏览量:7620次2021-05-01 14:14:55
-
浏览量:6453次2021-05-02 18:00:46
-
浏览量:11444次2020-12-14 13:26:01
-
浏览量:11073次2021-04-30 00:31:47
-
浏览量:3567次2024-02-20 10:27:52
-
浏览量:1292次2023-05-13 21:35:31
-
浏览量:1364次2023-03-15 09:05:04
-
浏览量:3428次2024-02-18 16:38:33
-
浏览量:703次2026-01-13 15:26:50
-
浏览量:9262次2020-12-16 13:01:00
-
浏览量:353次2023-07-24 11:00:24
-
浏览量:174次2023-08-16 18:28:43
-
浏览量:2246次2021-01-15 17:16:48
-
浏览量:5825次2021-01-14 16:44:46
-
浏览量:303次2023-08-22 15:12:16
-
浏览量:965次2023-12-05 17:39:39
-
浏览量:2930次2023-12-01 14:35:39


-
广告/SPAM
-
恶意灌水
-
违规内容
-
文不对题
-
重复发帖

搬砖中~

 微信支付
微信支付
举报类型
- 内容涉黄/赌/毒
- 内容侵权/抄袭
- 政治相关
- 涉嫌广告
- 侮辱谩骂
- 其他
详细说明
审核成功
审核失败


关注公众号
社区问题咨询:Ebaina-CN
定制需求咨询:xxqk158820
