

AI社交距离检测器:在视频帧中进行目标检测
上一篇文章AI社交距离检测器:基于TensorFlow和MobileNet的对象检测我们学习了如何使用绘图函数来标记检测到的对象。
在本文中,我们将继续学习如何使用AI人工智能来构建一个社交距离检测器。
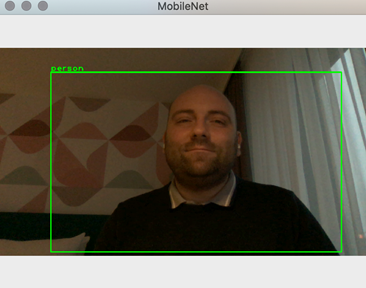
在学习了如何使用TensorFlow和预先训练好的MobileNet模型之后,我们继续将我们的检测器与网络摄像机结合起来。学习完本文,您将了解如何在视频序列上运行对象检测,如下所示。
相机捕捉
我首先实现了Camera类,它帮助从网络摄像机捕获帧。为此,我使用OpenCV里面的VideoCapture类。获取默认摄像头的引用,并将其存储在camera_capture字段:
def __init__(self):
    # Initialize the camera capture
    try:
        self.camera_capture = opencv.VideoCapture(0)
    except expression as identifier:
print(identifier)若要捕获视频帧,请使用read方法VideoCapture类实例。它返回两个值:
status-表示捕获状态的布尔变量。frame-用摄像机获取的实际帧。
要在使用视频帧之前检查状态,此外,在某些设备上,第一帧可能显示为空白。这个capture_frame方法的Camera类通过忽略第一个帧进行补偿,这取决于输入参数,如下所示:
def capture_frame(self, ignore_first_frame):
    # Get frame, ignore the first one if needed
    if(ignore_first_frame):
        self.camera_capture.read()

    (capture_status, current_camera_frame) = self.camera_capture.read()

    # Verify capture status
    if(capture_status):
        return current_camera_frame

    else:
        # Print error to the console
print('Capture error')类的一般使用流程。Camera类是调用初始化器一次,然后调用capture_frame视需要而定。
参考以前开发的模块
为了进一步发展,我们将使用先前开发的Inference类和ImageHelper类。为此,我们将引用这些模块。这些模块的源代码在上一篇文章中有解释。
为了参考这些模块,我修改了Main.py:
import sys
sys.path.insert(1, '../Part_03/')

from inference import Inference as model
from image_helper import ImageHelper as imgHelper

Now, we can easily access the object detector, and perform inference (object detection), even though the source files are in a different folder:

# Load and prepare model
model_file_path = '../Models/01_model.tflite'
labels_file_path = '../Models/02_labels.txt'

# Initialize model
ai_model = model(model_file_path, labels_file_path)

# Perform object detection
score_threshold = 0.5
results = ai_model.detect_objects(camera_frame, score_threshold)
把东西放在一起
我们只需要从相机捕捉帧,并将其传递给AI模块:
import sys
sys.path.insert(1, '../Part_03/')

from inference import Inference as model
from image_helper import ImageHelper as imgHelper

from camera import Camera as camera

if __name__ == "__main__":
    # Load and prepare model
    model_file_path = '../Models/01_model.tflite'
    labels_file_path = '../Models/02_labels.txt'

    # Initialize model
    ai_model = model(model_file_path, labels_file_path)

    # Initialize camera
    camera_capture = camera()

    # Capture frame and perform inference
    camera_frame = camera_capture.capture_frame(False)

    score_threshold = 0.5
    results = ai_model.detect_objects(camera_frame, score_threshold)

    # Display results
    imgHelper.display_image_with_detected_objects(camera_frame, results)
运行上述代码后,您将得到导言中所示的结果。
总结
我们开发了一个Python控制台应用程序,在视频序列帧中执行来自网络摄像头的对象检测。尽管这是一个单一的视频帧检测,但是您可以通过在循环中捕获和调用检测、连续显示视频流以及按需调用检测(例如,通过按键盘上的键)来扩展示例。下一篇文章将对测试数据集中的帧执行对象检测以及存储。
- 分享
- 举报
 微信扫码分享
 QQ好友
QQ好友
 暂无数据
暂无数据-
浏览量:8937次2020-12-14 16:47:50
-
浏览量:9265次2020-12-16 13:01:00
-
浏览量:8931次2020-12-13 17:30:07
-
浏览量:8898次2020-12-13 17:04:33
-
浏览量:10226次2020-12-12 15:24:59
-
浏览量:8645次2020-12-15 17:11:22
-
浏览量:8670次2020-12-15 16:59:08
-
浏览量:1986次2024-03-01 16:56:38
-
浏览量:1824次2023-06-02 17:42:09
-
浏览量:3111次2023-02-17 11:37:20
-
浏览量:1848次2023-09-19 17:11:18
-
浏览量:1326次2023-12-18 18:38:45
-
浏览量:2906次2022-05-13 10:46:47
-
2024-01-06 11:14:41
-
浏览量:6270次2021-08-09 16:11:19
-
浏览量:4841次2023-12-16 11:15:45
-
浏览量:1726次2023-12-11 16:56:37
-
浏览量:10138次2024-02-02 17:13:35
-
浏览量:1211次2023-12-14 16:51:13
恬静的小魔龙
他强任他强,清风拂山岗

-
18篇
-
广告/SPAM
-
恶意灌水
-
违规内容
-
文不对题
-
重复发帖
恬静的小魔龙

 微信支付
微信支付
举报类型
- 内容涉黄/赌/毒
- 内容侵权/抄袭
- 政治相关
- 涉嫌广告
- 侮辱谩骂
- 其他
详细说明
审核成功
审核失败


关注公众号
社区问题咨询:Ebaina-CN
定制需求咨询:xxqk158820
