Node-RED系列文章目前已经写了16篇,介绍了Node-RED的安装以及默认安装的一些基本节点的使用,作为物联网的一个可视化拖动的流程,Node-RED的确实很容易上手。还没开始学习的同学可以先看下我以前的文章。
有时候真是佩服自己,node-red的教程一写就是16篇,今天好好整理了一下最近的知识点,再写一篇,有关自定义节点的文章。
有关自定的节点,我之前在dashboard节点的配置里有介绍过。这是一个使用angular的高度定制的节点。
之前我们已经讲解过如何安装dashboard节点,这里就一笔带过。重点是介绍dashboard库中的template节点的使用
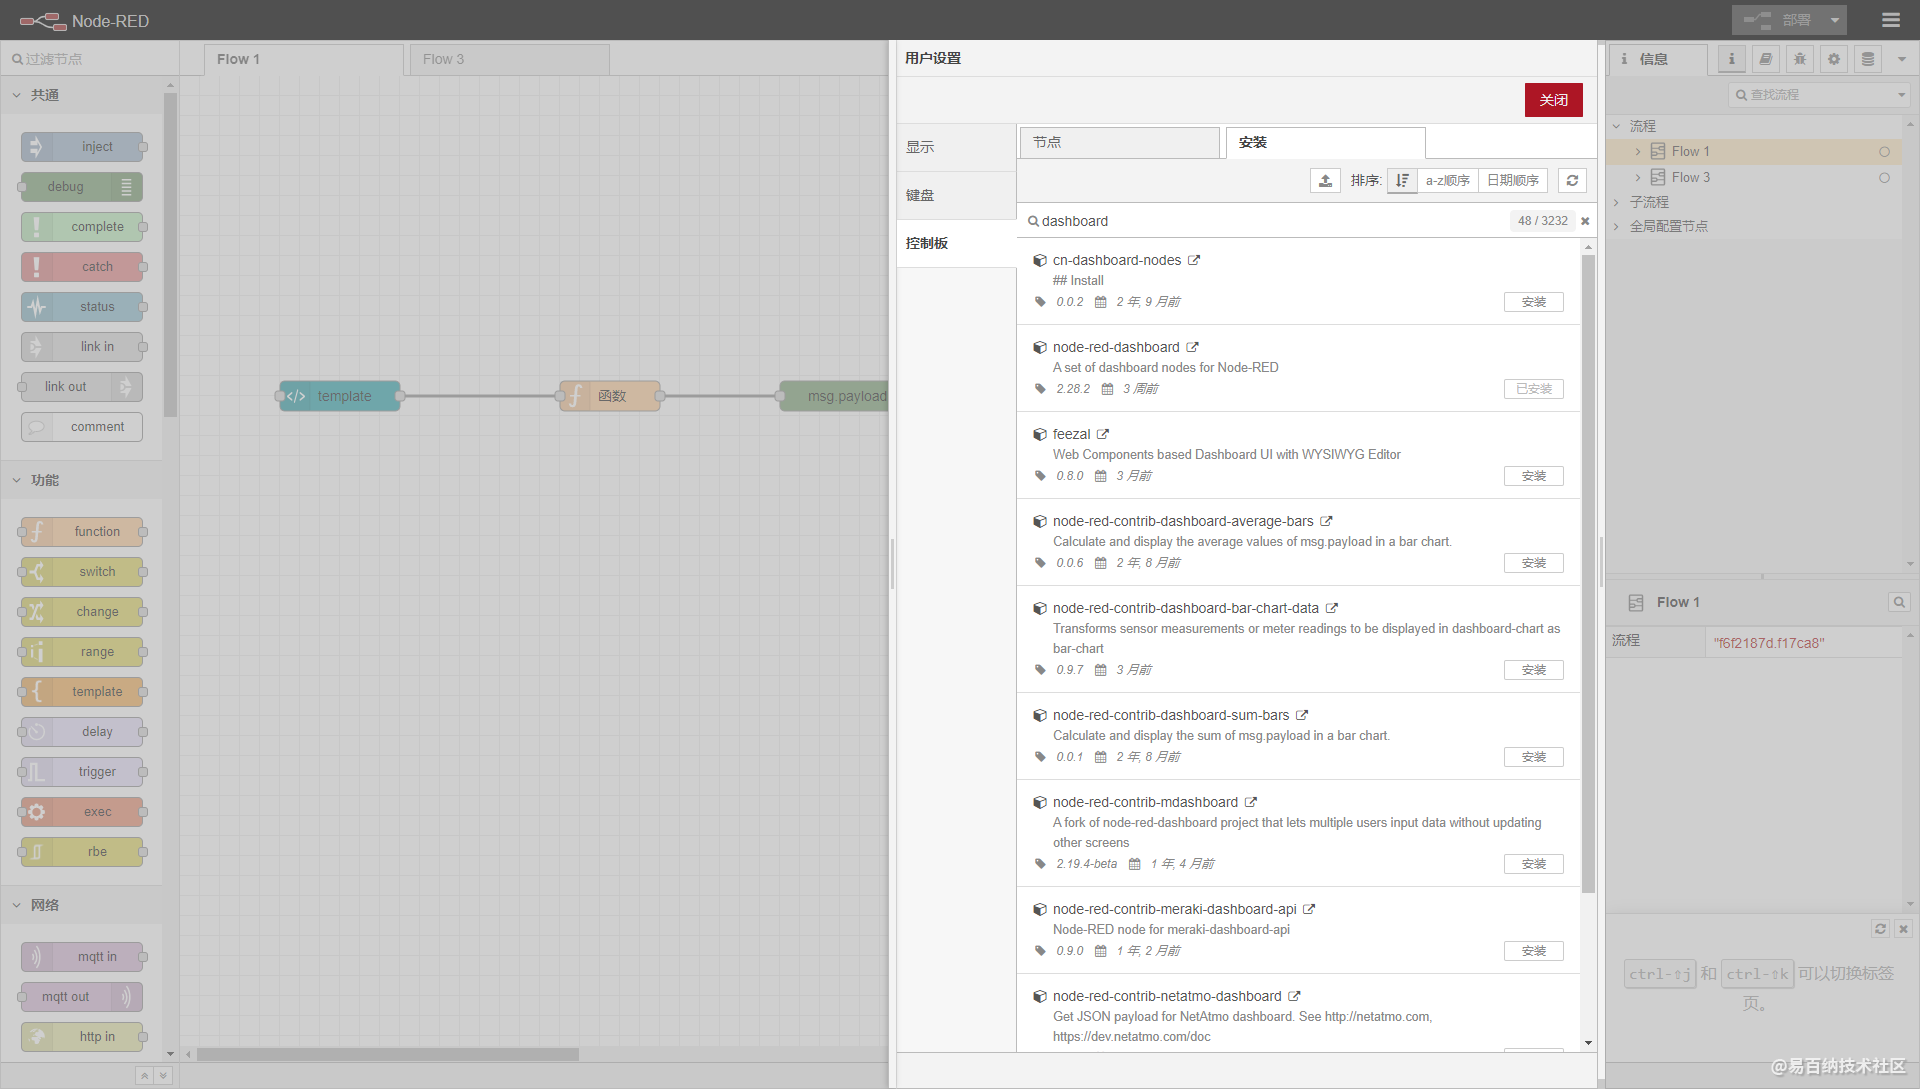
安装dashboard
打开设置,选择控制面板, 点击安装tab,输入 dashboard关键词,
找到 node-red-dashboard 的库。点击安装。
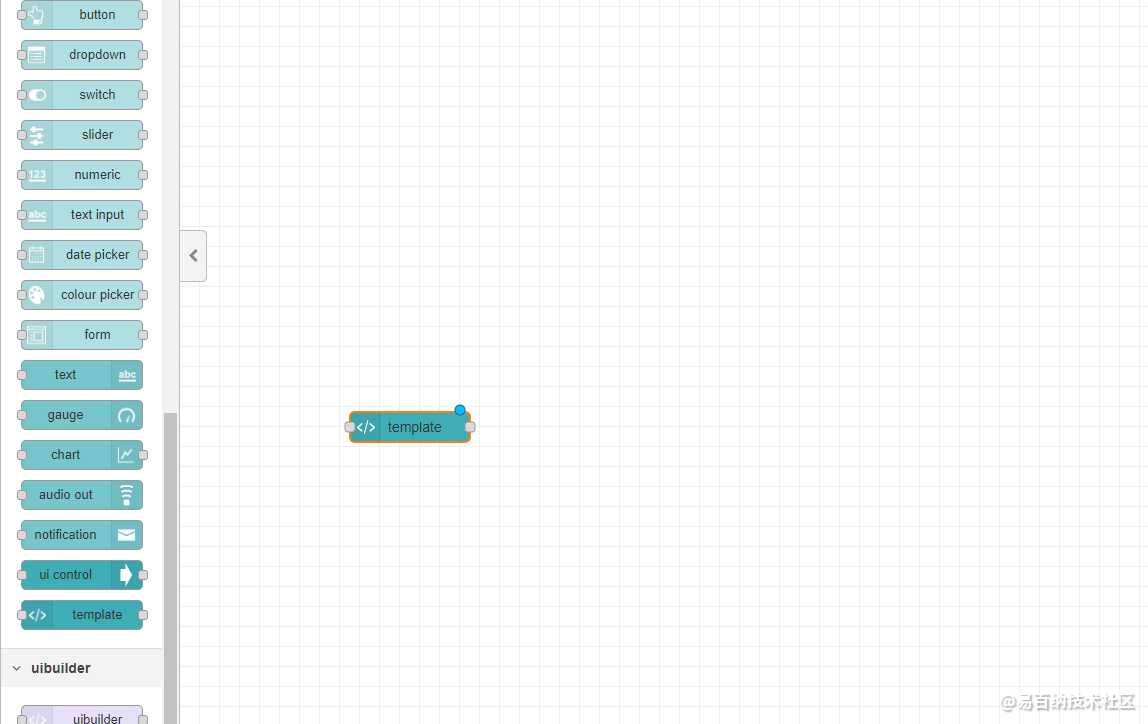
使用template
template的节点
节点的头部有一个 类似html标签的符合</>。表示这个节点可以写自定义的html,也可以写一些javascipt。
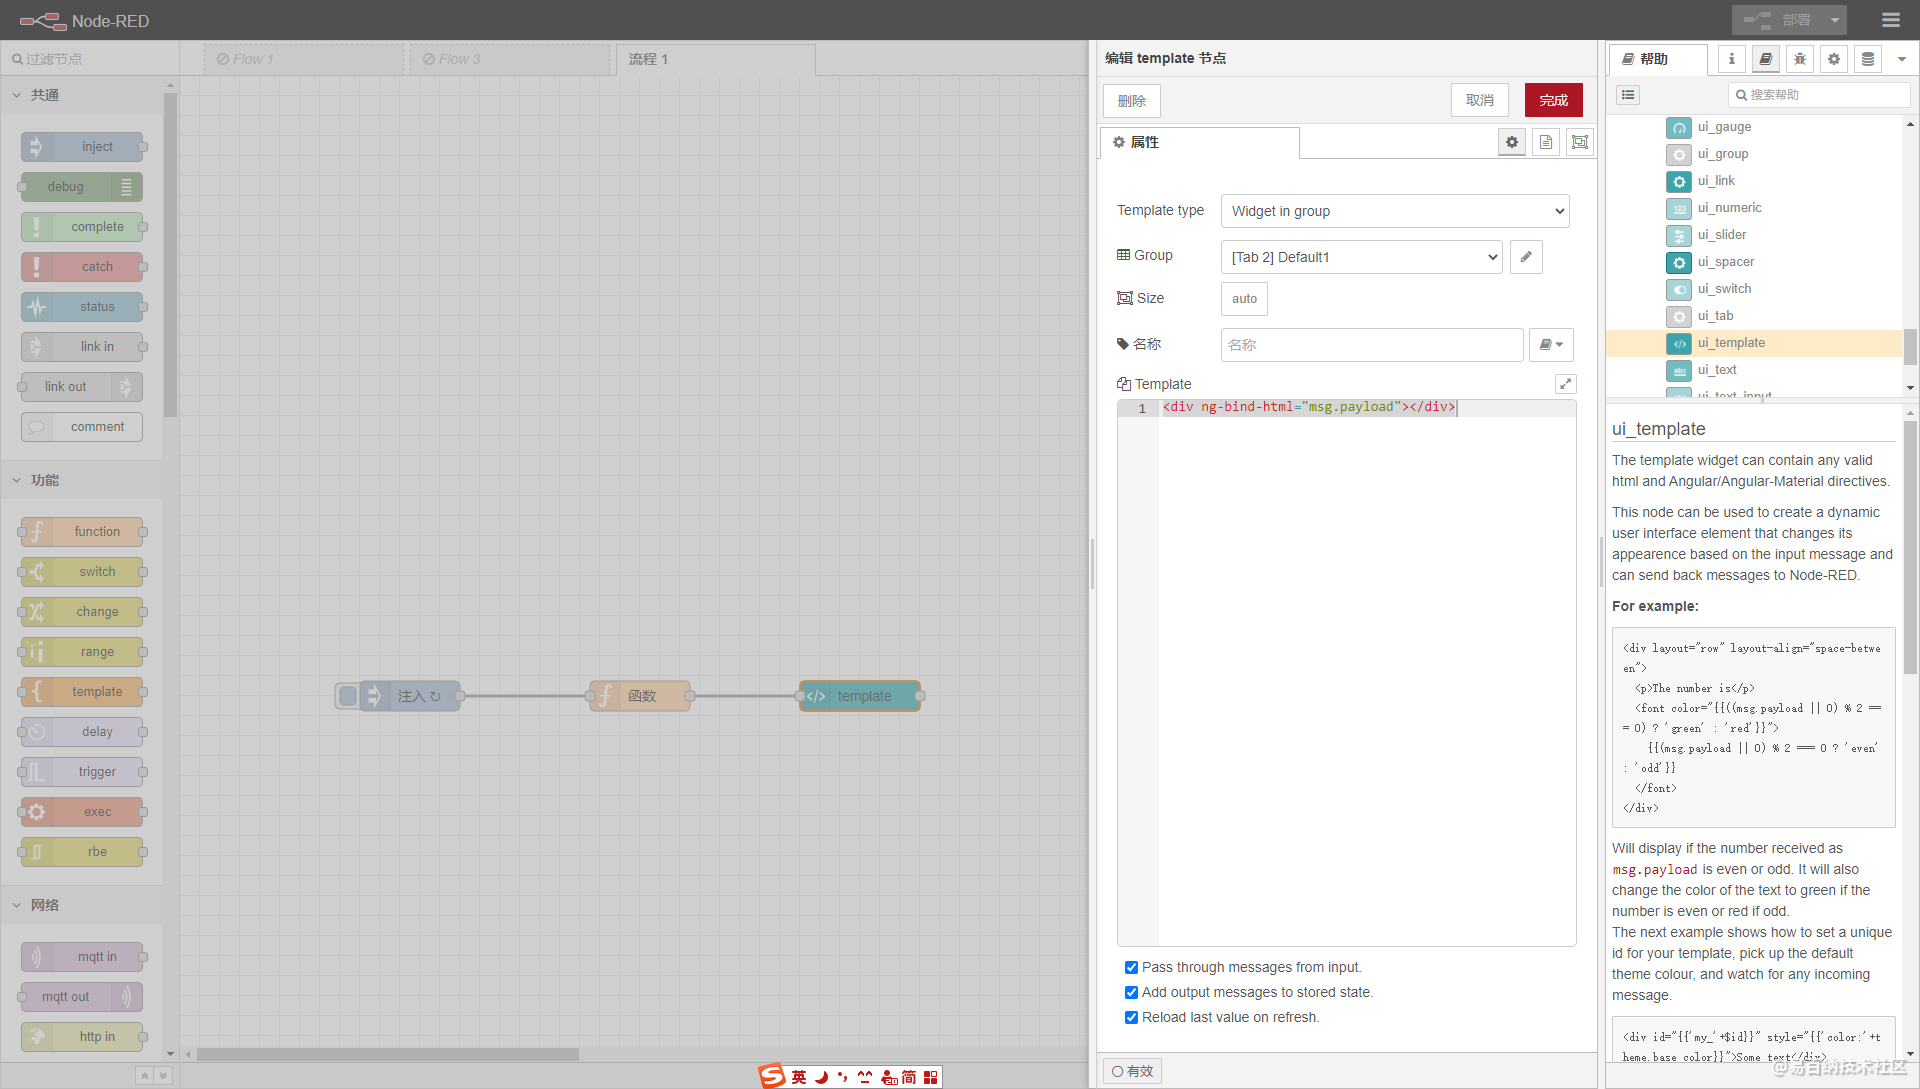
将节点拖放到编辑区域,双击节点进行编辑属性。
在编辑之前我先给大家详细介绍一下这个节点能做什么。
改节点就像一个angular的组件一样,你可以定义样式style,也可以写js,当然也可以写html。 另外重要的一点是,改组件已经自动将payload注入其中了。你可以直接使用,此外它还提供了一个send方法,将页面的变量发送到flow中。
这就是为什么 template节点拥有入口 和 出口。因为它接受入参,输出结果。
需要注意的一点是,组件的内容必须要以angular的格式来写。
如果你还不太熟悉angular。也没关系。找到官方文档看一遍就可以写了。
显示flow中的数据
template的作用大致就是上面说的那些,下面我们来真实地操作一些案例。
需求:现有一个温度计,每2秒发送一次文档。要求在页面上显示出这个值。
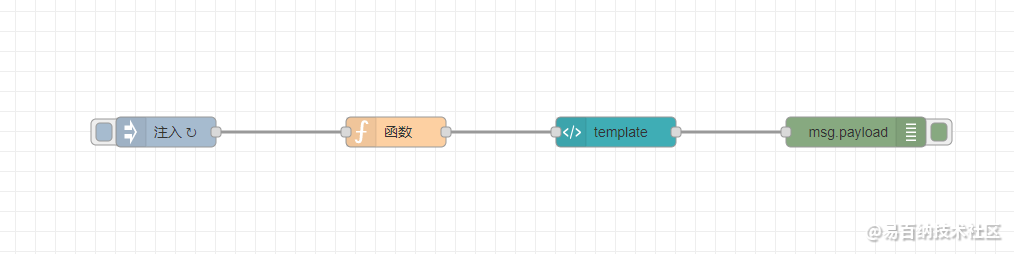
针对这个需求我们使用三个节点来完成。
inject+function+template
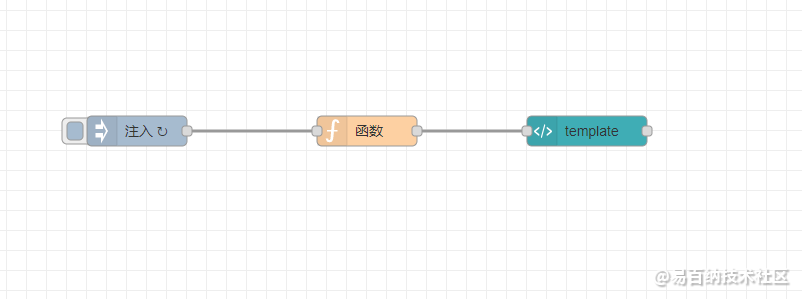
- inject节点来定时循环注入,
- function节点用于生产随机数。
- template 节点用于显示payload中的数据。
template中的配置很简单。
只有一句话
<div ng-bind-html="msg.payload"></div>
写好后看一下效果

在看一个稍微复杂一点的例子
<div layout="row" layout-align="space-between">
  <p>The number is</p>
  <font color="{{((msg.payload || 0) % 2 === 0) ? 'green' : 'red'}}">
    {{(msg.payload || 0) % 2 === 0 ? 'even' : 'odd'}}
  </font>
</div>
使用 msg.payload 来控制字体颜色,并表明是偶数还是奇数
这里写的案例都是一些直接显示msg中数据的例子。
看一个使用scope来监听msg的例子
<div id="{{'my_'+$id}}" style="{{'color:'+theme.base_color}}">Some text</div>
<script>
(function(scope) {
  scope.$watch('msg', function(msg) {
    if (msg) {
      // Do something when msg arrives
      $("#my_"+scope.$id).html(msg.payload);
    }
  });
})(scope);
</script>
使用scope.$watch来监听msg的改变, 改变后触发回调函数 将msg.payload填写到页面上。
到这里讲的就是使用template显示msg中的数据的所有例子。
提交数据到flow中
有这样一个需求,我们需要在页面做一个表单,这个表单有点特殊。有自己的排版,样式,和逻辑,用自带的form节点无法实现。
于是我们就需要使用template来定制一个表单。
比如我们要查询一个设备的用电量和内存使用情况。
这个复杂的例子晚点讲,我们先来看一下,如何使用template将变量传入到flow中
看下面这个例子
<script>
var value = "hello world";
// or overwrite value in your callback function ...
this.scope.action = function() { return value; }
</script>
<md-button ng-click="send({payload:action()})">
    Click me to send a hello world
</md-button>
页面有一个按钮,点击后触发send函数。这个函数是没有被定义的,其实这是该节点的内置函数。 该函数接受一个对象。 会将该对象发送到flow中。
让我们来测试一下。
节点的完整配置数据如下
[
    {
        "id": "db8e4c3f.dbfbc",
        "type": "tab",
        "label": "流程 1",
        "disabled": false,
        "info": ""
    },
    {
        "id": "368ada2b.e3eaa6",
        "type": "ui_template",
        "z": "db8e4c3f.dbfbc",
        "group": "b87ab62e.53b358",
        "name": "",
        "order": 1,
        "width": 0,
        "height": 0,
        "format": "<script>\nvar value = \"hello world\";\n// or overwrite value in your callback function ...\nthis.scope.action = function() { return value; }\n</script>\n<md-button ng-click=\"send({payload:action()})\">\n    Click me to send a hello world\n</md-button>",
        "storeOutMessages": true,
        "fwdInMessages": true,
        "resendOnRefresh": true,
        "templateScope": "local",
        "x": 680,
        "y": 620,
        "wires": [
            [
                "c268ee84.e5d9e"
            ]
        ]
    },
    {
        "id": "4423dbcc.dbfcd4",
        "type": "inject",
        "z": "db8e4c3f.dbfbc",
        "name": "",
        "props": [
            {
                "p": "payload"
            },
            {
                "p": "topic",
                "vt": "str"
            }
        ],
        "repeat": "2",
        "crontab": "",
        "once": false,
        "onceDelay": 0.1,
        "topic": "",
        "payload": "",
        "payloadType": "num",
        "x": 230,
        "y": 620,
        "wires": [
            [
                "a9b78dc0.d4e02"
            ]
        ]
    },
    {
        "id": "a9b78dc0.d4e02",
        "type": "function",
        "z": "db8e4c3f.dbfbc",
        "name": "",
        "func": "msg.payload = Math.floor(Math.random()*100)\nreturn msg;",
        "outputs": 1,
        "noerr": 0,
        "initialize": "",
        "finalize": "",
        "x": 460,
        "y": 620,
        "wires": [
            [
                "368ada2b.e3eaa6"
            ]
        ]
    },
    {
        "id": "c268ee84.e5d9e",
        "type": "debug",
        "z": "db8e4c3f.dbfbc",
        "name": "",
        "active": true,
        "tosidebar": true,
        "console": false,
        "tostatus": false,
        "complete": "payload",
        "targetType": "msg",
        "statusVal": "",
        "statusType": "auto",
        "x": 920,
        "y": 620,
        "wires": []
    },
    {
        "id": "b87ab62e.53b358",
        "type": "ui_group",
        "name": "Default1",
        "tab": "245d6810.4fdae8",
        "order": 1,
        "disp": true,
        "width": 20,
        "collapse": false
    },
    {
        "id": "245d6810.4fdae8",
        "type": "ui_tab",
        "name": "Tab 2",
        "icon": "dashboard",
        "order": 2,
        "disabled": false,
        "hidden": false
    }
]
打开dashboard的页面 看到只有一个按钮
点击它
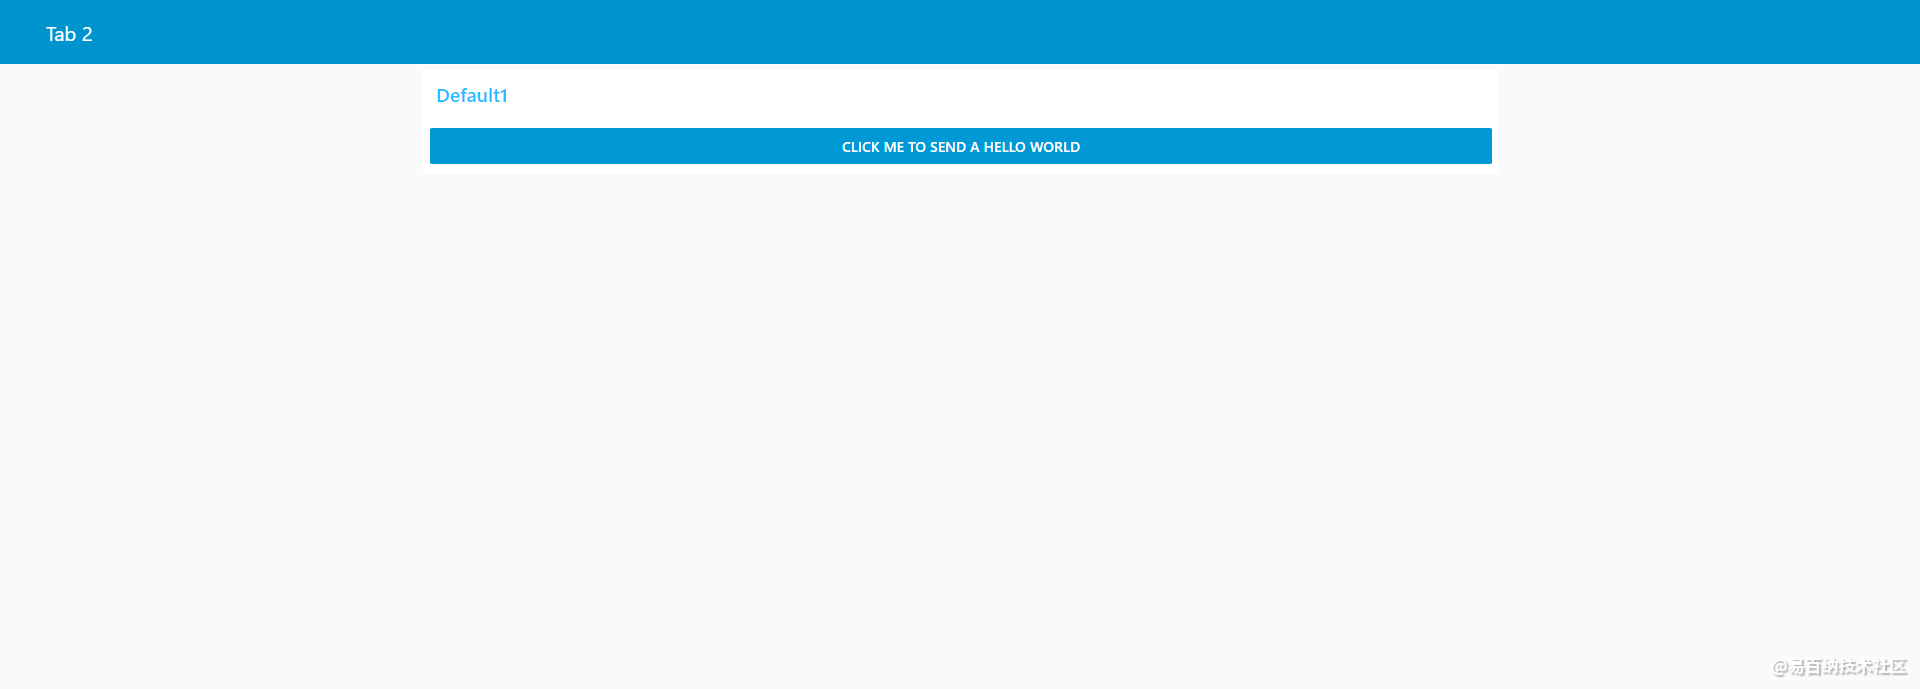
可以看到已经有值被注入到msg中了

下面写一个比较复杂的。
<!DOCTYPE html>
<html>

<head>
    <meta charset="UTF-8">
    <title>radio & checkbox</title>
</head>
<script>
    (function (scope) {

        scope.person = {
            sex: 'female',
            male_like: {
                pingpong: false,
                football: false,
                basketball: false,
            },
            female_like: ''
        }

        scope.action = function () {
            var selected = []
            var male_like = scope.person.male_like
            if (scope.person.sex === 'female') {
                selected = [scope.person.female_like]
            } else if (scope.person.sex === 'male'){
                Object.keys(male_like).forEach(x => {
                    if (male_like[x]) {
                        selected.push(x)
                    }
                })
            }
            var payload = {
                sex: scope.person.sex,
                selected,
            }

            return payload
        }
    })(scope);
</script>

<body ng-app="myApp" ng-controller="myCtrl">
    <div>
    <div style="display:inline-block;width:150px">
        <input type="radio"  name="sex" value="male" ng-model="person.sex" />男
    </div>
    <div style="display:inline-block;width:150px">
        <input type="radio" name="sex" value="female" ng-model="person.sex" />女
    </div>
 </div>

    <div ng-show="person.sex=='male'">
        <!--<p>选中男的复选选项</p>-->
        <input type="checkbox" ng-true-value="true" ng-false-value="false" ng-model="person.male_like.pingpong" />乒乓球
        <input type="checkbox" ng-true-value="true" ng-false-value="false" ng-model="person.male_like.football" />足球
        <input type="checkbox" ng-true-value="true" ng-false-value="false" ng-model="person.male_like.basketball" />篮球

    </div>

    <div ng-hide="person.sex=='male'">
        <!--<p>选中女的单选选项</p>-->
        <input type="radio" name="like" value="pingpong" ng-model="person.female_like" />乒乓球
        <input type="radio" name="like" value="football" ng-model="person.female_like" />足球
        <input type="radio" name="like" value="basketball" ng-model="person.female_like" />篮球

    </div>

    <!--<p>女性选中项:{{person.female_like}}</p>-->
    <!--<p>男性选中项{{person.male_like}}</p>-->

    <md-button ng-click="send({payload:action()})">
        Click me to send a hello world
    </md-button>

</body>

</html>

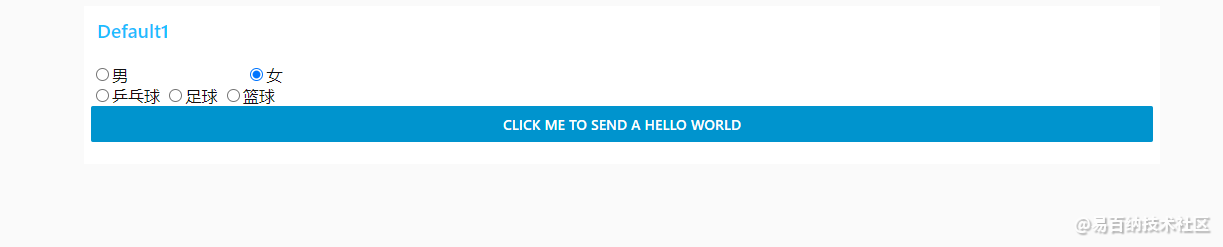
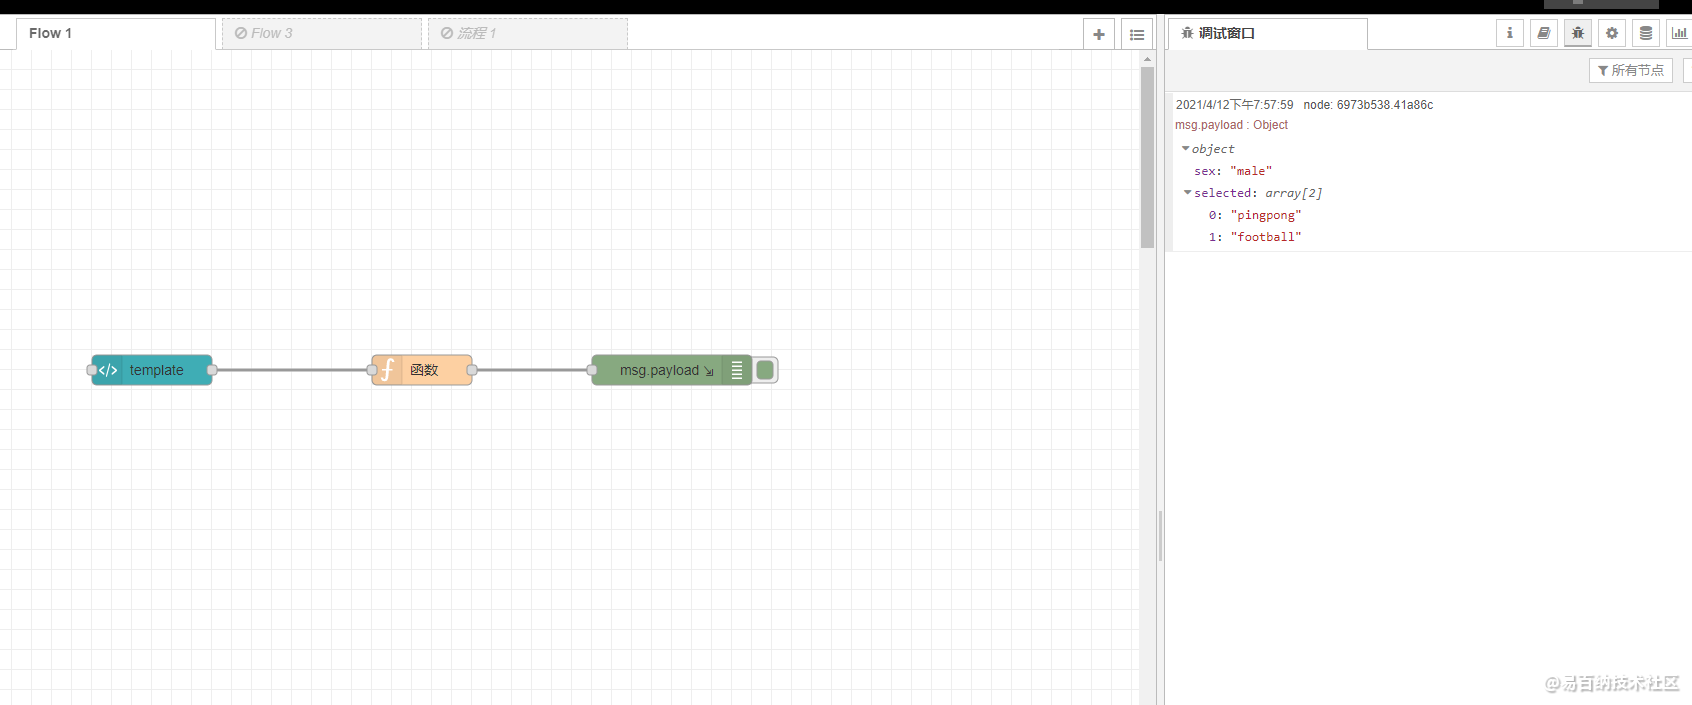
动态表单。将选项在客户端处理后发送到flow中,并打印出来。
点击按钮我们可以在调试控制台看到
好了,简单的案例和复杂的案例都已经讲了。
使用bootstarp
使用bootstrap来美化页面
    <link rel="stylesheet" href="https://cdn.staticfile.org/twitter-bootstrap/3.3.7/css/bootstrap.min.css">
    <script src="https://cdn.staticfile.org/jquery/2.1.1/jquery.min.js"></script>
    <script src="https://cdn.staticfile.org/twitter-bootstrap/3.3.7/js/bootstrap.min.js"></script>

    <div class="panel panel-success">
        <div class="panel-heading">
            <div class="row">
                <div class="col-md-8">
                    <div class="btn-group">
                        <button class="btn btn-default" ng-click="person.sex='male'" ng-class="{true:'btn-success',false:'btn-default'}[person.sex === 'male']">BOY</button>
                        <button class="btn btn-default" ng-click="person.sex='female'" ng-class="{true:'btn-success',false:'btn-default'}[person.sex === 'female']">GIRL</button>
                    </div>
                </div>
                <div class="col-md-4 text-right">

                </div>
            </div>
        </div>
        <div class="panel-body">
            <div class="row" ng-show="person.sex==='male'">
                <div class="col-md-12">
                    <ul class="list-group">
                        <li class="list-group-item" ng-repeat="h in hobbies">
                            <input class="checkbox-inline" type="checkbox" ng-model="h.checked" />
                            <label class="control-label text-primary" ng-bind="h.Title" ng-click="h.checked = !h.checked"></label>
                        </li>
                    </ul>
                </div>
            </div>

            <div class="row" ng-show="person.sex==='female'">
                <div class="col-md-12">
                    <ul class="list-group">
                        <li class="list-group-item" ng-repeat="h in hobbies">
                            <input type="radio" class="radio-inline" name="myHobby" ng-model="person.hobby" ng-value="h.Name" />
                            <label class="control-label text-primary" ng-click="person.hobby = h.Name" ng-bind="h.Title"></label>
                        </li>
                    </ul>
                </div>
            </div>
        </div>
        <div class="panel-footer text-right">
            <button class="btn btn-sm btn-primary" ng-click="submit()">Submit</button>
        </div>
    </div>

<script>

(function(scope){

    scope.person = {sex:'male', hobby:''};
    scope.hobbies = [{Name:'pingpong',Title:'乒乓球'},{Name:'football', Title:'足球'},{Name:'basketball',Title:'篮球'}];

    scope.submit = function(){

        console.log(JSON.stringify(scope.person, null, '\t'));
        console.log(JSON.stringify(scope.hobbies,null, '\t'));

        var result = {hobbies:[]};

        if(scope.person.sex == 'male'){
            scope.hobbies.forEach(function(x){
                if(x.checked){
                    result.hobbies.push(x);
                }
            });
        }else{
            scope.hobbies.forEach(function(x){
                if(scope.person.hobby === x.Name){
                    result.hobbies.push(x);
                }
            });
        }

        var msg = {payload:result};

        this.send(msg);
    };
})(scope);
</script>

很简单,直接引入 bootstrap的css即可
<link rel="stylesheet" href="https://cdn.staticfile.org/twitter-bootstrap/3.3.7/css/bootstrap.min.css">


 微信扫码分享
 QQ好友
QQ好友