

技术专栏
ThingsBoard教程(十六):制作RPC部件
前言
各位读者好,截止目前,ThingsBoard系列文章已经做了十篇,分别是
- ThingsBoard教程(一):ThingBoard介绍及安装
- ThingsBoard教程(二):租户,租户配置,部件组模块的使用
- ThingsBoard教程(三):系统设置模块的使用
- ThingsBoard教程(四):规则链简介与操作
- ThingsBoard教程(五):客户,资产管理
- ThingsBoard教程(六):设备管理
- ThingsBoard教程(七):模拟设备遥测
- ThingsBoard教程(八):自定义UI
- ThingsBoard教程(九):前端架构分析
- ThingsBoard教程(十):前端初级定制化
- ThingsBoard教程(十一):部件库的入门知识
- ThingsBoard教程(十二):部件库中使用echarts
- ThingsBoard教程(十三):部件的基本API解释
- ThingsBoard教程(十四):部件库基本JS函数API解释,及变量的使用,显示
- ThingsBoard教程(十五):部件库的点击事件
上一篇我们讲解了tb的静态组件的开发, 有关事件的控制,本篇文章我们来聊聊 在tb部件库中使用 RPC
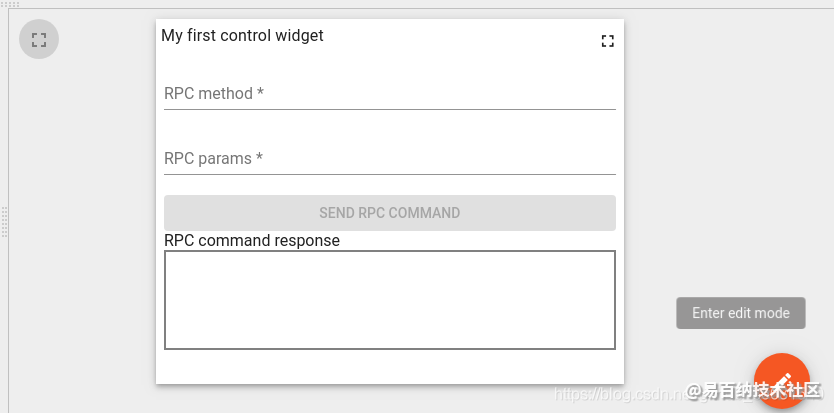
RPC部件效果展示
先来看下效果图
部件展示效果
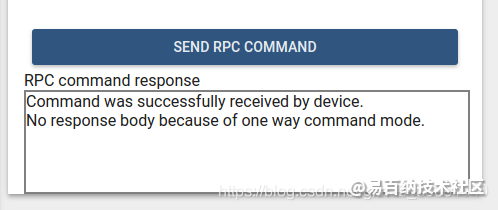
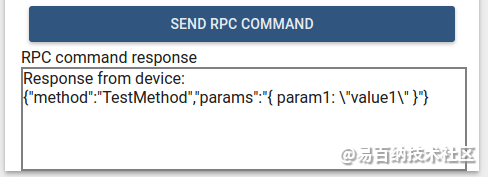
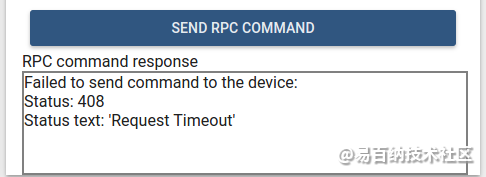
通讯结果
RPC部件库开发
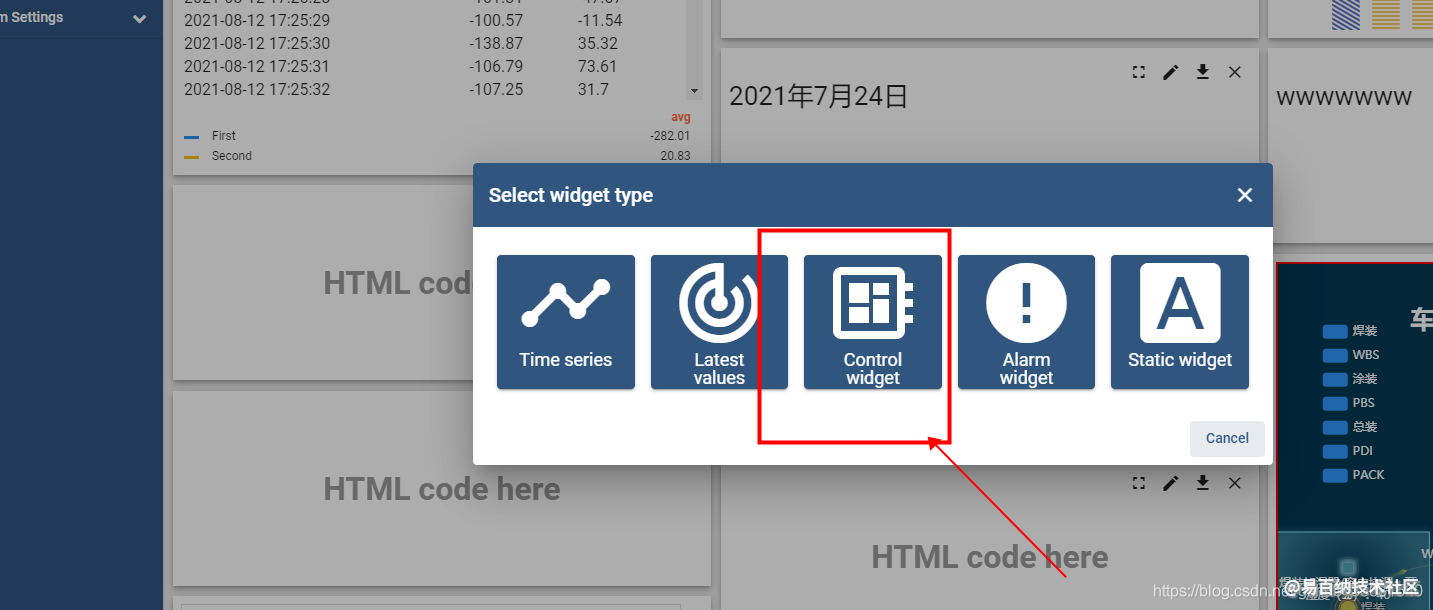
创建部件 选择 Control widget 部件类型。 这个很关键。
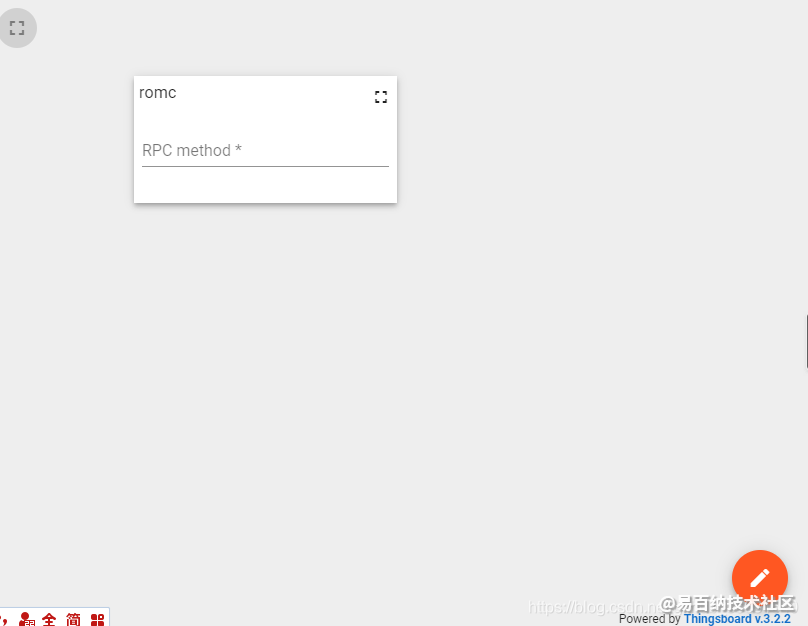
然后进入到编辑页面
html 代码
将使用以下内容替换html页面的内容
 <form #rpcForm="ngForm" (submit)="sendCommand()">
      <div class="mat-content mat-padding" fxLayout="column">
        <mat-form-field class="mat-block">
          <mat-label>RPC method</mat-label>
          <input matInput required name="rpcMethod" #rpcMethodField="ngModel" [(ngModel)]="rpcMethod"/>
          <mat-error *ngIf="rpcMethodField.hasError('required')">
            RPC method name is required.
          </mat-error>
        </mat-form-field>
        <mat-form-field class="mat-block">
          <mat-label>RPC params</mat-label>
          <input matInput required name="rpcParams" #rpcParamsField="ngModel" [(ngModel)]="rpcParams"/>
          <mat-error *ngIf="rpcParamsField.hasError('required')">
            RPC params is required.
          </mat-error>
        </mat-form-field>
        <button [disabled]="rpcForm.invalid || !rpcForm.dirty" mat-raised-button color="primary" type="submit" >
          Send RPC command
        </button>
        <div>
          <label>RPC command response</label>
          <div style="width: 100%; height: 100px; border: solid 2px gray" [innerHTML]="rpcCommandResponse">
          </div>
        </div>
      </div>
</form>这里使用的angular的语法 配合material组件 来布局一个表单。
javascript 代码
将以下内容写入javascript的面板中
self.onInit = function() {

    self.ctx.$scope.sendCommand = function() {
        var rpcMethod = self.ctx.$scope.rpcMethod;
        var rpcParams = self.ctx.$scope.rpcParams;
        var timeout = self.ctx.settings.requestTimeout;
        var oneWayElseTwoWay = self.ctx.settings.oneWayElseTwoWay ? true : false;

        var commandObservable;
        if (oneWayElseTwoWay) {
            commandObservable = self.ctx.controlApi.sendOneWayCommand(rpcMethod, rpcParams, timeout);
        } else {
            commandObservable = self.ctx.controlApi.sendTwoWayCommand(rpcMethod, rpcParams, timeout);
        }
        commandObservable.subscribe(
            function (response) {
                if (oneWayElseTwoWay) {
                    self.ctx.$scope.rpcCommandResponse = "Command was successfully received by device.<br> No response body because of one way command mode.";
                } else {
                    self.ctx.$scope.rpcCommandResponse = "Response from device:<br>";
                    self.ctx.$scope.rpcCommandResponse += JSON.stringify(response, undefined, 2);
                }
                self.ctx.detectChanges();
            },
            function (rejection) {
                self.ctx.$scope.rpcCommandResponse = "Failed to send command to the device:<br>"
                self.ctx.$scope.rpcCommandResponse += "Status: " + rejection.status + "<br>";
                self.ctx.$scope.rpcCommandResponse += "Status text: '" + rejection.statusText + "'";
                self.ctx.detectChanges();
            }

        );
    }

}
Settings schema 配置
{
    "schema": {
        "type": "object",
        "title": "Settings",
        "properties": {
            "oneWayElseTwoWay": {
                "title": "Is One Way Command",
                "type": "boolean",
                "default": true
            },
            "requestTimeout": {
                "title": "RPC request timeout",
                "type": "number",
                "default": 500
            }
        },
        "required": []
    },
    "form": [
        "oneWayElseTwoWay",
        "requestTimeout"
    ]
}
Data key settings schema
{
"schema": {
"type": "object",
"title": "Settings",
"properties": {
"oneWayElseTwoWay": {
"title": "Is One Way Command",
"type": "boolean",
"default": true
},
"requestTimeout": {
"title": "RPC request timeout",
"type": "number",
"default": 500
}
},
"required": []
},
"form": [
"oneWayElseTwoWay",
"requestTimeout"
]
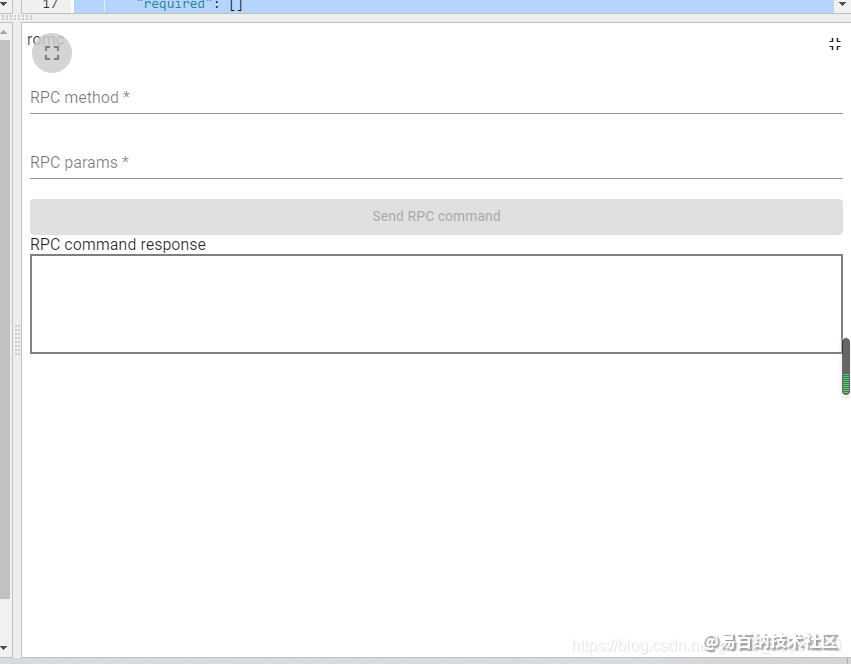
} 做完这些后就能看到部件的效果了
这里显示的太小了。我们点击右上角的 全屏图标就能放大,显示正常。
声明:本文内容由易百纳平台入驻作者撰写,文章观点仅代表作者本人,不代表易百纳立场。如有内容侵权或者其他问题,请联系本站进行删除。
红包
93
1
评论
打赏
- 分享
- 举报
 微信扫码分享
 QQ好友
QQ好友
评论
0个
手气红包
 暂无数据
暂无数据相关专栏
-
浏览量:15495次2021-08-13 16:08:47
-
浏览量:40009次2021-07-20 15:29:50
-
浏览量:10669次2021-07-24 18:04:04
-
浏览量:12956次2021-07-07 12:13:40
-
浏览量:12438次2021-07-13 16:37:15
-
浏览量:12572次2021-07-23 15:56:25
-
浏览量:17873次2021-02-07 11:52:24
-
浏览量:35866次2021-02-02 16:24:27
-
浏览量:22679次2021-02-02 19:39:27
-
浏览量:19881次2021-03-15 15:41:39
-
浏览量:21779次2021-03-22 17:45:29
-
浏览量:36950次2021-03-03 17:25:19
-
浏览量:29840次2021-02-05 17:49:30
-
浏览量:27543次2021-01-29 14:36:29
-
浏览量:43179次2021-01-27 20:32:32
-
浏览量:19126次2021-01-29 19:22:55
-
浏览量:3094次2020-08-03 20:16:34
-
浏览量:2665次2017-10-27 21:29:22
-
浏览量:1149次2023-10-12 11:18:32
关于作者

这把我C
完整的教程https://fizzz.blog.csdn.net。该网站都是残缺
原创246
阅读269.3w
收藏91
点赞84
评论19


切换马甲
上一页
下一页
TA最新文章
打赏用户
共 1 位

我要创作
分享技术经验,可获取创作收益
分类专栏
-
246篇
置顶时间设置
结束时间
删除原因
-
广告/SPAM
-
恶意灌水
-
违规内容
-
文不对题
-
重复发帖
打赏作者
这把我C
您的支持将鼓励我继续创作!
打赏金额:
¥1
¥5
¥10
¥50
¥100
支付方式:
 微信支付
微信支付
举报反馈
举报类型
- 内容涉黄/赌/毒
- 内容侵权/抄袭
- 政治相关
- 涉嫌广告
- 侮辱谩骂
- 其他
详细说明
审核成功
发布时间设置
发布时间:
请选择发布时间设置
是否关联周任务-专栏模块
审核失败
失败原因
请选择失败原因
备注
请输入备注


关注公众号
联系我们
社区问题咨询:Ebaina-CN
定制需求咨询:xxqk158820
社区问题咨询:Ebaina-CN
定制需求咨询:xxqk158820
回顶部
