

Linux设备树详解(三) 内核解析DTB成device_node

一、背景
前面我们了解到dtb的内存分布以后(dtb格式),接下来就来看看内核是如何把设备树解析成所需的device_node。
平台:arm
内核版本:Linux 5.19
二、解析详细流程
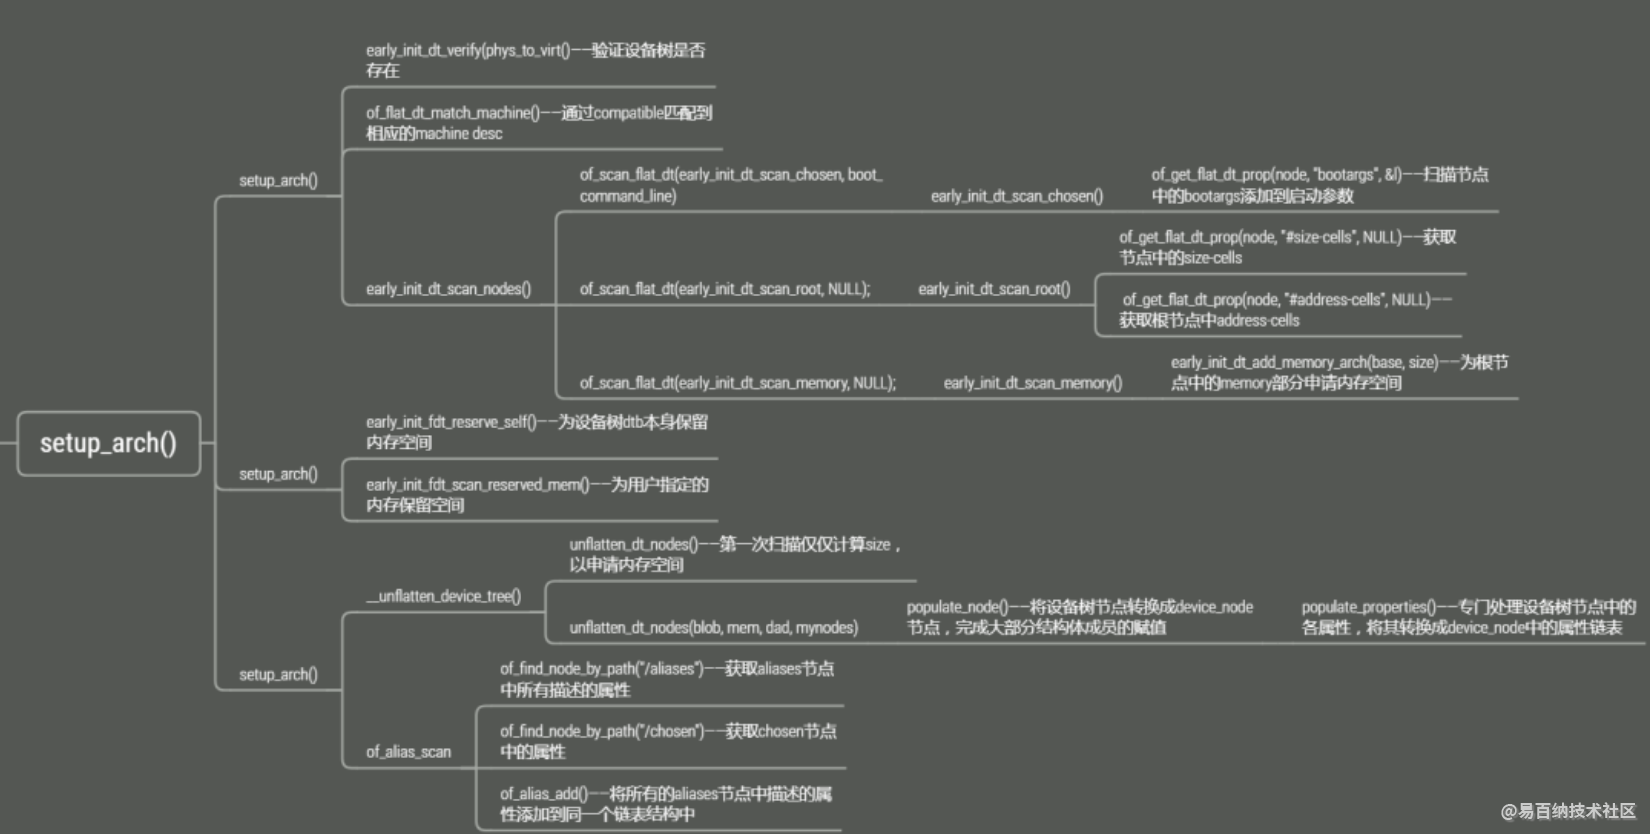
三、设备树的执行入口setup_arch
linux最底层的初始化部分在head.S中,这是汇编代码,我们暂且不作过多讨论。在head.S完成部分初始化之后,就开始调用C语言函数,而被调用的第一个C语言函数就是init/main.c start_kernel:
asmlinkage __visible void __init start_kernel(void)
{
    //...
    setup_arch(&command_line);
    //...
}
而对于设备树的处理,基本上就在arch/arm/kernel/setup.c setup_arch()这个函数中。
可以看到,在start_kernel()中调用了setup_arch(&command_line);
void __init setup_arch(char **cmdline_p)
{
    const struct machine_desc *mdesc = NULL;
    void *atags_vaddr = NULL;

    if (__atags_pointer)
        atags_vaddr = FDT_VIRT_BASE(__atags_pointer);
    ...
    // 根据传入的设备树dtb的首地址完成一些初始化操作
    mdesc = setup_machine_fdt(atags_vaddr);
    ...
    // 保证设备树dtb本身存在于内存中而不被覆盖
    arm_memblock_init(mdesc);
    ...
    // 对设备树具体的解析
    unflatten_device_tree();
    ...
}
这三个被调用的函数就是主要的设备树处理函数:
- setup_machine_fdt():根据传入的设备树dtb的首地址完成一些初始化操作。
- arm_memblock_init():主要是内存相关函数,为设备树保留相应的内存空间,保证设备树dtb本身存在于内存中而不被覆盖。用户可以在设备树中设置保留内存,这一部分同时作了保留指定内存的工作。
- unflatten_device_tree():对设备树具体的解析,事实上在这个函数中所做的工作就是将设备树各节点转换成相应的struct device_node结构体。
下面我们再来通过代码跟踪仔细分析。
四、setup_machine_fdt
// 根据传入的设备树dtb的首地址完成一些初始化操作
mdesc = setup_machine_fdt(atags_vaddr);
__atags_pointer 这个全局变量存储的就是r2的寄存器值,是设备树在内存中的起始地址,将设备树起始地址传递给setup_machine_fdt,对设备树进行解析。
setup_machine_fdt在文件arch/arm/kernel/devtree.c中定义,如下:
/**
 * setup_machine_fdt - Machine setup when an dtb was passed to the kernel
 * @dt_virt: virtual address of dt blob
 *
 * If a dtb was passed to the kernel in r2, then use it to choose the
 * correct machine_desc and to setup the system.
 */
const struct machine_desc * __init setup_machine_fdt(void *dt_virt)
{
    const struct machine_desc *mdesc, *mdesc_best = NULL;

    ...
    // 内存地址检查
    if (!dt_virt || !early_init_dt_verify(dt_virt))
        return NULL;

    // 读取 compatible 属性
    mdesc = of_flat_dt_match_machine(mdesc_best, arch_get_next_mach);
    ...

    // 扫描各个子节点
    early_init_dt_scan_nodes();

    ...
}
setup_machine_fdt 主要是获取了一些设备树提供的总览信息。
4.1 内存地址检查
先将设备树在内存中的物理地址转换为虚拟地址
然后再检查该地址上是否有设备树的魔数(magic),魔数就是一串用于识别的字节码:
- 如果没有或者魔数不匹配,表明该地址没有设备树文件,函数返回失败
- 否则验证成功,将设备树地址赋值给全局变量 initial_boot_params。
4.2 读取compatible属性
逐一读取设备树根目录下的 compatible 属性。of_flat_dt_match_machine在文件drivers/of/fdt.c中定义,部分代码如下:
/**
 * of_flat_dt_match_machine - Iterate match tables to find matching machine.
 *
 * @default_match: A machine specific ptr to return in case of no match.
 * @get_next_compat: callback function to return next compatible match table.
 *
 * Iterate through machine match tables to find the best match for the machine
 * compatible string in the FDT.
 */
const void * __init of_flat_dt_match_machine(const void *default_match,
        const void * (*get_next_compat)(const char * const**))
{
    const void *data = NULL;
    const void *best_data = default_match;
    const char *const *compat;
    unsigned long dt_root;
    unsigned int best_score = ~1, score = 0;

    // 获取首地址
    dt_root = of_get_flat_dt_root();
    // 遍历
    while ((data = get_next_compat(&compat))) {
        // 将compatible中的属性一一与内核中支持的硬件单板相对比,
        // 匹配成功后返回相应的machine_desc结构体指针。
        score = of_flat_dt_match(dt_root, compat);
        if (score > 0 && score < best_score) {
            best_data = data;
            best_score = score;
        }
    }

    ...

    pr_info("Machine model: %s\n", of_flat_dt_get_machine_name());

    return best_data;
}
machine_desc结构体中描述了单板相关的一些硬件信息,这里不过多描述。
主要的的行为就是根据这个compatible属性选取相应的硬件单板描述信息;一般compatible属性名就是"厂商,芯片型号"。
4.3 扫描各子节点
第三部分就是扫描设备树中的各节点,主要分析这部分代码。early_init_dt_scan_nodes在文件drivers/of/fdt.c中定义,代码如下:
void __init early_init_dt_scan_nodes(void)
{
    int rc;

    /* Initialize {size,address}-cells info */
    early_init_dt_scan_root();

    /* Retrieve various information from the /chosen node */
    rc = early_init_dt_scan_chosen(boot_command_line);
    if (rc)
        pr_warn("No chosen node found, continuing without\n");

    /* Setup memory, calling early_init_dt_add_memory_arch */
    early_init_dt_scan_memory();

    /* Handle linux,usable-memory-range property */
    early_init_dt_check_for_usable_mem_range();
}
这三个函数分别是处理chosen节点、root节点中除子节点外的属性信息、memory节点。
4.3.1 early_init_dt_scan_root
early_init_dt_scan_root在文件drivers/of/fdt.c中定义,代码如下:
/*
 * early_init_dt_scan_root - fetch the top level address and size cells
 */
int __init early_init_dt_scan_root(void)
{
    const __be32 *prop;
    const void *fdt = initial_boot_params;
    int node = fdt_path_offset(fdt, "/");

    if (node < 0)
        return -ENODEV;

    dt_root_size_cells = OF_ROOT_NODE_SIZE_CELLS_DEFAULT;
    dt_root_addr_cells = OF_ROOT_NODE_ADDR_CELLS_DEFAULT;

    prop = of_get_flat_dt_prop(node, "#size-cells", NULL);
    if (prop)
        dt_root_size_cells = be32_to_cpup(prop);
    pr_debug("dt_root_size_cells = %x\n", dt_root_size_cells);

    prop = of_get_flat_dt_prop(node, "#address-cells", NULL);
    if (prop)
        dt_root_addr_cells = be32_to_cpup(prop);
    pr_debug("dt_root_addr_cells = %x\n", dt_root_addr_cells);

    return 0;
}
通过进一步代码分析,early_init_dt_scan_root为了将root节点中的#size-cells和#address-cells属性提取出来,并非获取root节点中所有的属性,放到全局变量dt_root_size_cells和dt_root_addr_cells中。
size-cells和address-cells表示对一个属性(通常是reg属性)的地址需要多少个四字节描述,而地址的长度需要多少个四字节描述,数据长度基本单位为4。
// 表示数据大小为一个4字节描述,32位
#size-cells = 1

// 表示地址由一个四字节描述
#address-cells = 1

// 而reg属性由四个四字节组成,所以存在两组地址描述,
// 第一组是起始地址为0x12345678,长度为0x100,
// 第二组起始地址为0x22,长度为0x4,
// 因为在<>中,所有数据都是默认为32位。
reg = <0x12345678 0x100 0x22 0x4>
4.3.2 early_init_dt_scan_chosen
early_init_dt_scan_chosen在文件drivers/of/fdt.c中定义,部分代码如下:
int __init early_init_dt_scan_chosen(char *cmdline)
{
    ...
    node = fdt_path_offset(fdt, "/chosen");
    if (node < 0)
        node = fdt_path_offset(fdt, "/chosen@0");
    if (node < 0)
        return -ENOENT;

    chosen_node_offset = node;

    early_init_dt_check_for_initrd(node);
    early_init_dt_check_for_elfcorehdr(node);

    /* Retrieve command line */
    // 找到设备树中的的chosen节点中的bootargs,并作为cmd_line
    p = of_get_flat_dt_prop(node, "bootargs", &l);
    if (p != NULL && l > 0)
        strlcpy(cmdline, p, min(l, COMMAND_LINE_SIZE));
    ...
    pr_debug("Command line is: %s\n", (char *)cmdline);
    ...
    return 0;
}经过代码分析,early_init_dt_scan_chosen的作用是获取从chosen节点中获取bootargs,然后将bootargs放入boot_command_line中,作为启动参数。而非字面意思的处理整个chosen。
以我之前调过的zynq平台为例:
/ {
    model = "ZynqMP ZCU104 RevA";
    compatible = "xlnx,zynqmp-zcu104-revA", "xlnx,zynqmp-zcu104", "xlnx,zynqmp";

    aliases {
        ethernet0 = &gem3;
        gpio0 = &gpio;
        i2c0 = &i2c1;
        mmc0 = &sdhci1;
        rtc0 = &rtc;
        serial0 = &uart0;
        serial1 = &uart1;
        serial2 = &dcc;
        spi0 = &qspi;
        usb0 = &usb0;
    };

    chosen {
        bootargs = "earlycon";
        stdout-path = "serial0:115200n8";
    };

    memory@0 {
        device_type = "memory";
        reg = <0x0 0x0 0x0 0x80000000>;
    };
};
在支持设备树的嵌入式系统中,实际上:
- uboot基本上可以不通过显式的 bootargs=xxx 来传递给内核,而是在 env 拿出,并存放进设备树中的 chosen 节点中
- Linux也开始在设备树中的 chosen 节点中获取出来。这样子就可以做到针对uboot与Linux在bootargs传递上的统一。
4.3.3 early_init_dt_scan_memory
early_init_dt_scan_memory在文件drivers/of/fdt.c中定义,代码如下:
/*
 * early_init_dt_scan_memory - Look for and parse memory nodes
 */
int __init early_init_dt_scan_memory(void)
{
    int node;
    const void *fdt = initial_boot_params;

    fdt_for_each_subnode(node, fdt, 0) {
        const char *type = of_get_flat_dt_prop(node, "device_type", NULL);
        const __be32 *reg, *endp;
        int l;
        bool hotpluggable;

        /* We are scanning "memory" nodes only */
        if (type == NULL || strcmp(type, "memory") != 0)
            continue;

        if (!of_fdt_device_is_available(fdt, node))
            continue;

        reg = of_get_flat_dt_prop(node, "linux,usable-memory", &l);
        if (reg == NULL)
            reg = of_get_flat_dt_prop(node, "reg", &l);
        if (reg == NULL)
            continue;

        endp = reg + (l / sizeof(__be32));
        hotpluggable = of_get_flat_dt_prop(node, "hotpluggable", NULL);

        pr_debug("memory scan node %s, reg size %d,\n",
             fdt_get_name(fdt, node, NULL), l);

        while ((endp - reg) >= (dt_root_addr_cells + dt_root_size_cells)) {
            u64 base, size;

            base = dt_mem_next_cell(dt_root_addr_cells, ®);
            size = dt_mem_next_cell(dt_root_size_cells, ®);

            if (size == 0)
                continue;
            pr_debug(" - %llx, %llx\n", base, size);

            early_init_dt_add_memory_arch(base, size);

            if (!hotpluggable)
                continue;

            if (memblock_mark_hotplug(base, size))
                pr_warn("failed to mark hotplug range 0x%llx - 0x%llx\n",
                    base, base + size);
        }
    }
    return 0;
}
函数先判断节点的unit name是memory@0,如果不是,则返回。然后将所有memory相关的reg属性取出来,根据address-cell和size-cell的值进行解析,然后调用 early_init_dt_add_memory_arch()来申请相应的内存空间。
memory@0 {
    device_type = "memory";
    reg = <0x0 0x0 0x0 0x80000000>, <0x8 0x00000000 0x0 0x80000000>;
};
五、arm_memblock_init
arm_memblock_init在arch/arm/mm/init.c文件中定义,部分代码如下:
void __init arm_memblock_init(const struct machine_desc *mdesc)
{
    /* Register the kernel text, kernel data and initrd with memblock. */
    memblock_reserve(__pa(KERNEL_START), KERNEL_END - KERNEL_START);

    reserve_initrd_mem();

    arm_mm_memblock_reserve();

    /* reserve any platform specific memblock areas */
    if (mdesc->reserve)
        mdesc->reserve();

    early_init_fdt_scan_reserved_mem();
    ...
}
对于设备树的初始化而言,主要做了两件事:
- 调用 early_init_fdt_reserve_self,根据设备树的大小为设备树分配空间,设备树的totalsize在dtb头部中有指明,因此当系统启动之后,设备树就一直存在在系统中。
- 扫描设备树节点中的 "reserved-memory"节点,为其分配保留空间。
memblock_init对于设备树的部分解析就完成了,主要是为设备树指定保留内存空间。
六、unflatten_device_tree
这一部分就进入了设备树的解析部分:注意of_root这个对象,我们后续文章中会提到它。实际上,解析以后的数据都是放在了这个对象里面。
unflatten_device_tree()在文件drivers/of/fdt.c中定义,部分代码如下:
/**
 * unflatten_device_tree - create tree of device_nodes from flat blob
 *
 * unflattens the device-tree passed by the firmware, creating the
 * tree of struct device_node. It also fills the "name" and "type"
 * pointers of the nodes so the normal device-tree walking functions
 * can be used.
 */
void __init unflatten_device_tree(void)
{
    // 展开设备树
    __unflatten_device_tree(initial_boot_params, NULL, &of_root,
                early_init_dt_alloc_memory_arch, false);

    /* Get pointer to "/chosen" and "/aliases" nodes for use everywhere */
    // 扫描设备树
    of_alias_scan(early_init_dt_alloc_memory_arch);
    ...
}
展开设备树
6.1 property原型
struct property {
    char    *name;
    int    length;
    void    *value;
    struct property *next;
    // ...
};
在设备树中,对于属性的描述是key = value,这个结构体中的name和value分别对应key和value,而length表示value的长度;
next指针指向下一个struct property结构体(用于构成单链表)。
6.2 __unflatten_device_tree
__unflatten_device_tree(initial_boot_params, NULL, &of_root,
early_init_dt_alloc_memory_arch, false);我们再来看最主要的设备树解析函数,__unflatten_device_tree在文件drivers/of/fdt.c中定义,部分代码如下:
/**
 * __unflatten_device_tree - create tree of device_nodes from flat blob
 * @blob: The blob to expand
 * @dad: Parent device node
 * @mynodes: The device_node tree created by the call
 * @dt_alloc: An allocator that provides a virtual address to memory
 * for the resulting tree
 * @detached: if true set OF_DETACHED on @mynodes
 *
 * unflattens a device-tree, creating the tree of struct device_node. It also
 * fills the "name" and "type" pointers of the nodes so the normal device-tree
 * walking functions can be used.
 *
 * Return: NULL on failure or the memory chunk containing the unflattened
 * device tree on success.
 */
void *__unflatten_device_tree(const void *blob,
                  struct device_node *dad,
                  struct device_node **mynodes,
                  void *(*dt_alloc)(u64 size, u64 align),
                  bool detached)
{
    int size;

    ...
    /* First pass, scan for size */
    size = unflatten_dt_nodes(blob, NULL, dad, NULL);
    ...
    /* Allocate memory for the expanded device tree */
    mem = dt_alloc(size + 4, __alignof__(struct device_node));
    ...
    /* Second pass, do actual unflattening */
    ret = unflatten_dt_nodes(blob, mem, dad, mynodes);
    ...

    pr_debug(" <- unflatten_device_tree()\n");
    return mem;
}
主要的解析函数为unflatten_dt_nodes(),在__unflatten_device_tree()函数中,unflatten_dt_nodes()被调用两次:
- 第一次是扫描得出设备树转换成device node需要的空间,然后系统申请内存空间;
- 第二次就进行真正的解析工作,我们继续看unflatten_dt_nodes()函数:
值得注意的是,在第二次调用unflatten_dt_nodes()时传入的参数为unflatten_dt_nodes(blob, mem, dad, mynodes);
unflatten_dt_nodes
第一个参数是设备树存放首地址,第二个参数是申请的内存空间,第三个参数为父节点,初始值为NULL,第四个参数为mynodes,初始值为of_node.
/**
 * unflatten_dt_nodes - Alloc and populate a device_node from the flat tree
 * @blob: The parent device tree blob
 * @mem: Memory chunk to use for allocating device nodes and properties
 * @dad: Parent struct device_node
 * @nodepp: The device_node tree created by the call
 *
 * Return: The size of unflattened device tree or error code
 */
static int unflatten_dt_nodes(const void *blob,
                  void *mem,
                  struct device_node *dad,
                  struct device_node **nodepp)
{
    struct device_node *root;

    ...
    for (offset = 0;
         offset >= 0 && depth >= initial_depth;
         offset = fdt_next_node(blob, offset, &depth)) {
    ...

    return mem - base;
}
这个函数中主要的作用就是从根节点开始,对子节点依次调用 populate_node(),从函数命名上来看,这个函数就是填充节点,为节点分配内存。
device_node原型
// include/linux/of.h
struct device_node {
    const char *name;
    phandle phandle;
    const char *full_name;
    struct fwnode_handle fwnode;

    struct  property *properties;
    struct  property *deadprops;    /* removed properties */
    struct  device_node *parent;
    struct  device_node *child;
    struct  device_node *sibling;
#if defined(CONFIG_OF_KOBJ)
    struct  kobject kobj;
#endif
    unsigned long _flags;
    void    *data;
#if defined(CONFIG_SPARC)
    unsigned int unique_id;
    struct of_irq_controller *irq_trans;
#endif
};- name:设备节点中的name属性转换而来。
- type:由设备节点中的device_type转换而来。
- phandle:有设备节点中的"phandle"和"linux,phandle"属性转换而来,特殊的还可能由"ibm,phandle"属性转换而来。
- full_name:这个指针指向整个结构体的结尾位置,在结尾位置存储着这个结构体对应设备树节点的unit_name,意味着一个struct device_node结构体占内存空间为sizeof(structdevice_node)+strlen(unit_name)+字节对齐。
- properties:这是一个设备树节点的属性链表,属性可能有很多种,如:"interrupts","timer","hwmods"等等。
- parent,child,sibling:与当前属性链表节点相关节点,所以相关链表节点构成整个device_node的属性节点。
- kobj:用于在/sys目录下生成相应用户文件。
6.3 populate_node
populate_node在文件drivers/of/fdt.c中定义,部分代码如下:
static int populate_node(const void *blob,
              int offset,
              void **mem,
              struct device_node *dad,
              struct device_node **pnp,
              bool dryrun)
{
    struct device_node *np;

    ...
    // 申请内存
    // 注,allocl是节点的unit_name长度(类似于chosen、memory这类子节点描述开头时的名字,并非.name成员)
    np = unflatten_dt_alloc(mem, sizeof(struct device_node) + len,
                __alignof__(struct device_node));
    if (!dryrun) {
        char *fn;
        // 初始化node(设置kobj,接着设置node的fwnode.ops。)
        of_node_init(np);
        // 将device_node的full_name指向结构体结尾处,
        // 即,将一个节点的unit name放置在一个struct device_node的结尾处。
        np->full_name = fn = ((char *)np) + sizeof(*np);

        memcpy(fn, pathp, len);
        // 设置其 父节点 和 兄弟节点(如果有父节点)
        if (dad != NULL) {
            np->parent = dad;
            np->sibling = dad->child;
            dad->child = np;
        }
    }
    // 为节点的各个属性分配空间
    populate_properties(blob, offset, mem, np, pathp, dryrun);
    if (!dryrun) {
        // 获取,并设置device_node节点的name属性
        np->name = of_get_property(np, "name", NULL);
        if (!np->name)
            np->name = "<NULL>";
    }

    *pnp = np;
    return true;
}
一个设备树中节点转换成一个struct device_node结构的过程渐渐就清晰起来,现在我们接着看看populate_properties()这个函数,看看属性是怎么解析的。
6.4 populate_properties
populate_properties在文件drivers/of/fdt.c中定义,部分代码如下:
static void populate_properties(const void *blob,
                int offset,
                void **mem,
                struct device_node *np,
                const char *nodename,
                bool dryrun)
{
    ...
    pprev = &np->properties;
    for (cur = fdt_first_property_offset(blob, offset);
         cur >= 0;
         cur = fdt_next_property_offset(blob, cur)) {
        const __be32 *val;
        const char *pname;
        u32 sz;

        val = fdt_getprop_by_offset(blob, cur, &pname, &sz);
        if (!val) {
            pr_warn("Cannot locate property at 0x%x\n", cur);
            continue;
        }

        if (!pname) {
            pr_warn("Cannot find property name at 0x%x\n", cur);
            continue;
        }

        if (!strcmp(pname, "name"))
            has_name = true;

        pp = unflatten_dt_alloc(mem, sizeof(struct property),
                    __alignof__(struct property));
        if (dryrun)
            continue;

        /* We accept flattened tree phandles either in
         * ePAPR-style "phandle" properties, or the
         * legacy "linux,phandle" properties.  If both
         * appear and have different values, things
         * will get weird. Don't do that.
         */
        if (!strcmp(pname, "phandle") ||
            !strcmp(pname, "linux,phandle")) {
            if (!np->phandle)
                np->phandle = be32_to_cpup(val);
        }

        /* And we process the "ibm,phandle" property
         * used in pSeries dynamic device tree
         * stuff
         */
        if (!strcmp(pname, "ibm,phandle"))
            np->phandle = be32_to_cpup(val);

        pp->name   = (char *)pname;
        pp->length = sz;
        pp->value  = (__be32 *)val;
        *pprev     = pp;
        pprev      = &pp->next;
    }
    ...
}
从属性转换部分的程序可以看出,对于大部分的属性,都是直接填充一个struct property属性;
而对于"phandle"属性和"linux,phandle"属性,直接填充struct device_node的phandle字段,不放在属性链表中。
6.5 of_alias_scan
从名字来看,这个函数的作用是解析根目录下的 alias,of_alias_scan在文件drivers/of/base.c中定义,具体代码如下:
/**
 * of_alias_scan - Scan all properties of the 'aliases' node
 * @dt_alloc:   An allocator that provides a virtual address to memory
 *      for storing the resulting tree
 *
 * The function scans all the properties of the 'aliases' node and populates
 * the global lookup table with the properties.  It returns the
 * number of alias properties found, or an error code in case of failure.
 */
void of_alias_scan(void * (*dt_alloc)(u64 size, u64 align))
{
    struct property *pp;

    of_aliases = of_find_node_by_path("/aliases");
    of_chosen = of_find_node_by_path("/chosen");
    if (of_chosen == NULL)
        of_chosen = of_find_node_by_path("/chosen@0");

    if (of_chosen) {
        /* linux,stdout-path and /aliases/stdout are for legacy compatibility */
        const char *name = NULL;

        if (of_property_read_string(of_chosen, "stdout-path", &name))
            of_property_read_string(of_chosen, "linux,stdout-path",
                        &name);
        if (IS_ENABLED(CONFIG_PPC) && !name)
            of_property_read_string(of_aliases, "stdout", &name);
        if (name)
            of_stdout = of_find_node_opts_by_path(name, &of_stdout_options);
    }

    if (!of_aliases)
        return;

    for_each_property_of_node(of_aliases, pp) {
        const char *start = pp->name;
        const char *end = start + strlen(start);
        struct device_node *np;
        struct alias_prop *ap;
        int id, len;

        /* Skip those we do not want to proceed */
        if (!strcmp(pp->name, "name") ||
            !strcmp(pp->name, "phandle") ||
            !strcmp(pp->name, "linux,phandle"))
            continue;

        np = of_find_node_by_path(pp->value);
        if (!np)
            continue;

        /* walk the alias backwards to extract the id and work out
         * the 'stem' string */
        while (isdigit(*(end-1)) && end > start)
            end--;
        len = end - start;

        if (kstrtoint(end, 10, &id) < 0)
            continue;

        /* Allocate an alias_prop with enough space for the stem */
        ap = dt_alloc(sizeof(*ap) + len + 1, __alignof__(*ap));
        if (!ap)
            continue;
        memset(ap, 0, sizeof(*ap) + len + 1);
        ap->alias = start;
        of_alias_add(ap, np, id, start, len);
    }
}
of_alias_scan()函数先是处理设备树chosen节点中的"stdout-path"或者"stdout"属性(两者最多存在其一),然后将stdout指定的path赋值给全局变量of_stdout_options,并将返回的全局struct device_node类型数据赋值给of_stdout,指定系统启动时的log输出。
接下来为aliases节点申请内存空间,如果一个节点中同时没有name/phandle/linux,phandle,则被定义为特殊节点,对于这些特殊节点将不会申请内存空间。
然后,使用of_alias_add()函数将所有的aliases内容放置在aliases_lookup链表中。
- 分享
- 举报
 微信扫码分享
 QQ好友
QQ好友
 暂无数据
暂无数据-
浏览量:2283次2023-08-14 16:26:07
-
浏览量:6407次2024-01-15 16:17:45
-
浏览量:2248次2023-08-10 14:03:57
-
浏览量:3401次2023-11-29 12:31:57
-
浏览量:1855次2024-01-10 14:28:04
-
浏览量:1875次2023-08-10 11:15:37
-
浏览量:3255次2024-02-05 11:02:54
-
浏览量:2452次2023-12-01 12:14:35
-
浏览量:1936次2024-02-21 17:08:25
-
浏览量:2980次2023-12-06 12:30:38
-
浏览量:1254次2023-11-15 17:25:34
-
浏览量:7145次2024-03-18 15:00:34
-
浏览量:4221次2023-06-12 14:34:18
-
浏览量:1560次2023-08-14 17:53:58
-
浏览量:2066次2023-12-06 16:50:25
-
浏览量:1946次2023-05-16 14:10:29
-
浏览量:3951次2022-05-27 10:41:52
-
浏览量:2769次2024-02-04 17:43:11
-
浏览量:7282次2021-06-11 11:34:24


-
广告/SPAM
-
恶意灌水
-
违规内容
-
文不对题
-
重复发帖
Debug

 微信支付
微信支付
举报类型
- 内容涉黄/赌/毒
- 内容侵权/抄袭
- 政治相关
- 涉嫌广告
- 侮辱谩骂
- 其他
详细说明
审核成功
审核失败


关注公众号
社区问题咨询:Ebaina-CN
定制需求咨询:xxqk158820
