

【深度学习】利用一些API进行图像数据增广
文章目录
【深度学习】利用一些API进行图像数据增广
1 先送上一份最强的翻转代码(基于PIL)
2 Keras中的数据增强API种类概述
3 特征标准化
4 ZCA白化
5 随机旋转、移动、剪切和反转图像
6 保存和展示图像代码
7 pytorch随机裁剪
1 先送上一份最强的翻转代码(基于PIL)
import PIL.Image as img
import os

path_old = "/home/haishan/Data/dataLiXiang/nnunetData/training/input"  # 老目录
path_new = "/home/haishan/Data/dataLiXiang/DATA_rotate/input/"  # 新目录

def process(dirname):
    for maindir, subdir, file_name_list in os.walk(dirname):
        for filename in file_name_list:
            apath = os.path.join(maindir, filename)  # 合并成一个完整路径
            im = img.open(apath)
            ng = im.transpose(img.ROTATE_270)
            ng.save(path_new + '270'+filename)
            print("----")

process(path_old)
2 Keras中的数据增强API种类概述
在Keras中提供了对图像增强的API,这个API与大多Keras的API-样简单易用。在Keras中通过类ImageDataGenerator来实现图像增强处理的功能,这些功能包括:
●特征标准化。
●ZCA白化。
●随机旋转、移动、剪切和反转图像。
●维度排序。
●保存增强后的图像。
3 特征标准化
数据标准化是在特征处理环节必不可少的重要步骤。
数据标准化是为了消除不同指标量纲的影响,方便指标之间的可比性,量纲差异会影响某些模型中距离计算的结果。
常见标准化方法主要有归一化、正态化。
数据归一化也即0-1标准化,又称最大值-最小值标准化,核心要义是将原始指标缩放到0~1之间的区间内。相当于对原变量做了一次线性变化。
其公式为 EX = (x- min)/(max - min)
另一种常用的标准化方法是z-score标准化,将原始指标标准化为均值为0,标准化为1的正态分布。
EX = (x - mean)/σ# 图像特征化
imgGen = ImageDataGenerator(featurewise_center=True, featurewise_std_normalization=True)
imgGen.fit(X_train)4 ZCA白化
什么是白化?
维基百科给出的描述是:

即对数据做白化处理必须满足两个条件:
使数据的不同维度去相关;
使数据每个维度的方差为1;
条件1要求数据的协方差矩阵是个对角阵;条件2要求数据的协方差矩阵是个单位矩阵
假设训练数据是图像,由于图像中相邻像素之间具有很强的相关性,所以用于训练时输入是冗余的。白化的目的就是降低输入的冗余性。ZCA白化的定义为:
ZCA白化只是在PCA白化的基础上做了一个旋转操作,使得白化之后的数据更加的接近原始数据。
ZCA白化首先通过PCA去除了各个特征之间的相关性,然后是输入特征具有单位方差,此时得到PCA白化后的处理结果,然后再把数据旋转回去,得到ZCA白化的处理结果,感觉这个过程让数据的特征之间有具有的一定的相关性,
下面实验进行验证。
在实验中,我分别计算了原始数据,旋转后数据,PCA白化以及ZCA白化的协方差矩阵,数据用的是UFLDL的实验数据,是个协方差矩阵分别为:

# ZCA白化
imgGen = ImageDataGenerator(zca_whitening=True)
5 随机旋转、移动、剪切和反转图像
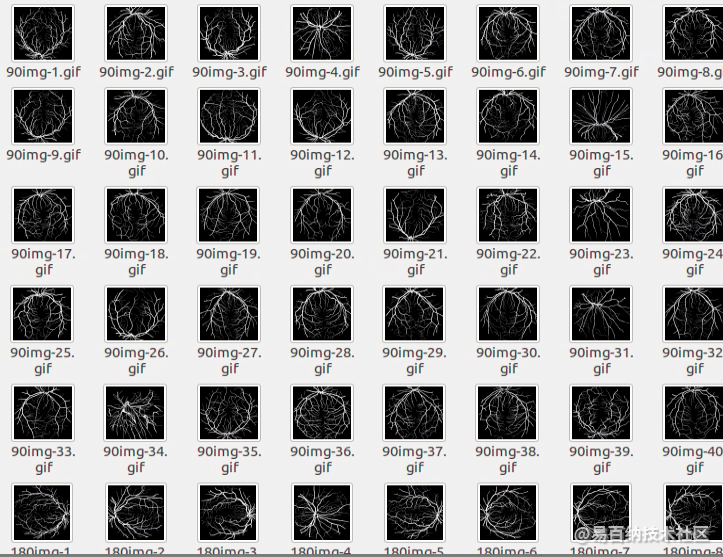
我最常用的是随机旋转:
如下图是对眼底标签图像的数据增强,采用旋转操作。
# 图像旋转
imgGen = ImageDataGenerator(rotation_range=90)
imgGen.fit(X_train)

for X_batch, y_batch in imgGen.flow(X_train, y_train, batch_size=9):
    for i in range(0, 9):
        plt.subplot(331 + i)
        plt.imshow(X_batch[i].reshape(28, 28), cmap=plt.get_cmap('gray'))
    plt.show()
    break

# 图像移动
imgGen = ImageDataGenerator(width_shift_range=0.2, height_shift_range=0.2)
imgGen.fit(X_train)

for X_batch, y_batch in imgGen.flow(X_train, y_train, batch_size=9):
    for i in range(0, 9):
        plt.subplot(331 + i)
        plt.imshow(X_batch[i].reshape(28, 28), cmap=plt.get_cmap('gray'))
    plt.show()
    break

# 图像剪切
imgGen = ImageDataGenerator(shear_range=0.2)
imgGen.fit(X_train)

for X_batch, y_batch in imgGen.flow(X_train, y_train, batch_size=9):
    for i in range(0, 9):
        plt.subplot(331 + i)
        plt.imshow(X_batch[i].reshape(28, 28), cmap=plt.get_cmap('gray'))
    plt.show()
    break

# 图像反转
imgGen = ImageDataGenerator(horizontal_flip=True, vertical_flip=True)
imgGen.fit(X_train)
这里多说一下使用numpy进行crop的方式:
源代码如下:
import matplotlib.pyplot as plt
import numpy as np
import random
from PIL import Image
image_path = "/home/xsr-ai/datasets/butterfly.jpg"
def random_crop(image, crop_shape, padding=None):
oshape = np.shape(image)
if padding:
oshape = (oshape[0] + 2 * padding, oshape[1] + 2 * padding)
npad = ((padding, padding), (padding, padding), (0, 0))
image_pad = np.lib.pad(image, pad_width=npad, mode='constant', constant_values=0)
nh = random.randint(0, oshape[0] - crop_shape[0])
nw = random.randint(0, oshape[1] - crop_shape[1])
image_crop = image_pad[nh:nh + crop_shape[0], nw:nw + crop_shape[1]]
return image_crop
else:
print("WARNING!!! nothing to do!!!")
return image
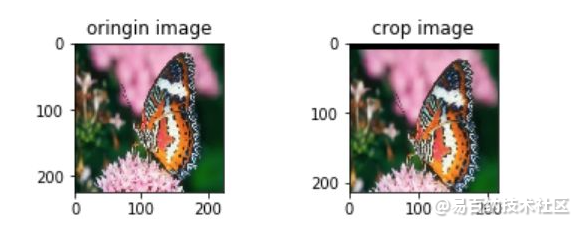
if __name__ == "__main__":
image_src = Image.open(image_path)
crop_width = image_src.size[0] - 10
crop_height = image_src.size[1] - 10
image_dst_crop = random_crop(image_src, [crop_width, crop_height], padding=10)
plt.figure()
plt.subplot(221)
plt.imshow(image_src)
plt.title("oringin image")
plt.subplot(222)
plt.imshow(image_dst_crop)
plt.title("crop image")
plt.show()crop结果:
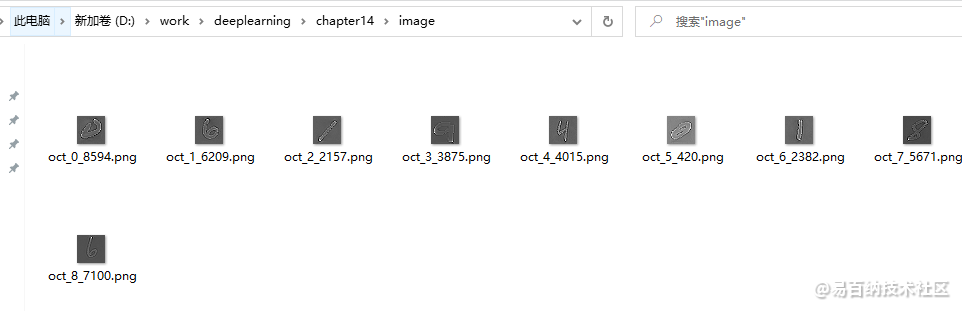
6 保存和展示图像代码
# 创建目录,并保存图像
try:
    os.mkdir('image')
except:
    print('The fold is exist!')
for X_batch, y_batch in imgGen.flow(X_train, y_train, batch_size=9, save_to_dir='image', save_prefix='oct',
                                    save_format='png'):
    for i in range(0, 9):
        plt.subplot(331 + i)
        plt.imshow(X_batch[i].reshape(28, 28), cmap=plt.get_cmap('gray'))
    plt.show()
    break
7 pytorch随机裁剪
1.随机裁剪: transforms.RandomCrop
class torchvision.transforms.RandomCrop(size, padding=None, pad_if_needed=False, fill=0, padding_mode='constant')
功能:依据给定的size随机裁剪
参数:size- (sequence or int),若为sequence,则为(h,w),若为int,则(size,size) padding-(sequence or int, optional),此参数是设置填充多少个pixel。
当为int时,图像上下左右均填充int个,例如padding=4,则上下左右均填充4个pixel,若为3232,则会变成4040。
当为sequence时,若有2个数,则第一个数表示左右扩充多少,第二个数表示上下的。当有4个数时,则为左,上,右,下。
fill- (int or tuple) 填充的值是什么(仅当填充模式为constant时有用)。int时,各通道均填充该值,当长度为3的tuple时,表示RGB通道需要填充的值。
padding_mode- 填充模式,这里提供了4种填充模式,1.constant,常量。2.edge 按照图片边缘的像素值来填充。3.reflect,暂不了解。4. symmetric,暂不了解。
2.中心裁剪: transforms.CenterCrop
class torchvision.transforms.CenterCrop(size) 功能:依据给定的size从中心裁剪 参数:size- (sequence or int),若为sequence,则为(h,w),若为int,则(size,size)
3.随机长宽比裁剪 transforms.RandomResizedCrop
class torchvision.transforms.RandomResizedCrop(size, scale=(0.08, 1.0), ratio=(0.75, 1.3333333333333333), interpolation=2) 功能:随机大小,随机长宽比裁剪原始图片,最后将图片resize到设定好的size 参数:size- 输出的分辨率 scale- 随机crop的大小区间,如scale=(0.08, 1.0),表示随机crop出来的图片会在的0.08倍至1倍之间。ratio- 随机长宽比设置 interpolation- 插值的方法,默认为双线性插值(PIL.Image.BILINEAR)
4.上下左右中心裁剪: transforms.FiveCrop
class torchvision.transforms.FiveCrop(size) 功能:对图片进行上下左右以及中心裁剪,获得5张图片,返回一个4D-tensor 参数:size- (sequence or int),若为sequence,则为(h,w),若为int,则(size,size)
5.上下左右中心裁剪后翻转: transforms.TenCrop
class torchvision.transforms.TenCrop(size, vertical_flip=False) 功能:对图片进行上下左右以及中心裁剪,然后全部翻转(水平或者垂直),获得10张图片,返回一个4D-tensor。参数:size- (sequence or int),若为sequence,则为(h,w),若为int,则(size,size) vertical_flip (bool) - 是否垂直翻转,默认为flase,即默认为水平翻转
随机裁剪组合输入到网络中,这种增强带来的收益是巨大的哈。
就到这啦。
- 分享
- 举报
 微信扫码分享
 QQ好友
QQ好友
 暂无数据
暂无数据-
浏览量:5641次2020-08-26 17:30:20
-
浏览量:5811次2021-11-20 15:17:49
-
浏览量:3187次2022-11-10 10:02:57
-
浏览量:2163次2020-05-06 09:55:45
-
浏览量:1531次2023-04-19 09:11:57
-
浏览量:5767次2021-08-13 15:39:02
-
浏览量:6935次2020-12-20 20:54:26
-
浏览量:9313次2021-05-28 16:59:43
-
浏览量:13907次2021-05-12 12:35:30
-
浏览量:8284次2021-07-19 17:10:27
-
浏览量:2481次2018-04-13 15:26:46
-
浏览量:2613次2019-11-13 08:51:50
-
浏览量:4758次2023-04-16 20:29:23
-
浏览量:3301次2018-01-07 15:19:24
-
浏览量:3710次2020-08-24 21:15:42
-
浏览量:8960次2021-05-19 16:25:40
-
浏览量:3149次2020-03-26 10:21:51
-
浏览量:2654次2020-04-02 10:29:26
-
浏览量:7306次2021-08-09 16:09:53
这把我C
完整的教程https://fizzz.blog.csdn.net。该网站都是残缺


-
246篇
-
广告/SPAM
-
恶意灌水
-
违规内容
-
文不对题
-
重复发帖
这把我C

 微信支付
微信支付
举报类型
- 内容涉黄/赌/毒
- 内容侵权/抄袭
- 政治相关
- 涉嫌广告
- 侮辱谩骂
- 其他
详细说明
审核成功
审核失败


关注公众号
社区问题咨询:Ebaina-CN
定制需求咨询:xxqk158820
