

YOLOv5s部署在瑞芯微电子RK3399Pro中使用NPU进行加速推理

前言
本文介绍了YOLOv5s算法在国产瑞芯微电子RK3399ProD上的部署推理.介绍整个的流程,并基于RK3399Pro简单的介绍下RKNN的Python接口使用,并记录一些踩过的坑。本文仅做交流使用,文中有什么理解的不到位的或者谬误,也欢迎大家能够交流下。
1. 部署流程
- 在服务器端或者电脑端进行训练,训练完成后将.pt文件转换成ONNX格式
- 电脑端使用rknn-toolkit1.6.0将ONNX模型转换成RKNN模型
- RK3399Pro中进行模型推理
其中第二步,转换模型,可以在装了rknn-toolkit的rk3399Pro中,之前不知道的时候都是在这个开发板中进行转换的,不过还是建议在电脑端Ubuntu18.04系统下进行转换,可以将量化的batch设置的大一些,量化的速度快一些。
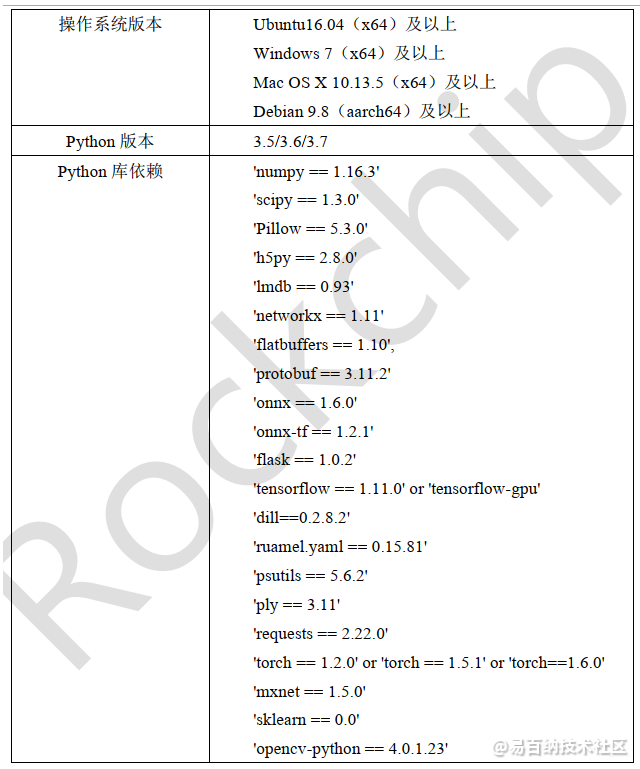
2. 环境准备
环境问题可能是比较棘手的问题,因为好多人都是在这个问题上出现了各种各样的bug,最好的办法是直接在Ubuntu上拉取他们提供的docker,直接拉取,环境都给配置好了,然后转换模型。
然后开发板选择官方的开发板,官方的开发板环境是最友好的,官方的RK3399Pro里面给安装好了环境,不怎么需要配置环境,不怎么会遇到问题,用于算法的验证还是很好的。
接下来是我在Ubuntu上配置的环境(使用的比较笨的方法QAQ),该环境是根据RKNN提供的手册进行安装的,其中,想要安装最终的rknn-toolkit1.6.0及以上版本,需要提前安装好依赖库,并且依赖库的版本要求非常的严格,版本不能有任何的不一样,在Rockchip_Quick_Start_RKNN_Toolkit_V1.6.1_CN.pdf文件中。
在Ubuntu上,我安装的是3.6版本的Python,其余的环境是按照下面的库依赖,严格配置的。安装好依赖库之后,去rockchip的官方仓库下载编译好的whl文件,直接在环境中pip install + xxx.whl就行了
官方git仓库
3. 服务器端或者电脑端训练YOLOv5s
项目地址:
训练这部分并不用多说什么,仓库拉出来,根据自己的数据集改好参数,然后进行训练,YOLOv5的训练还是挺友好的。
不过训练YOLOv5的过程中,我选择在common文件中,将silu层全部换成了RuLe层,因为对准换后的RKNN模型有加速作用,这样总体的mAP会稍微降一些,经过测试总体的mAP降低的。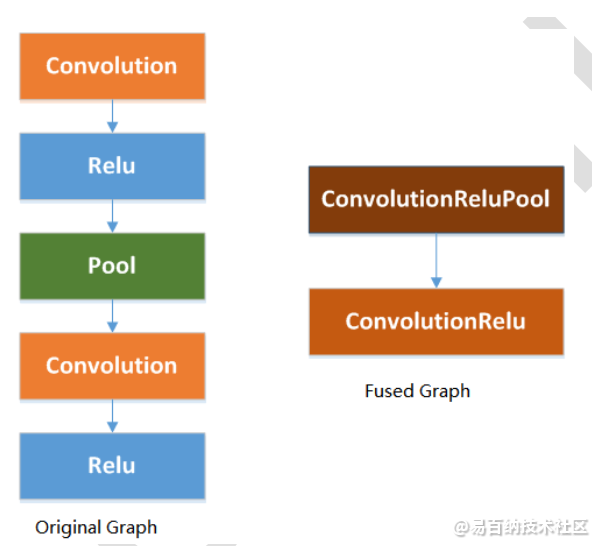
Rockchip_Developer_Guide_RKNN_Toolkit_Custom_OP_V1.6.1_CN.pdf在该文件中有详细的解释,使用ReLU激活层会融合一些层,从而进行优化。
4. 模型转换—>ONNX
根据github项目需要先将PyTorch训练出的.pt模型转换成ONNX格式。根据项目的Repo直接转换即可。
在命令行输入 :
python3 models/export_op.py --rknn_mode
即可。
5. 模型转换—>RKNN
将转换出来的模型xxxx.onnx复制到convert文件夹下面,convert文件夹需要有转换脚本,dataset.txt的量化文件,量化图片。量化的图片建议200张,batch尽量设置的大一些。
在命令行输入:
python rknn_convert.py
rknn_convert.py文件代码
import yaml
from rknn.api import RKNN
import cv2

_model_load_dict = {
    'caffe': 'load_caffe',
    'tensorflow': 'load_tensorflow',
    'tflite': 'load_tflite',
    'onnx': 'load_onnx',
    'darknet': 'load_darknet',
    'pytorch': 'load_pytorch',
    'mxnet': 'load_mxnet',
    'rknn': 'load_rknn',
    }

yaml_file = './config.yaml'


def main():
    with open(yaml_file, 'r') as F:
        config = yaml.load(F)
    # print('config is:')
    # print(config)

    model_type = config['running']['model_type']
    print('model_type is {}'.format(model_type))#检查模型的类型

    rknn = RKNN(verbose=True)


#配置文件
    print('--> config model')
    rknn.config(**config['config'])
    print('done')


    print('--> Loading model')
    load_function = getattr(rknn, _model_load_dict[model_type])
    ret = load_function(**config['parameters'][model_type])
    if ret != 0:
        print('Load yolo failed! Ret = {}'.format(ret))
        exit(ret)
    print('done')

    ####
    #print('hybrid_quantization')
    #ret = rknn.hybrid_quantization_step1(dataset=config['build']['dataset'])


    if model_type != 'rknn':
        print('--> Building model')
        ret = rknn.build(**config['build'])
        print('acc_eval')
        rknn.accuracy_analysis(inputs='./dataset1.txt', target='rk3399pro')
        print('acc_eval done!')

        if ret != 0:
            print('Build yolo failed!')
            exit(ret)
    else:
        print('--> skip Building model step, cause the model is already rknn')


#导出RKNN模型
    if config['running']['export'] is True:
        print('--> Export RKNN model')
        ret = rknn.export_rknn(**config['export_rknn'])
        if ret != 0:
            print('Init runtime environment failed')
            exit(ret)
    else:
        print('--> skip Export model')


#初始化
    print('--> Init runtime environment')
    ret = rknn.init_runtime(**config['init_runtime'])
    if ret != 0:
        print('Init runtime environment failed')
        exit(ret)
    print('done')


    print('--> load img')
    img = cv2.imread(config['img']['path'])
    print('img shape is {}'.format(img.shape))
    img = cv2.cvtColor(img, cv2.COLOR_BGR2RGB)
    inputs = [img]
    print(inputs[0][0:10,0,0])
#推理
    if config['running']['inference'] is True:
        print('--> Running model')
        config['inference']['inputs'] = inputs
        #print(config['inference'])
        outputs = rknn.inference(inputs)
        #outputs = rknn.inference(config['inference'])
        print('len of output {}'.format(len(outputs)))
        print('outputs[0] shape is {}'.format(outputs[0].shape))
        print(outputs[0][0][0:2])
    else:
        print('--> skip inference')
#评价
    if config['running']['eval_perf'] is True:
        print('--> Begin evaluate model performance')
        config['inference']['inputs'] = inputs
        perf_results = rknn.eval_perf(inputs=[img])
    else:
        print('--> skip eval_perf')


if __name__ == '__main__':
    main()
主要是修改对应的config.yaml文件
running:
  model_type: onnx       # 转换模型的类型
  export: True                   # 转出模型
  inference: False
  eval_perf: True


parameters:
  caffe:
    model: './mobilenet_v2.prototxt'
    proto: 'caffe' #lstm_caffe
    blobs: './mobilenet_v2.caffemodel'

  tensorflow:
    tf_pb: './ssd_mobilenet_v1_coco_2017_11_17.pb'
    inputs: ['FeatureExtractor/MobilenetV1/MobilenetV1/Conv2d_0/BatchNorm/batchnorm/mul_1']
    outputs: ['concat', 'concat_1']
    input_size_list: [[300, 300, 3]]

  tflite:
    model: './sample/tflite/mobilenet_v1/mobilenet_v1.tflite'

  onnx:      # 填写要转换模型的model
    model: './best_noop.onnx'   #best_op.onnx   #best_noop.onnx

    #C:\Users\HP\Desktop\CODE\yolov5_for_rknn-master\weights\best.onnx

  darknet:
    model: './yolov3-tiny.cfg'
    weight: './yolov3.weights'

  pytorch:
    model: './yolov5.pt'
    input_size_list: [[3, 512, 512]]

  mxnet:
    symbol: 'resnext50_32x4d-symbol.json'
    params: 'resnext50_32x4d-4ecf62e2.params'
    input_size_list: [[3, 224, 224]]

  rknn:
    path: './bestrk.rknn'

config:
  #mean_value: [[0,0,0]]
  #std_value: [[58.82,58.82,58.82]]
  channel_mean_value: '0 0 0 255' # 123.675 116.28 103.53 58.395 # 0 0 0 255
  reorder_channel: '0 1 2' # '2 1 0'
  need_horizontal_merge: False
  batch_size: 1
  epochs: -1
  target_platform: ['rk3399pro']
  quantized_dtype: 'asymmetric_quantized-u8'
#asymmetric_quantized-u8,dynamic_fixed_point-8,dynamic_fixed_point-16
  optimization_level: 3

build:
  do_quantization: True
  dataset: './dataset.txt' # '/home/zen/rknn_convert/quant_data/hand_dataset/pic_path_less.txt'
  pre_compile: False

export_rknn:
  export_path: './best_noop1.rknn'

init_runtime:
  target: rk3399pro
  device_id: null
  perf_debug: False
  eval_mem: False
  async_mode: False

img: &img
  path: './test2.jpg'

inference:
  inputs: *img
  data_type: 'uint8'
  data_format: 'nhwc' # 'nchw', 'nhwc'
  inputs_pass_through: None

eval_perf:
  inputs: *img
  data_type: 'uint8'
  data_format: 'nhwc'
  is_print: True
其中在设置config部分的参数时,建议看看官方的API介绍,去选择相应的参数部分,在文件Rockchip_User_Guide_RKNN_Toolkit_V1.6.1_CN.pdf
6. RK3399Pro中模型推理
在detect文件夹下,其中data/image下面放的是需要检测的图片,在models文件夹下放的是转换的RKNN模型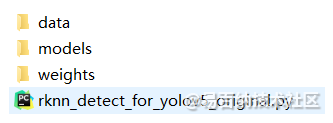
最后点开shell 执行:
python rknn_detect_for_yolov5_original.py
即可
在开发板中会生成模型推理的结果和时间
推理的时间比较快,60毫秒左右,这个推理速度和我在笔记本电脑(3060)上使用模型detect的速度是差不多的。
7.模型预编译
解决模型的加载时间过长的问题
from rknn.api import RKNN
if __name__ == '__main__':
    # Create RKNN object
    rknn = RKNN()
# Load rknn model
ret = rknn.load_rknn('./best_as_200.rknn')
if ret != 0:
    print('Load RKNN model failed.')
    exit(ret)
# init runtime
ret = rknn.init_runtime(target='rk3399pro', rknn2precompile=True)
if ret != 0:
    print('Init runtime failed.')
    exit(ret)
# Note: the rknn2precompile must be set True when call init_runtime
ret = rknn.export_rknn_precompile_model('./best_pre_compile.rknn')
if ret != 0:
    print('export pre-compile model failed.')
    exit(ret)
rknn.release()
转换的环境是在RK3399Pro中,方法很笨但是有效。
将生成的模型继续使用模型的推理代码,在RK3399Pro中进行预测,模型推理速度50毫秒左右,有20FPS,使用Python接口还是比较快的了。
Reference:
https://github.com/EASY-EAI/yolov5
https://github.com/soloIife/yolov5_for_rknn
https://github.com/ultralytics/yolov5
https://github.com/rockchip-linux/rknn-toolkit
https://blog.csdn.net/weixin_42237113/category_10147159.html?spm=1001.2014.3001.5482
- 分享
- 举报
 微信扫码分享
 QQ好友
QQ好友
 暂无数据
暂无数据-
浏览量:5521次2021-07-22 18:16:29
-
浏览量:2884次2022-05-17 09:00:33
-
浏览量:3903次2022-05-17 09:00:35
-
浏览量:1446次2023-12-21 18:18:43
-
浏览量:1924次2023-12-21 18:17:30
-
浏览量:2749次2023-12-29 17:53:39
-
浏览量:4207次2018-02-20 00:36:12
-
浏览量:2990次2022-10-09 10:41:47
-
浏览量:6425次2024-02-05 10:41:25
-
浏览量:5182次2024-01-22 17:46:51
-
浏览量:5481次2023-12-29 17:55:25
-
浏览量:5767次2024-01-05 14:11:13
-
浏览量:2081次2023-12-07 01:07:22
-
浏览量:5934次2024-05-23 13:45:40
-
浏览量:2683次2022-05-17 09:00:19
-
浏览量:1958次2023-12-26 18:03:31
-
浏览量:4644次2022-05-17 09:00:46
-
浏览量:2044次2022-01-26 09:00:19
-
浏览量:5960次2024-02-19 17:07:05


-
广告/SPAM
-
恶意灌水
-
违规内容
-
文不对题
-
重复发帖

hei-boy

 微信支付
微信支付
举报类型
- 内容涉黄/赌/毒
- 内容侵权/抄袭
- 政治相关
- 涉嫌广告
- 侮辱谩骂
- 其他
详细说明
审核成功
审核失败


关注公众号
社区问题咨询:Ebaina-CN
定制需求咨询:xxqk158820
