

技术专栏
onnx模型转engine并进行推理全过程解析

文章目录
深度学习模型在训练好以后,下一步就是部署到不同的设备进行测试,不同设备之间的转换一般可以通过中间件ONNX进行转换,以达到不同平台的通用。本文以模型转为ONNX为起点,分析介绍ONNX转为TensorRT Engine并进行推理的整个流程链路。
1、ONNX序列化为TensorRT Engine
ONNX序列化为TRT模型的整个流程可以用下图表示
使用C++的API进行开发时,需要引入头文件NvInfer以及NvOnnxParser,C++的接口都是通过I开头的的接口类定义的,如ILogger、IBuilder等。
#include “NvInfer.h”
#include “NvOnnxParser.h”

using namespace nvonnxparser;
using namespace nvinfer1;
1.1 创建builder
创建构建器之前有两种方式实例化ILogger:
1、引用tensorrtx的logging.h,使用其中的Logger
    #include "logging.h"

    static Logger gLogger;
    IBuilder* builder = createInferBuilder(gLogger);
2、继承ILogger,实例化接口
    class Logger : public ILogger
    {
        void log(Severity severity, const char* msg) noexcept override
        {
            if (severity <= Severity::kWARNING)
                std::cout << msg << std::endl;
        }
    } logger;
     IBuilder* builder = createInferBuilder(gLogger);
1.2 创建network
创建构建器后,需要创建网络定义来进行模型优化:
INetworkDefinition *network = builder->createNetworkV2(0U); //是0U还是1u需视情况而定
1.3 创建parse解析器
创建onnx的解析器来进行网络定义的填充,并读取模型文件并处理是否存在错误。
    IParser* parser = createParser(*network, gLogger);
    parser->parseFromFile(onnx_path, static_cast<int32_t>(ILogger::Severity::kWARNING));
     for (int32_t i = 0; i < parser->getNbErrors(); ++i)
    {
        std::cout << parser->getError(i)->desc() << std::endl;
    }
    std::cout << "successfully parse the onnx model" << std::endl;
1.4 设置必要参数并创建Engine
    IBuilderConfig *config = builder->createBuilderConfig();
    builder->setMaxBatchSize(maxBatchSize);
    config->setMaxWorkspaceSize(1 << 20);

    auto profile = builder->createOptimizationProfile();
    auto input_tensor = network->getInput(0);
    auto input_dims = input_tensor->getDimensions();

    input_dims.d[0] = 1;
    profile->setDimensions(input_tensor->getName(), nvinfer1::OptProfileSelector::kMIN, input_dims);
    profile->setDimensions(input_tensor->getName(), nvinfer1::OptProfileSelector::kOPT, input_dims);
    input_dims.d[0] = batchSize;
    profile->setDimensions(input_tensor->getName(), nvinfer1::OptProfileSelector::kMAX, input_dims);
    config->addOptimizationProfile(profile);
#ifdef USE_FP16
    config->setFlag(BuilderFlag::kFP16);
#endif
#ifdef USE_INT8
    config->setFlag(BuilderFlag::kINT8);
#endif
1.5 创建Engine并序列化
    ICudaEngine* engine = builder->buildEngineWithConfig(*network, *config);
    assert(engine != nullptr);
    (*modelStream) = engine->serialize();
    assert(modelStream != nullptr);
     std::ofstream p(engine_path, std::ios::binary);
    if (!p)
    {
        std::cerr << "could not open plan output file" << std::endl;
        return -1;
    }
    p.write(reinterpret_cast<const char*>(modelStream->data()), modelStream->size());
    modelStream->destroy();
2、读取序列化后TensorRT Engine 并进行推理
onnx转换为engine并序列化后,可以减少构建和优化模型的时间,如下图所示,从序列化的engine读取开始完成整个推理过程。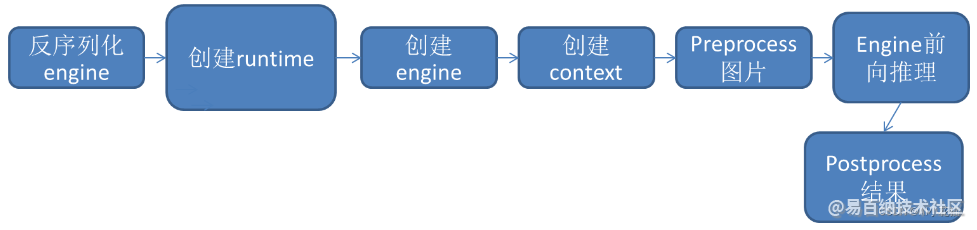
2.1 反序列化engine
读取序列化的模型,存放在trtModelstream中。
    size_t size{ 0 };
    std::ifstream file(engine_path, std::ios::binary);
    if (file.good()) {
        file.seekg(0, file.end);
        size = file.tellg();
        file.seekg(0, file.beg);
        trtModelStream = new char[size];
        assert(trtModelStream);
        file.read(trtModelStream, size);
        file.close();
2.2 创建runtime
通过logger创建runtime
     IRuntime* runtime = createInferRuntime(gLogger);
    assert(runtime != nullptr);
2.3 创建engine
通过runtime解析trtModelstream,创建engine
    ICudaEngine* engine = runtime->deserializeCudaEngine(trtModelStream, size, nullptr);
    assert(engine != nullptr);
2.4 创建context
    IExecutionContext* context = engine->createExecutionContext();
    assert(context != nullptr);
    runtime->destroy();
2.5 前处理+前向推理+后处理
前处理
float* input_data = (float*)malloc(3 * input_h * input_w * sizeof(float));
int ImgCount = InputImage.size();
    for (int b = 0; b < ImgCount; b++) {
        cv::Mat img = InputImage.at(b);
        int w = img.cols;
        int h = img.rows;
        int i = 0;
        for (int row = 0; row < h; ++row) {
            uchar* uc_pixel = img.data + row * img.step;
            for (int col = 0; col < input_w; ++col) {
                input_data[b * 3 * input_h * input_w + i] = (float)uc_pixel[2] / 255.0;
                input_data[b * 3 * input_h * input_w + i + input_h * input_w] = (float)uc_pixel[1] / 255.0;
                input_data[b * 3 * input_h * input_w + i + 2 * input_h * input_w] = (float)uc_pixel[0] / 255.0;
                uc_pixel += 3;
                ++i;
            }
        }

    }
前向推理
void doInference()
{
    const ICudaEngine& engine = context.getEngine();
    // Pointers to input and output device buffers to pass to engine.
    // Engine requires exactly IEngine::getNbBindings() number of buffers.
    //assert(engine.getNbBindings() == 2);
    void* buffers[2];
    // In order to bind the buffers, we need to know the names of the input and output tensors.
    // Note that indices are guaranteed to be less than IEngine::getNbBindings()
    const int inputIndex = engine.getBindingIndex(INPUT_BLOB_NAME);
    const int outputIndex = engine.getBindingIndex(OUTPUT_BLOB_NAME);
    //const int inputIndex = 0;
    //const int outputIndex = 1;
    // Create GPU buffers on device
    cudaMalloc(&buffers[inputIndex], batchSize * 3 * input_h * input_w * sizeof(float));
    cudaMalloc(&buffers[outputIndex], batchSize * output_size * sizeof(float));
    // Create stream
    cudaStream_t stream;
    CHECK(cudaStreamCreate(&stream));
    // DMA input batch data to device, infer on the batch asynchronously, and DMA output back to host
    CHECK(cudaMemcpyAsync(buffers[inputIndex], input, batchSize * 3 *input_h * input_w * sizeof(float), cudaMemcpyHostToDevice, stream));
    context.enqueue(batchSize, buffers, stream, nullptr);
    CHECK(cudaMemcpyAsync(output, buffers[outputIndex], batchSize * output_size * sizeof(float), cudaMemcpyDeviceToHost, stream));
    cudaStreamSynchronize(stream);
    // Release stream and buffers
    cudaStreamDestroy(stream);
    CHECK(cudaFree(buffers[inputIndex]));
    CHECK(cudaFree(buffers[outputIndex]));
后处理
以LPRNet为例
    std::vector<int> preds;
    std::cout << std::endl;
    for (int i = 0; i < 18; i++) {
        int maxj = 0;
        for (int j = 0; j < 68; j++) {
            if (prob[i + 18 * j] > prob[i + 18 * maxj]) maxj = j;
        }
        preds.push_back(maxj);
    }
    int pre_c = preds[0];
    std::vector<int> no_repeat_blank_label;
    for (auto c: preds) {
        if (c == pre_c || c == 68 - 1) {
            if (c == 68 - 1) pre_c = c;
            continue;
        }
        no_repeat_blank_label.push_back(c);
        pre_c = c;
    }
    std::string str;
    for (auto v: no_repeat_blank_label) {
        str += alphabet[v];
    }
以上是利用TensorRT C++ API进行ONNX构建trt engine,并进行推理的全过程解析,基本所有的onnx转化为TRT模型进行推理都包含在以上方式中,仅此记录。
声明:本文内容由易百纳平台入驻作者撰写,文章观点仅代表作者本人,不代表易百纳立场。如有内容侵权或者其他问题,请联系本站进行删除。
红包
点赞
收藏
评论
打赏
- 分享
- 举报
 微信扫码分享
 QQ好友
QQ好友
评论
0个
手气红包
 暂无数据
暂无数据相关专栏
-
浏览量:6381次2021-04-07 09:53:09
-
浏览量:1995次2024-03-05 15:21:43
-
2023-11-23 14:00:42
-
浏览量:2976次2024-01-10 15:17:17
-
浏览量:4247次2020-09-30 18:33:31
-
浏览量:2751次2023-04-14 10:20:01
-
浏览量:3810次2024-01-19 17:42:50
-
2024-01-22 16:01:53
-
浏览量:3844次2024-01-05 16:46:11
-
浏览量:2515次2018-10-15 21:38:57
-
浏览量:5872次2024-03-05 15:05:36
-
浏览量:5771次2024-01-05 14:11:13
-
2024-01-22 10:56:03
-
浏览量:2851次2023-04-12 19:12:22
-
浏览量:2382次2023-04-12 18:59:36
-
浏览量:4759次2024-01-18 18:05:38
-
浏览量:4748次2023-03-16 10:59:43
-
浏览量:1524次2024-01-22 15:27:25
-
浏览量:3435次2024-02-18 16:38:33


置顶时间设置
结束时间
删除原因
-
广告/SPAM
-
恶意灌水
-
违规内容
-
文不对题
-
重复发帖
打赏作者

miko
您的支持将鼓励我继续创作!
打赏金额:
¥1
¥5
¥10
¥50
¥100
支付方式:
 微信支付
微信支付
举报反馈
举报类型
- 内容涉黄/赌/毒
- 内容侵权/抄袭
- 政治相关
- 涉嫌广告
- 侮辱谩骂
- 其他
详细说明
审核成功
发布时间设置
发布时间:
请选择发布时间设置
是否关联周任务-专栏模块
审核失败
失败原因
请选择失败原因
备注
请输入备注


关注公众号
联系我们
社区问题咨询:Ebaina-CN
定制需求咨询:xxqk158820
社区问题咨询:Ebaina-CN
定制需求咨询:xxqk158820
回顶部
