

使用YOLOv8和PySimpleGUI构建目标计数GUI

标检测是在图片或视频中定位物体的过程。其中一个著名的目标检测框架是YOLO(You Only Look Once)。在某些情况下,我们不仅需要定位图片或视频中的物体,还需要了解每个物体的运动,就像在这篇文章中,我们想要计数通过某些位置的物体。这就是我们需要不仅仅是检测的地方,我们需要称为目标跟踪的东西的地方。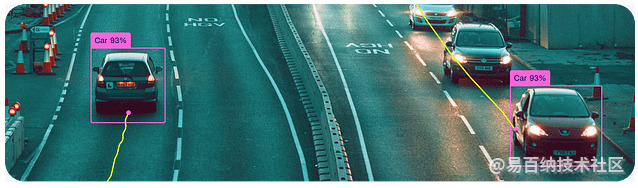
此外,大多数情况下,我们通常只是通过执行脚本或命令行中的代码来使用它,如果我们可以将我们的模型部署为GUI或应用程序,以便用户更轻松地使用它,那将更好。在这篇文章中,将分享如何使用框架YOLOv8和PySimpleGUI构建一个目标计数GUI。
什么是YOLOv8?
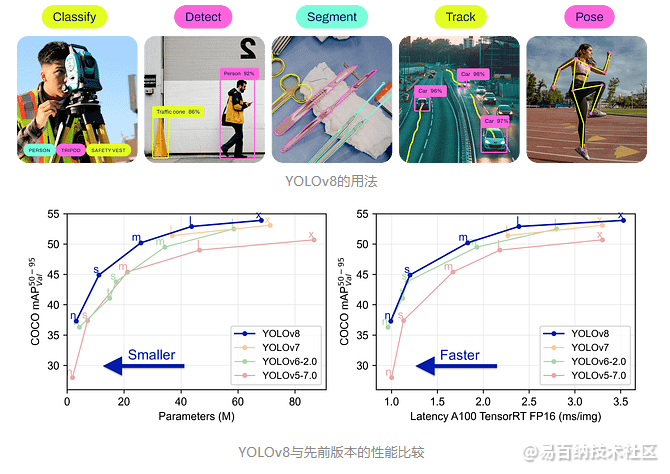
YOLOv8,即You Only Look Once version 8,是由UItralytics开发的图像处理框架,YOLOv8可以执行目标检测和跟踪、实例分割、图像分类和姿态估计任务。
使用YOLOv8进行目标跟踪
有很多方法可以使用YOLOv8进行目标跟踪。我喜欢Python脚本方法,因为我可以有更多的控制权,使用此方法需要执行以下几个步骤,您还可以从Ultralytics的文档中查看此链接。
1.创建虚拟环境
python -m venv yologui
2.激活虚拟环境
yologui\Scripts\activate
3.安装YOLOv8的依赖项
pip install -r https://raw.githubusercontent.com/ultralytics/ultralytics/main/requirements.txt
4.安装YOLOv8
pip install ultralytics
5.创建一个yolo脚本
# https://docs.ultralytics.com/modes/track/#python-examples
import cv2
from ultralytics import YOLO

# Load the YOLOv8 model
model = YOLO('yolov8n.pt')

# Open the camera
cap = cv2.VideoCapture(0)

# Loop through the video frames
while cap.isOpened():
    # Read a frame from the video
    success, frame = cap.read()

    if success:
        # Run YOLOv8 tracking on the frame, persisting tracks between frames
        results = model.track(frame, persist=True)
        # Visualize the results on the frame
        annotated_frame = results[0].plot()
        # Display the annotated frame
        cv2.imshow("YOLOv8 Tracking", annotated_frame)
        # Break the loop if 'q' is pressed
        if cv2.waitKey(1) & 0xFF == ord("q"):
            break
    else:
        # Break the loop if the end of the video is reached
        break

# Release the video capture object and close the display window
cap.release()
cv2.destroyAllWindows()
执行脚本,您应该可以得到由YOLOv8进行的目标跟踪:
python yolo.py
这是结果,当满意时按“Q”退出。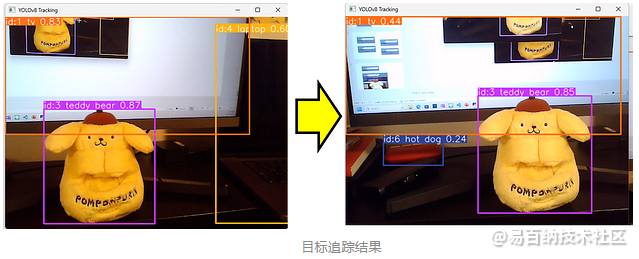
您可以看到我们的脚本可以记住左侧图片中的泰迪熊与右侧图片中的泰迪熊是相同的。实际上,他是一只狗….
添加目标跟踪的计数逻辑
目标跟踪为我们提供了比目标检测更多的选项,其中之一是我们可以使用它来计算进入或离开框架中某个区域或线的独特目标的数量。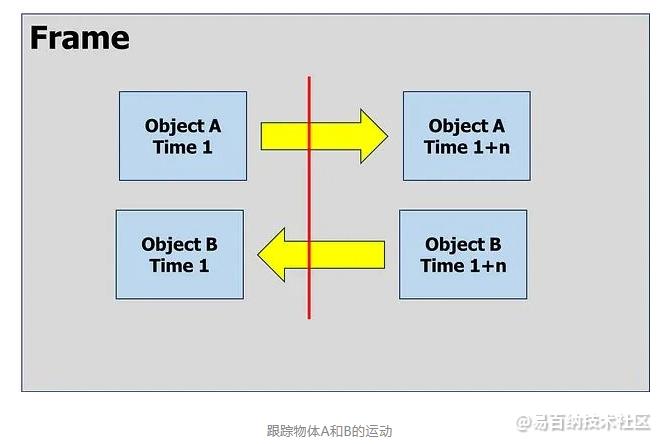
要计算通过我们的线左右经过的物体数量,我们需要从我们的目标跟踪脚本中提取目标的id和位置。Ultralytics的模型已经为我们提供了该属性,通过使用以下命令来处理跟踪结果。
# Using Model
results= model.track(frame, persist=True)

# Extrack result
result = results[0].cpu().boxes
detect_id = result.id.tolist() if result.id != None else []
detect_xyxy = result.xyxy.tolist() if result.xyxy != None else []
frame_counting_buffer = dict(zip(detect_id, detect_xyxy))
因此,我们可以获取每个目标的位置,接下来是进行一些计算,以了解目标是从右到左还是从左到右经过。在这种情况下,我只关注目标的中心和X轴。以下是在X轴上进行目标计数的完整脚本。
# https://docs.ultralytics.com/modes/track/#python-examples
import cv2
from ultralytics import YOLO

# Load the YOLOv8 model
model = YOLO('yolov8n.pt')

# Counting config
line_position = 50
text_size = 30
text_x_position = 50
text_y_position = 0

# Open the camera
cap = cv2.VideoCapture(0)

# Get Camera Parameter
width  = cap.get(cv2.CAP_PROP_FRAME_WIDTH)
height = cap.get(cv2.CAP_PROP_FRAME_HEIGHT)

# Counting prep
x_line= line_position*width/100
pt1 = (int(x_line), 0)
pt2 = (int(x_line), int(height))
counting_buffer = {}
counting_result = {'left-to-right' : 0, 'right-to-left' : 0}

# Loop through the video frames
while cap.isOpened():
    # Read a frame from the video
    success, frame = cap.read()
    if success:
        # Run YOLOv8 tracking on the frame, persisting tracks between frames
        results = model.track(frame, persist=True, verbose=False)

        # Visualize the results on the frame
        annotated_frame = results[0].plot()

        # Get Data for counting
        result = results[0].cpu().boxes
        detect_id = result.id.tolist() if result.id != None else []
        detect_xyxy = result.xyxy.tolist() if result.xyxy != None else []
        frame_counting_buffer = dict(zip(detect_id, detect_xyxy))
        # Process
        for i in frame_counting_buffer :
            # Prep count buffer
            counting_buffer[i] = counting_buffer.get(i,[])
            if len(counting_buffer[i]) >= 2 : counting_buffer[i] = counting_buffer[i][-1:]
            # Append avg x axis to buffer
            avg_x = (frame_counting_buffer[i][0] + frame_counting_buffer[i][2])/2
            counting_buffer[i].append(avg_x)
            # Count logic
            if len(counting_buffer[i]) >= 2 :
                if (counting_buffer[i][0] > x_line) & (counting_buffer[i][1] < x_line) :
                    counting_result['right-to-left'] += 1
                elif (counting_buffer[i][0] < x_line) & (counting_buffer[i][1] > x_line) :
                    counting_result['left-to-right'] += 1

        # Create Line
        cv2.line(annotated_frame, pt1= pt1, pt2= pt2 , color= (0,0,255), thickness= 2)
        # Put Counting to picture
        text_position = text_y_position
        for i in counting_result :
            text_position += text_size
            info_text = f"{i} : {counting_result[i]}"
            annotated_frame = cv2.putText(annotated_frame
                                          , info_text
                                          , (int(width*text_x_position/100), text_position)
                                          , cv2.FONT_HERSHEY_SIMPLEX
                                          , 1, (0,0,255), 1, cv2.LINE_AA)

        # Display the annotated frame
        cv2.imshow("YOLOv8 Tracking", annotated_frame)

        # Break the loop if 'q' is pressed
        if cv2.waitKey(1) & 0xFF == ord("q"):
            break
    else:
        # Break the loop if the end of the video is reached
        break

# Release the video capture object and close the display window
cap.release()
cv2.destroyAllWindows()
然后,我们将得到一个如图所示的目标计数脚本,当满意时按Q。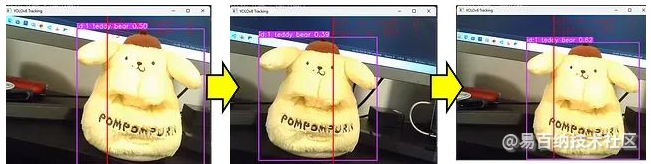
什么是PySimpleGUI?
PySimpleGUI是一个用于制作GUI的Python库,具有跨平台性且非常简单易用。
GUI的框架
创建GUI时,有一些比编码更重要的东西,即设计阶段。我们在编码之前应该有一些草图设计。在这种情况下,我画了一个目标计数GUI的初步设计,就像这张图片一样。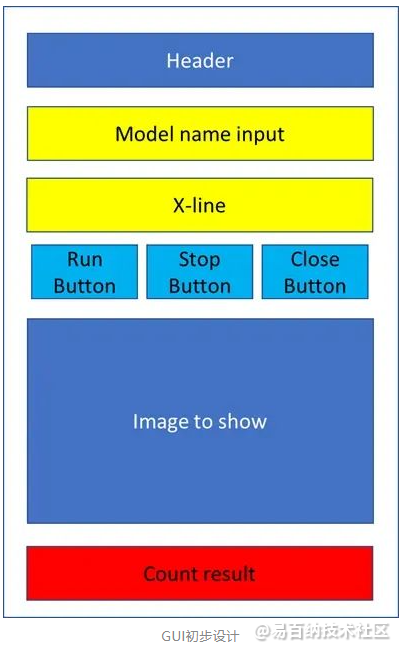
设计阶段后,接下来就是编码:
- 安装PySimpleGUI。
pip install pysimplegui - 创建一个GUI脚本
```pythonhttps://www.pysimplegui.org/en/latest/#jump-start
import PySimpleGUI as sg
Create Layouy of the GUI
layout = [
[sg.Text(‘GUI Object Counting with Yolo V8’)],
[sg.Text(‘Enter Model Name’, size= (15)), sg.InputText(key=’model_name’)],
[sg.Text(‘X-line for Counting’, size= (15)), sg.InputText(key= ‘line_position’)],
[sg.Button(‘Run’), sg.Button(‘Stop’), sg.Button(‘Close’)],
[sg.Text(‘PICTURE’)],
[sg.Text(‘Left-to-Right’, size= (15), key=’out1’), sg.Text(“0”, key=’out1-v’)],
[sg.Text(‘Right-to-Left’, size= (15), key=’out2’), sg.Text(“0”, key=’out2-v’)]
]
Create the Window
window = sg.Window(‘GUIYoloV8-Counting’, layout)
Event Loop to process “events”
while True:
event, values = window.read()
# When press Run
if event == 'Run' :
    print(values)
# When close window or press Close
if event in (sg.WIN_CLOSED, 'Close'): break
Close window
window.close()
正如您所见,PySimpleGUI的脚本非常简单。之后,我们所要做的就是运行此GUI脚本。
```python
python gui.py
之后,您应该会得到一个像图中这样的简单GUI,尝试玩耍并在满意时关闭。
合并
在我们有了目标计数和GUI框架之后,是时候将它们合并到一起了。我们可以将两个脚本合并成一个名为main.py的新脚本,如下所示:
# https://www.pysimplegui.org/en/latest/#jump-start
import PySimpleGUI as sg
import cv2
# https://docs.ultralytics.com/modes/track/#python-examples
from ultralytics import YOLO

# Create Layouy of the GUI
layout = [
            [sg.Text('GUI Object Counting with Yolo V8')],
            [sg.Text('Enter Model Name', size= (15)), sg.InputText(key='model_name')],
            [sg.Text('X-line for Counting', size= (15)), sg.InputText(key= 'line_position')],
            [sg.Button('Run'), sg.Button('Stop'), sg.Button('Close')],
            [sg.Image(filename='', key='image')],
            [sg.Text('Right-to-Left', size= (15), key='out1'), sg.Text("0", key='right-to-left')],
            [sg.Text('Left-to-Right', size= (15), key='out2'), sg.Text("0", key='left-to-right')]
            ]

# Create the Window
window = sg.Window('GUIYoloV8-Counting', layout)
run_model, verbose = False, False
# Event Loop to process "events"
while True:
    event, values = window.read(timeout=0)
    # When press Run
    if event == 'Run' :
        # Load the YOLOv8 model
        model = YOLO(values['model_name'])
        # Counting config
        line_position = 50
        text_size = 30
        text_x_position = 50
        text_y_position = 0
        # Open the camera
        cap = cv2.VideoCapture(0)
        # Get Camera Parameter
        width  = cap.get(cv2.CAP_PROP_FRAME_WIDTH)
        height = cap.get(cv2.CAP_PROP_FRAME_HEIGHT)
        # Counting prep
        x_line= line_position*width/100
        pt1 = (int(x_line), 0)
        pt2 = (int(x_line), int(height))
        counting_buffer = {}
        counting_result = {'left-to-right' : 0, 'right-to-left' : 0}
        # Run Signal
        run_model = True
    # When close window or press Close
    elif event in ('Stop', sg.WIN_CLOSED, 'Close'):
        if run_model :
            run_model = False # Stop running
            cap.release() # Release video
            if event != sg.WIN_CLOSED : window['image'].update(filename='') # Destroy picture
        # When close window or press Close
        if event in (sg.WIN_CLOSED, 'Close'): break
    # Run Model
    if run_model :
        # Read a frame from the video
        success, frame = cap.read()
        if success:
            # Run YOLOv8 tracking on the frame, persisting tracks between frames
            results = model.track(frame
                                  , persist=True
                                  , verbose=False
                                  )

            # Visualize the results on the frame
            annotated_frame = results[0].plot()

            # Get Data for counting
            result = results[0].cpu().boxes
            detect_id = result.id.tolist() if result.id != None else []
            detect_xyxy = result.xyxy.tolist() if result.xyxy != None else []
            frame_counting_buffer = dict(zip(detect_id, detect_xyxy))
            # Process
            for i in frame_counting_buffer :
                # Prep count buffer
                counting_buffer[i] = counting_buffer.get(i,[])
                if len(counting_buffer[i]) >= 2 : counting_buffer[i] = counting_buffer[i][-1:]
                # Append avg x axis to buffer
                avg_x = (frame_counting_buffer[i][0] + frame_counting_buffer[i][2])/2
                counting_buffer[i].append(avg_x)
                # Count logic
                if len(counting_buffer[i]) >= 2 :
                    if (counting_buffer[i][0] > x_line) & (counting_buffer[i][1] < x_line) :
                        counting_result['right-to-left'] += 1
                    elif (counting_buffer[i][0] < x_line) & (counting_buffer[i][1] > x_line) :
                        counting_result['left-to-right'] += 1
            # Create Line
            cv2.line(annotated_frame, pt1= pt1, pt2= pt2 , color= (0,0,255), thickness= 2)
            # Put Counting to picture
            text_position = text_y_position
            for i in counting_result :
                text_position += text_size
                info_text = f"{i} : {counting_result[i]}"
                annotated_frame = cv2.putText(  annotated_frame
                                            , info_text
                                            , (int(width*text_x_position/100)
                                            , text_position)
                                            , cv2.FONT_HERSHEY_SIMPLEX
                                            , 1
                                            , (0,0,255)
                                            , 1
                                            , cv2.LINE_AA)
            # Show Image
            imgbytes = cv2.imencode('.png', annotated_frame)[1].tobytes()
            window['image'].update(data=imgbytes)
            window['right-to-left'].update(str(counting_result['right-to-left']))
            window['left-to-right'].update(str(counting_result['left-to-right']))
        else:
            # Break the loop if not read
            cap.release()
            run_model = False

# Close window
window.close()
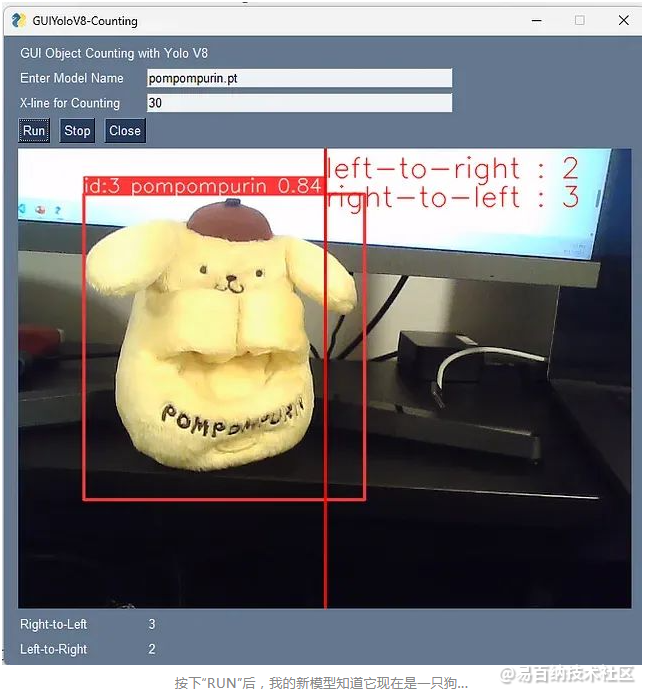
然后,我们可以运行主脚本。
python main.py
然后,我们就可以得到以下图片所示的目标计数GUI。这一次,我将使用一个定制模型来识别我从Ultralytics HUB创建的Pompompurin。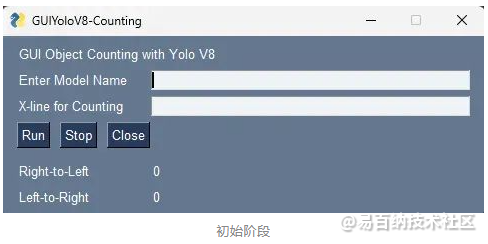
接下来,为了让我们的用户更轻松地使用,我们可以创建一个包含以下代码的“cmd”文件。
python main.py
pause
现在,用户可以通过打开cmd文件来使用我们的GUI/应用程序。
- 分享
- 举报
 微信扫码分享
 QQ好友
QQ好友
 暂无数据
暂无数据-
浏览量:4845次2023-12-16 11:15:45
-
浏览量:10152次2024-02-02 17:13:35
-
浏览量:5318次2024-02-02 18:15:06
-
2024-12-10 11:13:53
-
2024-12-10 10:34:18
-
浏览量:4317次2023-11-25 17:47:33
-
浏览量:5877次2024-03-05 15:05:36
-
浏览量:2731次2023-12-14 17:15:07
-
2023-09-07 13:53:43
-
浏览量:4968次2024-11-13 14:14:36
-
2024-12-10 10:52:33
-
2024-12-10 11:25:33
-
浏览量:1997次2024-12-10 13:21:45
-
浏览量:4109次2024-02-28 16:15:25
-
浏览量:2183次2023-12-19 17:38:07
-
浏览量:161次2026-04-14 13:57:02
-
浏览量:7500次2024-02-28 15:36:09
-
浏览量:6665次2023-05-25 16:32:18
-
浏览量:714次2026-01-13 15:26:50


-
广告/SPAM
-
恶意灌水
-
违规内容
-
文不对题
-
重复发帖

蜡笔不信

 微信支付
微信支付
举报类型
- 内容涉黄/赌/毒
- 内容侵权/抄袭
- 政治相关
- 涉嫌广告
- 侮辱谩骂
- 其他
详细说明
审核成功
审核失败


关注公众号
社区问题咨询:Ebaina-CN
定制需求咨询:xxqk158820
